DIY: Taking Your Tracks from the Studio to the Club

Your new track is finished. It grooves, it rocks and you’re happy with how it sounds. But unless you’re content with throwing light-switch raves in your studio, you’ll want to take that beast out into the wild environs of the club. In this guide, I’ll show you how to quickly take a raw, freshly-mixed song and polish it so it hits hard on a club system.

BRIDGING THE GAP

One of the simple thrills of producing is when you finish a new track, play it on a venue’s PA, and see how people respond to it. The only problem is that at most venues, you’re up against professionally mastered tracks. So how can you even the playing field? 

These simple steps will show you how to bring your tracks up to par with the pro stuff. I’ll be using Ableton – download the custom rack here – but these principles and techniques can be applied to any DAW.

1) Start with a solid mix that doesn’t clip the master channel

This is your last chance to correct any glaring flaws in your track. Is a certain instrument sitting too loud in the mix? Are others drowned out? Does each part come through clearly? Jump in and fix those problems before you get started.

Also make sure that you’ve left around 4-5 dB of headroom on your final mix. You can tell how much headroom you have by playing the mix at its loudest point, and seeing how high it peaks. If you need to bring down the level, just slap a utility plug-in on the master channel of your finished track, lower the gain, and bounce down a fresh mix.

THIS:

NOT THIS:

2) Cut out the low frequencies

No, not your precious sub-bass. I’m talking about the super-low stuff – below around 30 Hz. – that no system can accurately reproduce. Removing those frequencies will eliminate potential rumble, and leave more room for everything else.

To do this, you need a high-pass filter with an extreme slope. One band of Ableton’s EQ isn’t nearly steep enough, but if you stack eight of them together, you’re good to go. I’ve included this in the rack. If you’d like to get rid of the low-cut – for example, if you already took care of this before the mixdown – simply turn the device off.

3) Remove any problematic frequencies

The idea here is simple: if something sounds like crap, or is downright annoying, get rid of it. To find the problem areas, use a steep EQ boost to sweep back and forth until you’ve found the offending frequencies. Then turn the gain dial down, creating a small notch. You want to remove the nasty areas with a minimum impact on the overall track. Here’s a rough guide to help you zero in on unwanted sounds:

  • Subby: Use a narrow cut around 60 Hz.
  • Boomy: Use a narrow cut around 150 Hz.
  • Muddy: Use a narrow cut around 250 Hz.
  • Boxy: Use a wide cut from 400-600 Hz.
  • Ear-piercing: Use a wide cut from 2-3.5 KHz

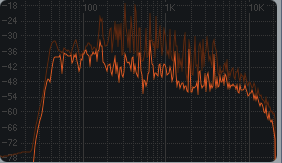
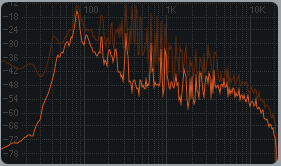
4) Make sure your frequencies are evenly balanced

Fire up an analyzer, like Ableton’s Spectrum, and take a look at your frequencies. You should either have a gradual slope from the lows down to the highs, or a spectrum that’s basically flat across the spectrum. A relatively even balance means that everything should translate well on a club system, with minimal tweaking to the mixer’s EQ knobs.

If you don’t have a good balance, it’s time to turn to the EQ again. Use precise EQ cuts to tame any large frequency spikes. And if you find that a certain area is lacking – for example, the highs are lacking– try a gradual boost in those areas. A little goes a long way when you’re boosting, so be careful; too much, and you’ll probably wind up doing more harm than good.

Don’t fall into the trap of thinking a big bump in the low end will somehow sound awesome. I can tell you from experience that this usually sounds like complete ass in live situations; the bass frequencies will drown out everything else, you’ll lose headroom, and you’ll have to rush to turn down the bass knob on the mixer.

THIS:

NOT THIS:


5) Bust out the compressor

You might have already used compressors on your individual tracks, maybe to achieve that OMG PHAT BASS or to sidechain the ever-loving crap out of everything. Here we’ll be using it in a more subtle way, to squeeze a few extra dB out of your mix. And that, in turn, will make your track slightly louder and punchier.

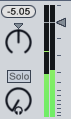
The main goal here is to cut the peaks of the song, which will let you to bring up the average level of the track. Since you don’t want to alter the tone or feel of the song, the best choice is typically a compressor with a low ratio (like 2:1) and slower attack/release settings.  I’ve used these settings in the downloadable rack, but feel free to tweak them to dial in whatever sounds best to your ears.

Start by gradually bringing the threshold down, closely watching the gain reduction (GR) meter. Once you see the GR flashing 2-4 dB of reduction, you’re good to go. This rack uses the “makeup” button to add back the reduced gain, although I have better results doing it manually. First, make a note of the track’s peak level before you activate the compressor. Then make a note of where it peaks after the compressor is activated. The difference between the two numbers is what you enter for “output.”

6) Limit for loudness

Now that you’ve added some final polish and tweaking to your track, it’s time to make it louder. Ableton’s limiter is dead simple. Slowly turn the gain knob until you see the GR meter flashing about 3-5 dB.

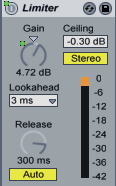
This is where the dark side will tempt you to join the loudness wars. The more you limit, the louder the track will get. But as you crank that knob further, you’ll be sacrificing dynamics, coloring the tone, and adding weird artifacts. It’s your call.

7) Holy crap it’s gig night

Time to take your beefed-up monster out into the wild. If you can, get to the venue early for a soundcheck. This will let you preview the song on the club’s system and mentally prepare for any adjustments; you may have to adjust the EQ knobs or add gain to make the song mesh with other tracks. Based on how it sounds on the club’s PA, you might want to go back and make adjustments to your mix after the gig.

So how does this technique sound?

KNOW YOUR LIMITS

This quick-and-dirty DIY approach is awesome for getting your songs club-ready, but unless you started with an absolutely slamming mix, the final result might not sit perfectly alongside professionally-mastered tracks. But hey, you get what you pay for. If you’re willing to spend around $25-$50 a song, a mastering engineer can provide you with:

  • A fresh, objective set of ears.
  • Tons of outboard gear to add warmth and distortion-free loudness.
  • Years of experience making songs sound good on any system – big or small.

TECH TIPS:

While Ableton’s native devices are awesome, specialized VST’s can improve your results. For precision low-bass cuts, check out the Waves LinEQ. A lot of producers swear by the PSP VintageWarmer for compression. And for limiting, check out Waves L2 or the Fabfilter Pro-L.

Club systems sound best when the low-frequency content is in mono. Slap this free VST on your master, with a setting around 300 Hz and a width setting of zero, and you’re good to go.

While you’re at it, it’s a good idea to check your overall mix in mono; some club systems have just one channel. Make sure every part is still coming through with clarity – especially the stuff with weird panning or phasing FX.

The steps and settings I just walked you through are good starting points, but there’s no right way to do this. Tweak those knobs – for example, the attack and release on the compressor – and always use your ears.

About the Author: Kent Barton produces live, organic electronica as SEVEN7H WAVE. His upcoming album, cyberia, is due out later this year. http://soundcloud.com/seven7h-wave

CONTINUE READING:

A djs guide to mastering
Warm up your dj software
How to Compress with the Best

Comments (67)
Add Comment
  • David

    as someone who listens to music and also produces, i feel like this is all a waste of time. I listened to both the unpolished and polished track and if you play the unpolished track at a higher volume it sounds identical to the polished track at a lower one. so i’m not sure what the point of this is truly is, can someone please explain it to me?

  • Dj DoIn BaD

    “Fire up an analyzer, like Ableton’s Spectrum, and take a look at your frequencies” is there something like this in Mashcine so that I can see all the frequencies on the track that im working on?

  • Clancybaxter

    Hi, amazing article, was just wondering how much the limiters gain should be turned up roughly? any sort of guess would be more then helpful thank you 🙂

  • acapellas4u

    Alexkrigbaum – it works, downloading it now.

  • Alexkrigbaum

    The Download is still dead, can you fix this?

  • ITTIBITIMIDIKIDI

    PLEASE FIX THE DOWNLOAD LINKS!! – Article has little frame of reference without them.
     

    Please check links, That’s the fundamental point of the internet, links to share information more freely… (Or at least its original intent was to do so) Now it seems porn is what is shared more freely. Thank goodness we can’t get virtual STD’s just yet. Oh hang on, that’s what PC’s are all about..   😉

  • sss

    good one, will try this out soon

  • sss

    good one, will try this out soon

  • Mohamed Simon

    great article. one question.. will that work if i rewire with reason? All my tracks are almost done on reason, and would be a good idea to rewire it to ableton and master it using those tips?

  • Mohamed Simon

    great article. one question.. will that work if i rewire with reason? All my tracks are almost done on reason, and would be a good idea to rewire it to ableton and master it using those tips?

    • Sander Bongertman

      Yes. Although it’s easier to just bounce the mix down and import that into Ableton.

    • Sander Bongertman

      Yes, it will. It might be easier though to render the track in Reason and import that back into Ableton.

  • Anonymous

    check out t-racks 1 and 3. i use t-racks 1’s eq for my productions its fricken amazing 😀 and t-racks 3 i use for quick masters before i upload to the cloud or dj 😀 but all my releases get sent out to get pro mastered

  • guest

    A very fine article.  But alas.  This will never be enough to compete with the mastering you hear on Beatport and the like.

  • R3Bonaire

    from 25 years of sound enginering/design expirience i can say this is the best explained post ever on DJTT to appear. Off course like said at the very bottom “use your EARS” is the final touch. And always try to stay away from close to clipping signal. Best dynamics and overall sound are created by these procedures.

  • Xcv

    Very easy to understand and very helpfull.  Thanks

  • Xcv

    Very easy to understand and very helpfull.  Thanks

  • Kent Barton

    Hmmm…sounds like possible version confusion with the rack. Lemme try resaving – this time as a live set – and get it uploaded tomorrow. Hopefully that’ll fix the issue.

  • Kent Barton

    Hmmm…sounds like possible version confusion with the rack. Lemme try resaving – this time as a live set – and get it uploaded tomorrow. Hopefully that’ll fix the issue.

  • Kent Barton

    Hmmm…sounds like possible version confusion with the rack. Lemme try resaving – this time as a live set – and get it uploaded tomorrow. Hopefully that’ll fix the issue.

  • Fox

    Great article, can’t wait to try those tips on my tracks… but it looks like the rack download is corrupted, can you please upload it again?

  • Igor Gladkiy

    couldn’t open your rack in ableton 8.2.5, got this error “wrong class found. expected a “ToolSong” or subclass, found a “GroupDevicePreset”.

  • soundcloud.com/asi9dubstep

    This is the most helpful article I have EVER read on DJTT.
    I have been reading a 300 pg mastering/mixing textbook and this simplifies everything I’ve learned.

    GOOD WORK!!!

  • Thomas

    If you’re clipping your master output, to simply “slap a utility plug-in on the master channel of your finished track” will only cause you to clip the input of the plug. A better solution would be to stage your gain so that it sums to around -5dBFS WITHOUT the plug in.

  • Thomas

    If you’re clipping your master output, to simply “slap a utility plug-in on the master channel of your finished track” will only cause you to clip the input of the plug. A better solution would be to stage your gain so that it sums to around -5dBFS WITHOUT the plug in.

    • Emile V

      In the manual of ableton 8.2.5 p189: “Because of the enormous headroom of Live’s 32-bit oating point audio engine,  Live’s
      meters can be driven far into the red without causing the signals to clip.”

      A lot of DAWs dont do this, but ableton will give you some slack. Though its just good practice to not go into the red..

    • Sander Bongertman

      Emile is correct. Even if you run every single channel into the reds, but the master signal going to the soundcard is not clipping, you won’t notice a thing. There is so much headroom there is no need to worry about it. I’m not saying it’s a good idea though ;). Gain structuring is something you should always do so you know how to do it when you need it.

  • Thomas

    If you’re clipping your master output, to simply “slap a utility plug-in on the master channel of your finished track” will only cause you to clip the input of the plug. A better solution would be to stage your gain so that it sums to around -5dBFS WITHOUT the plug in.

  • Andrew

    ozone 4 is a very good mastering software. it costs up to 300$ or more thoh but teh results are definately astonishing!!

  • watchmen

    Why do I need these expensive bits of software to compress my track when there’s a compressor and a limiter right there in Ableton? The answer is PHASE. Every tool in the Ableton box introducesa little phase distortion to the signal so that sending the bass through one process and the treble through another, when you sum them back together at the end can give you patchy areas of sound where the phases have cancelled out.

    The expensive software compensates for this throughout their signal path so that you get the best possible sound at the end, and this is why mastering software takes a beefy CPU and is worth the money. And it’s also why a mastering engineer has to learn their craft – what to do and what to avoid.

    • Gowers

      you will only get phase issues when you are parallel processing. This happens in any DAW, to avoid this just set any mixes to 100% or 0% in each chain with the same plugins in each chain. If you think that phase issues are the biggest issue when getting a tune to sound good you are a fool and probably bang on about 192khz over 96khz. This is all hype/spin and needs to stop!!!

      You can get better results if you are good at what you do than someone with loads of expensive gear. In fact the dude with the expensive gear has probably owned all the cheap stuff, learned and means he can afford it.

  • Anonymous

    hehehe….I actually like the first unmastered track a bit better. Just need to turn the volume up a bit more.;)

    scamo

  • Reilly Steel

    Good article, but I strongly disagree that your frequencies should be even across the spectrum. This entirely depends on the style of music you are producing. For dubstep and other bass music, after mastering the subbass (below 100 Hz) usually lies around +11-12db, while the rest of the track usually lies a bit below 0. Even for house, the subbass lies around +8-10db.  Just pop a well mixed and mastered track into a spectrum analyzer and see for yourself.

    • Dr Spoof

      Cause with +11dB in any frequency band your song wouldn’t clip, no?

    • Kent Barton

      That’s true; it helps to A/B tracks with a style similar to what you’re working on, and see where the freqs are hitting. The advantage of a flatter spectrum (or gradual downward slope) is that it tends to be easier to tweak when you play it out on a club system, whereas big spikes in the sub might wind up drowning out the rest of the track.

    • Travelermusic.net

      This is a great article, a lot of good advice for getting a track ready for a big system. As for spectrum analysis, I agree with Reilly.

      Your spectrum shouldn’t always read flat, it totally depends on what type of music you’re making. As long as your RMS volume isn’t too loud, and you aren’t clipping any frequencies too much with your mastering limiter, you’re tracks can still sound great on a big system.

      The most important thing is the mix, no matter how well you master your tracks. If the mix is off, it will only get magnified as you go through the mastering process.

  • DJ Manuel

    Can you give your opinions on using Ozone 4 as a mastering package with the DAW of your preference compared to the VSTs you mentioned?

    • Kent Barton

      I’ve never messed around with Ozone personally, but it generally gets solid reviews. People tend to like the beautiful GUI and helpful presets. But it’s 200 bucks, and the presets can only take you so far, since each track is different. YMMV…maybe check out the demo and see how you like it.

      • DJ Manuel

        cool thanks for the tip.

      • Sander Bongertman

        Exactly. I have heard so many people rave over Ozone’s limiter that I just had to try it, and I have to say, it is really good.

  • DJ Manuel

    Can you give your opinions on using Ozone 4 as a mastering package with the DAW of your preference compared to the VSTs you mentioned?

  • Anonymous

    I highly suggest you compare with other tracks using meters. Tracks in the same genre tend to have the same eq curves and loudness. I actually have a video I recorded this weekend that I will be posting later today that goes into more detail.

  • Anonymous

    I highly suggest you compare with other tracks using meters. Tracks in the same genre tend to have the same eq curves and loudness. I actually have a video I recorded this weekend that I will be posting later today that goes into more detail.

  • Brandon Hughes

    Your link to the mastering kit wasn’t completed correctly.  Overall good article.

  • Brandon Hughes

    Your link to download the kit isn’t available.

  • markkoo

    broken link for custom rack download.
    can you make it working? thanks!!

  • markkoo

    broken link for custom rack download.
    can you make it working? thanks!!

  • markkoo

    broken link for custom rack download.
    can you make it working? thanks!!

  • DjStereotype

    ‘If you’re willing to spend around $25-$50 a song, a mastering engineer can provide you with’….

    anyone care to point me in the direction of a good mastering company with those sorts of prices? all i can find is $100+ services

    thanks

  • DjStereotype

    ‘If you’re willing to spend around $25-$50 a song, a mastering engineer can provide you with’….

    anyone care to point me in the direction of a good mastering company with those sorts of prices? all i can find is $100+ services

    thanks

    • Thomas

      Good luck.

    • Thomas

      Good luck.

    • Thomas

      Good luck.

    • Gowers

      yeah if you are paying 25-50 a song they are shit and not worth using.

    • Gowers

      yeah if you are paying 25-50 a song they are shit and not worth using.

    • Andrew Johnson

      Check out Ryan Enzed.  He’s produced some Beatport 100’s and he also puts out tons of helpful Synth tutorials on youtube.  He masters for 30$ a song.

  • Matti Kiviniemi

    Great Article. I will definitely check how this translates to my productions. Just one gripe, the download link does not seem to work, could you look into that please? 

    • David Pixley

      Since Tone Projects Basslane download link doesn’t work, I suggest an alternative: Slap 3 EQ3’s on and group them, solo’ing each one for “bass”, “mids”, and “highs”. Set the low to 300 and below, and slap a utility on the low; and put the width on the utility to 0% — that will set your lows to MONO.

  • dutty

    great article covering the most important stuff!

  • dutty

    great article covering the most important stuff!

  • dutty

    great article covering the most important stuff!

  • dutty

    great article covering the most important stuff!