Many of you have seen plenty of videos featuring artists and DJs banging away on pads and buttons creating near perfect musical jams virtually from thin air. If you’re like a lot of finger drumming novices, you probably marvel at their incredible skills, but are disappointed when you turn around to have a jam session yourself. Today I’m sharing some secrets on becoming a finger drumming YouTube superstar – with just a little daily practice and some good techniques. Read on to learn more!
If you want to get a soundpack like the one used in this tutorial delivered to your inbox in a few days alongside a new one to practice and play with for free each week, just sign up for the DJ TechTools Weekly Newsletter!
Can’t get the song stuck out of your head? DOWNLOAD it for FREE right here!
There are a lot of different schools of thought and approaches to finger drumming, and I don’t think there has to be a definitive “right way” to do it. It’s a bit like martial arts, in that it has many different teachers, styles, and ideologies. I studied under Master Quan in the Hubei Province. You might be wondering:
What is Finger Drumming, and is it really worth the effort?
First and foremost, it’s insanely fun. The fusion of electronic music’s sonic power with live instrumentation gives me a rush unparalleled by anything else. That aside, it is an incredible tool for composing expressive songs quickly and/or for jamming with your friends. It’s also a fast way to become a internet video sensation. The basic concept is to turn electronic music into a living, breathing instrument and be able to morph and compose your beats on the fly – without having to get lost in the slow translation of programming.
Before computers, people just played instruments. While there’s certainly some genuinely amazing things about electronic music, it has a tendency to lack that “human element.” As a result, we risk losing touch with what makes music special in the first place. By creating and practicing real musicianship with electronic sounds, we can begin to regain the “soul connection.”
MUSIAGO – MAD ZACH’S TECHNIQUE
That said, I have developed a finger drumming technique I call “Musiago” – which is a word I made up. When translated from Madzachish, it means “many branches” – as in finger branches on a wrist trunk. Admittedly, this technique has been developed on and is assisted by the Midi Fighter, which is uniquely armed with tight button spacing and spring-loaded trigger buttons which enable faster, more efficient playing.
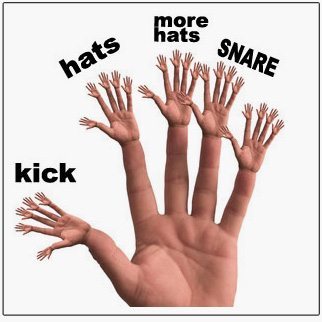
I use my thumb for the kick, 1st and 2nd fingers for hats, and ring finger for snare. I chose these fingers for their relative dexterity: my thumb is solid, tireless, and funky whereas my first 2 fingers are technical and expressive. And the ring finger holds a nice balance with the thumb, perfect for rocking back and forth. My pinky is pretty useless – I don’t use it that much currently.
This method is centered around playing the beat with the right hand so you can layer in bass, one shots, and more with the left. If you are left handed, you might consider inverting my fingerings.
WHERE SOUNDS GO
One of the most important things to take into consideration when practicing is making sure you know which sound is where and that your chosen layout format works for your own personal technique and style.
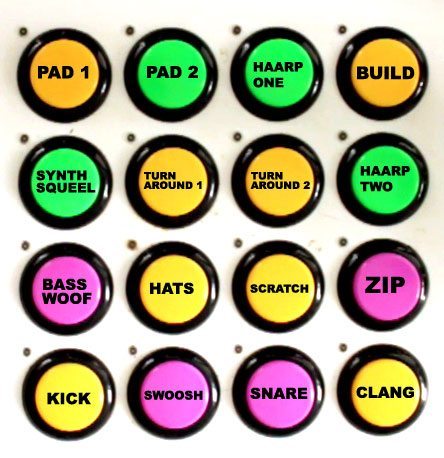
Most of the Mad Zach packs follow a familiar layout that I personally find to work really well – and for this pack, I’ve created the above helpful little diagram for you to use to make sure you know what sound is where. If you think it might help to have a physical copy, print one out!
FINGER DRUMMING TIPS FROM MAD ZACH
- It may help to position yourself somewhat diagonal to your controller.
- Instead of moving your arms, focus on holding your wrists still while articulating your fingers in a smooth, effortless manner
- Start small: just focus on keeping time with 1 or 2 sounds. It’s okay to stay simple, don’t worry about going fast or crazy at first.
- Leave room in your mix, don’t worry about playing every sound at once! Think instead in groups of 2-3 tones.
- Use a “build” button to transition between energy intensities within your sound rack.
- Experiment with mirroring your two hands rhythmically but using different numbers of buttons in each hand’s pattern.
- Don’t be afraid to find “chords” or places where multiple buttons sound great together.
JUST THE PERFORMANCE, ALREADY
If you want to get a new soundpack like the one used in this video to practice and play with each week for free, just sign up for the DJ TechTools Weekly Newsletter!
Can’t get the song stuck out of your head? DOWNLOAD IT FOR FREE HERE!
GET INVOLVED
Got your own style of finger drumming? Show us! Maybe it’ll be so incredible we’ll want to feature your sweet style on the blog. Respond to the video with one showing off your strategy, techniques and skills.
We’d also love to see what you do with the pack, so consider filming a video of you playing with it and upload for a chance to pick the name/theme of the next weekly soundpack from Mad Zach. How to make sure we see it: post about it on Twitter – mention @madzach1 and @djtechtools!
Mad Zach is a maverick controllerist and producer, focused on bridging the gap between production and performance.
Follow Mad Zach on: Facebook SoundCloud Twitter YouTube
[…] you want to get into finger drumming and you have no idea which midi controller to […]
[…] The first example I looked up was “How to practice finger drumming and controllerism” on a website called djtechtools.com. This website provides a brief summary on what finger drumming is and why it would be fun to learn. It talks about why people do and and the basic concepts of it. When you continue to scroll down, you will come across a picture of the drum pad that this website talks about and it is zoomed in so you are able to see each button and where it is placed on the board. Compared to other boards, this one is for a beginner because each of the buttons are labeled. https://djtechtools.com/2012/09/03/how-to-practice-finger-drumming-and-controllerism/ […]
[…] Keep Reading: How To Practice Finger Drumming […]
[…] Keep Reading: How To Practice Finger Drumming […]
@mad_zach:disqus Dope stuff man! Mad props, I’ve started some days ago, but i can’t find the link for the sound pack. I already subscribed for the newsletter.
hello i just subscribe to the website tell me where can I download the pack for practicing , i can’t find no links please it will be very helpfull
hey madzach, just wondering if i can finger drum in the same manner on my maschine, like when you get pads to only play when your finger hits them and then the sample stops then the finger lifts off, is there a way to put my maschine buttons in such a mode?
Yeah Julian, ADSR mode is what you’re looking for in Maschine. You can mess around with the ‘release’ of the sample also to adjust how long the sample holds after you’ve let go of the pad.
Dope..
I noticed on his performance in the video at 0:22 he switch between 2 different kicks. How did he do this? He eventually switched back to the original kick later, if anyone knows it would really open up some options for me! Thanks
Hi there,
great tutorial, I hope there, will be more to come !
Amazing job on the Hi Hat´s ! can anyone explain me whats happening ? press gives closed hi hat and if you tap, gives open hat´. Mad Zach help
Is there anywhere i can download your drum rack?
you can sign up to get the next one by getting on our newsletter, I send them out each week to the newsletter. Also in a couple weeks you’ll be able to pick up all the old packs in the store so stay tunes
awesome videos and article! i was wondering how you switch between drumkits during your performance?
Thanks Mad Zach and the DJTT team.
Here’s my suggestion:
Jeremy Ellis Lessons:
http://www.youtube.com/user/jeremyellismusic?feature=watch
different style but super good as well!
Great stuff. I picked up some of these techniques studying your other videos but it was good to see them all in on place with an explanation. Doing things SLOW really does help. It’s hard to force yourself to do it since it doesn’t sound right going slow, but a few slow runs helps more than a bunch of full speed practice where you keep messing up.
This is fantastic! I just got my Midi Fighter 3D the other day and have been marveling at my complete and utter lack of ability to do anything beyond banging out a somewhat-in-time kick/snare beat.
Nice, this is going to be a hot article! Way to go Mad Zach and the DJTT team.
ok.. 2 very important questions. I got your soundpack and i’m im using it on maschine. 1. How are you taking that one hi-hat and when your double timing it it almost seems to change sounds when you hit it, almost like one of them is open on the same pad? and 2. I have the noise motion sound from another one of your dope ass sound packs (bc its not on this one) that your doing the crab scratch with in this video.. but how are you automating the time that it comes in each time you hit it? If you could explain this, it would change my life forever. you f#ckin rock.
hey EXPO the first has to do with what sample I start with and the decay, sustain and release being very specific. The second has to do with non-retriggering LFO’s 🙂 Not sure if you can do that stuff with Maschine though although you might. Try taking a look at how I have it set up in the ableton pack
I’ve done this with Maschine pretty easily, although without your sound pack — made unsynced LFO with output to LP filter with high resonance and drive (which gives great high frequencies for scratch sample).
I’ve been literally looking for tutorials like this for some time. Thanks a LOT!
By the way, if it would be even better if you spend some time explaining how to properly fingerdrum this way with velocity sensitivity turned on with MPC, Maschine or a similar pad-based controller. I can only get velocity right if I drum one pad at a time with two fingers at once, can’t figure out how to do it properly.
I do not like or use velocity on my MPC or MF and have had very bad experiences with “velocity” sensitivity in general. This sentiment is shared amongst many live beat players including Jeremy Ellis, Araabmusik, Ean Golden, Amp Live and myself
Well, at least I’m not alone in this 😉
Velocity finger drumming is “David Finger Hayes” next level god like skill shit, edm style kinda wants full volicity IMO, but if you wanna sound like a proper real drum kit then velocity is the best way to achieve this.
I’m not saying one is better than the other, just two different beasts for different goals. I have velocity on or off depending on what type of kit I’m playing. If it’s a normal drum kit with no synth bells and whistles than velocity has to go on as it gives you so much more expression.
I just googled him, and WOW. Blew my mind.
It’s true for expression, but striking with indended velocity with every finger seems extremely hard. I usually have to take two finger pinch approach so I can control the velocity of my hits. How many years did he take to train that skill?
Now there’s a good question I’d love to know the answer to! I’d say at least 10 possibly 20years, there’s vids on YouTube of David Hayes smashing out sick beats on old alesis drum machines from the 80’s! The guy probably couldn’t rock a dance floor the same as some of the guys Zach mentioned but the skill level and endles techniques of David is unparalleled. Comparing Jeremy elis to David hayes would be similar to comparing dj shifty and qbert.
Check out Mpcstuff.com where you can buy sensitivity kits for Maschine or MPC. Making my Maschine pads more sensitive really helped me with velocity based finger drumming, otherwise you really have to smack the shit of the pads to hit full volume.
yeah that guy is frikin nuts!!! I’ve seen him before on youtube and had my mind blown
The vid of David On Maschine freaks me out despite how many times I’ve watched it, mental skills
Great tutorial tho Zach! Ive been hammering sum of your techniques last night, my problem is i normally have snare and hi hats in the oposite to your layout = serious brain melt, but makes total sense in use.
.
http://www.mediafire.com/?lrmi836kc5s5819
This is the Ableton mapping of this fonger drumming video I made here :
Nice!
OT:: Where is gone the “FB Like button”? :V
Wicked Wicked stuff once again sir! A trick that I have found to be useful over the years is to make a tom roll (from high to mid to floor) and snare roll (low velocity to high) sequences ended by a cymbal crash. And mapped to just two pads, obviously these will be fixed bpm but at least this allows these useless pinkys to feel like they are also contributing musically, but really though, they just faking the funk lol :p
Keep up the Awesome Schooling It is Very Much Appreciated Zach!
For more 2 hand wizardry…
Mght be a dumb question: But do you need sth like Ableton live to do this? Sure, an F1 could work too with Traktor, but I don’t have one either… ^^
Traktor’s remix decks can only play 1 sample out of a slot at a time 🙁 . But you can achieve this using Reason’s Kong, FL Studio’s FPC, NI Battery, Sonar’s Session Drummer, Toontrack’s Easy Drummer etc. There are lots of options out there indeed
~one
like Donmecz said these principles transcend any particular software since there are so many that offer the same basic functionality, there’s also Maschine, MPC, or even just Traktor cue points
Aweome tutorial ! Thanks!
Great tutorial, this really helps me a lot! 🙂
These kind of tutorials are extremely helpful!! Thanks! May I suggest giving the buttons numbers (ie. kick 1 snare 2) It would be easier for complete beginners like myself to have a count.
Then maybe you could give us a few practice sequences to get started.
Thanks again for the great tutorial
i agree with paddy1. a tutorial sample pack with some basic sequences would be great! ie: kick, snare, hats, bass note1, bass note2, lead note1, hit, transition (“swoosh”) etc… not that i am too lazy to do it myself but i just can’t figure out how to make it all fit together.
maybe this could help getting the dust off my roland sp404sx sampler. 🙂
just sign up for the djtt newsletter and you’ll get that pack delivered to your inbox in a few days
there’s a bunch of practice sequences in the vid