MacBook Pro Running Slow? You Need A Solid State Drive

For Digital DJs laptop performance and speed is critical. After a few years of using the same computer you may notice that day one speed just isn’t there. How can you get back that brand new computer feeling back where everything runs super fast? Install a solid state drive.
Rather than spend $1899 – $2499 for a brand new MacBook Pro, why not get more from your original investment with this small performance upgrade. Today we’ll share the easiest and fastest way to upgrade your MacBook/MacBook Pro to a super fast solid state drive and be up and running in no time.

Hard Disk Drive vs. Solid State Drive
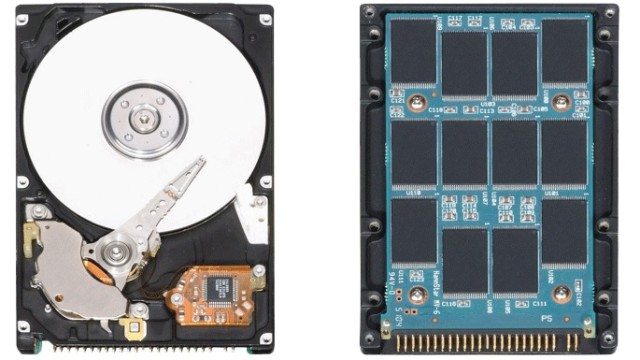
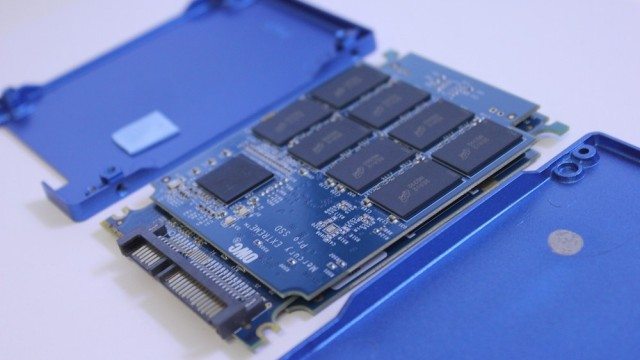
HDD (left) vs. SSD (right)

What is the difference between and HDD and a Solid State Drive? Why are SSDs so much faster?

You’re probably familiar with USB memory sticks – SSDs can be thought of as an oversized and more sophisticated version of the humble USB memory stick. Like a memory stick, there are no moving parts to an SSD. Rather, information is stored in microchips. Conversely, a hard disk drive uses a mechanical arm with a read/write head to move around and read information from the right location on a storage platter. This difference is what makes SSD so much faster. As an analogy, what’s quicker? Having to walk across the room to retrieve a book to get information or simply magically having that book open in front of you when you need it? That’s how an HDD compares to an SSD; it simply requires more physical labor (mechanical movement) to get information. (Source: Storage Review)

An SSD can have a dramatic impact on the overall performance of your Mac. With an SSD you’ll experience faster boot up, faster app start up (no more bouncing icons), and overall smoother performance when running multiple apps. There are additional advantages to SSDs that goes beyond just speed:

  1. Durability – Non mechanical design means less risk of damage from shock
  2. Energy Efficient – 2W vs. 6W for an HDD, this can result in a small increase in battery life
  3. Cool and Quiet – No moving parts generate far less heat and near silent operation

Which Mac Is This For?

Before going any further it’s important to clarify what MacBook and MacBook Pro models this tutorial applies to. This tutorial applies to 2008 – 2012 MacBook/MacBook Pro models that are using a hard disk drive. These instructions do not apply to the MacBook Air or MacBook Pro with Retina Displays. These models by default ship with an SSD, which can be upgraded for more storage but DJs with these models are already benefitting from the performance benefits of an SSD. This tutorial definitely doesn’t apply to the new MacBook that’s not very DJ friendly.

What SSD Should I Buy?

There are several SSDs available from manufacturers like Samsung, OCZ, Kingston, and OWC. I personally use a Samsung 850 EVO 250GB with my iMac and an OWC Electra 6G for my MacBook Pro. I highly recommend ordering from OWC because they offer bundles that include everything you need to do the hard drive swap: precision tools for opening your MacBook, an external drive enclosure, and the SSD itself. They also have detailed installation video’s for most Macs that make the process really easy to follow. Here are the 3 bundles for different drive sizes:

Once you’ve purchased an SSD, it’s time to create a clone of your current hard drive. By cloning the hard drive it’s making a bootable duplicate of your existing drive. This makes the drive “plug and play” once it’s installed in the laptop with the same file structure, the same drive name, same apps and OS. This is the fastest way to get up and running with the new SSD. When making a clone, you’ll need an SSD that matches the size of your existing drive. 250 GB? You need a 250 GB HD. 500 GB? You guessed it.

If you don’t have the cash for a large SSD, another option is to move large files/folders, such as your iTunes collection, to an external drive. Then reuse your existing internal drive as an second internal storage drive with the OWC Data Doubler to store your movies/music/large collections etc. Note this requires removing the optical/disk drive of your MacBook Pro. You can also keep the old internal drive as a bootable backup for digital insurance.

Although you may be tempted to go with an even smaller drive for more cost savings I wouldn’t recommend buying an SSD with less than 250GB storage. This can result in needing to constantly delete or move files around to create space on a smaller SSD.

Formatting And Cloning Your Drive

Before cloning the drive, we’ll need to format the new drive using Disk Utility (Applications —> Utilities —> Disk Utility). Highlight the new drive in the sidebar, they’re usually labelled by the brand and model (i.e. OWC Electra 6G). Then click the “Erase” tab, for format choose “Mac OS Extended (Journaled)”, and for the name match it to your existing drive so your file paths will be the same on the new drive. Click “Erase” and it will format and rename the drive. Now you’re ready to clone the drive.
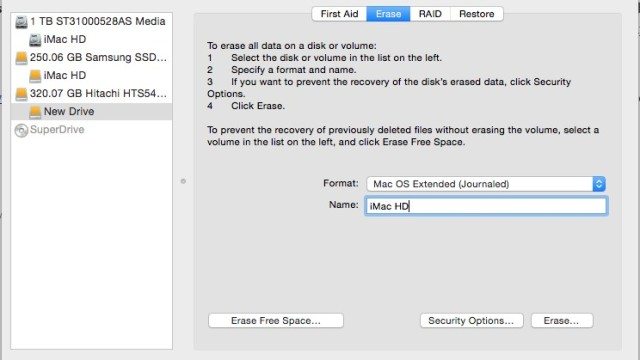
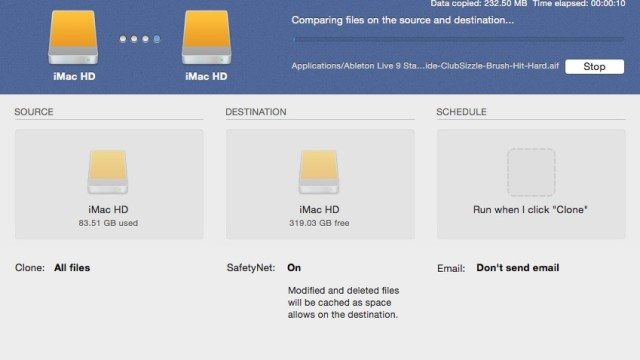
Format and name the new drive to match the old drive name. In this case, i’m naming the new drive “iMac HD”.

The app that we’ll be using to create the clone is called “Carbon Copy Cloner” (click here to download). The free 30 day trial allows you to create a full bootable backup so this is all you need to get started, no need to purchase the full license. The app is super easy to use:

  1. Connect your external enclosure with the SSD
  2. Open Carbon Copy Cloner
  3. Choose a source (your internal hard drive)
  4. Choose a destination (your SSD in the external enclosure)
  5. Click Clone!

After the cloning process is complete, it’s time to test the drive to ensure that everything is working properly. You can do this without installing the SSD. Shut down your Mac and start it up again. After pressing the power up button, hold down the “option/alt” button on your keyboard. After a few seconds the startup manager will display the volumes (drives) that you can boot into. Choose your new drive (the drive icon should be yellow with a USB logo). Your Mac will startup using the new drive and since it’s a clone everything should appear exactly as it did on your old drive.
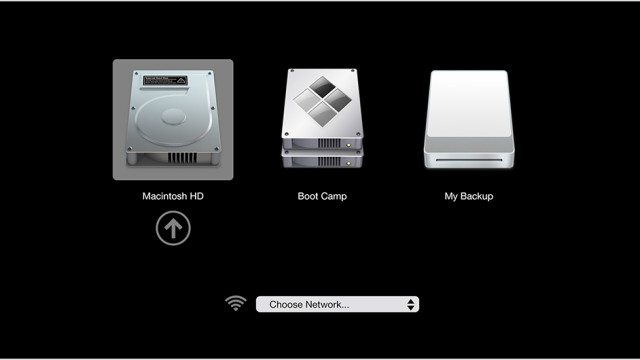
Bootable volumes will appear after holding “option/alt” upon startup.

Installing the SSD In Your Mac

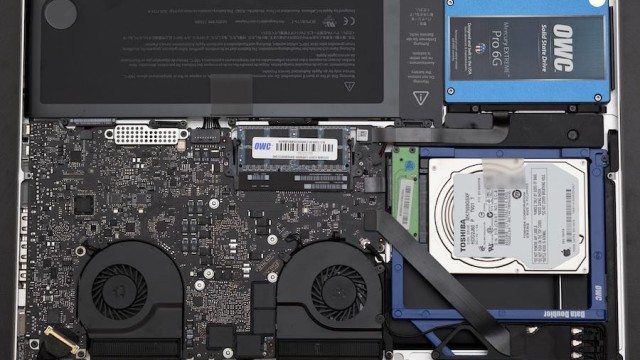
MacBook Pro Internals with SSD and Data Doubler.

Once you’ve verified that the clone is working properly it’s time to install it into your Mac. Don’t worry, the process is actually pretty easy, even if you don’t consider yourself a “tech person”. OWC has detailed installation video’s for the MacBook/MacBook Pro that cover installing a new hard drive, replacing a battery, and installing their Data Doubler. Lots of Macs look alike so you’ll want to use the Mac’s Model ID to find the right installation video.

Here is an example of the hard drive replacement/installation process on the 2011/2012 MacBook Pro:

Bonus: Super Speed and Storage With A Data Doubler

If you’re going through the process of installing a new hard drive why not go all out and maximize the speed and storage of your Mac? Again the cost is relatively cheap compared to the price of a new MacBook Pro. This requires removing the optical/disk drive of your Mac, but with the availability of Netflix it’ll be hard to miss.

Super Speed and Super Storage

Super Speed and Max Storage

The cool thing about this upgrade is that it’s unique to older MacBook/Pro models. In newer MacBook Air and MacBook Pro Retina Displays there’s no optical drive and simply not enough space for a second drive, so the maximum storage you can get is 1TB. So if you’ve got an older MacBook Pro take advantage of that extra space!

Are you running an SSD? What make/model?

Let us know in the comments below!

hard drive replacementHDDmacbookmacbook airmacbook proMacbook Pro Retina displayPerformance upgradeSolid state driveSSD
Comments (50)
Add Comment
  • Junior Pops

    Thanks for such a article, i updated my 2011 MacBook Pro 13inc and i must say what a difference, its twice as fast and i now have 16GB Ram, 500GB SSD Drive and 2TB HDD Drive.
    I am so glad that i didnt purchase a new MacBook Pro.

  • Dylan

    Hey guys, can someone smarter than me tell me if my “Macbook Pro 13-inch (Late 2011)-

    Model Identifier: MacBookPro8,1
    Processor Name: Intel Core i5
    Processor Speed: 2.4 GHz
    Number of Processors: 1
    Total Number of Cores: 2
    L2 Cache (per Core): 256 KB
    L3 Cache: 3 MB
    Memory: 8 GB
    Boot ROM Version: MBP81.0047.B27

    is compatible with the above upgrade mentioned in the article. “OWC Mercury Electra 1TB SSD with Data Doubler?

    I just replaced my RAM, but still maxing out when using multiple apps. I got told it might be the HD that is the problem? Please shed some light…

    • Rayanaldo Nikola Brkljacic

      Yes Sir, it will 😀

  • Roy Bear

    Nice Article! This should be usefull for a lot of People 😀
    But: Why not use Apples own FusionDrive?
    back in 2013 I decided to Switch from Windows to MacOSX and got me an MacBookPro 15 (non-Retina Model, not regretting it) and the first thing I did was to upgrade the RAM to 16GB and get rid of the 500GB HDD. Replaced it with a 250GB Samsung 840 Evo and a 1TB WD Black. Totally worth it!
    And since some Manufacturers released 2TB HDDs (9,5mm height, not 15mm :D) I am thinking about a “upgrade”. Yes, this means I have to make a complete Backup (even with a USB3 HDD/NAS it takes “forever”) crack the fusionated Drive, then Switch to the 2TB HDD, rebuild the FusionDrive and get the TimeMachine back onto the Mac, and there you have it 😀
    2,25TB is a lot of space 😀
    and yes, since I use Komplete, a lot of my favorite movies on iTunes AND going to record a lot of Audio

  • Mathias Bruus Håkonsson

    I upgraded to a samsung evo 500gb, and put 32 gb of ram in my 2012 mb.
    Its super fast, best investment i have ever done since my old s4.

    • Rayanaldo Nikola Brkljacic

      How’d you manage 32b of RAM? mid-2012 only supports 16gb…

  • DJ alt.rock

    I just wanted to take time out to thank you for turning me on to OWC. I’m new to the apple game and recently bought a 2012 MBP because it’s user-upgradeable. I love how legit and no-nonsense OWC is and the fact that they assemble their products in the USA is freaking awesome! I dropped in a 1TB drive and 16GB of ram and it was so easy. They include all the tools you need if you buy a SSD upgrade package. Clearly, everything runs faster than before but I knew that because I’ve been hip to SSDs for many years on Windows machines but never heard of OWC until this article. Also, the program you suggest to clone my HD was a winner too. peace from Akron, Ohio!

  • Jake Hale

    great article- love seeing more in depth technical how-to on this site.

  • Mitch Brown

    I read this article and thought this is for me… I’ve got a 2006 Macbook Pro 2.0Ghz, 2GB Ram, 100GB 7200 RPM hard drive which is used soley for Production with Logic Pro 9, which I’ve had fron new. Runnong OSX 10.6.8

    (YES I KNOW IT HAS A SATA DATA LIMIT OF 1.5 gbps)
    After doing a little research on youtube etc i decided to buy a Crucial BX100 250GB SSD for £77 direct from Crucial UK

    I used Disk utility to format and clone the drive, which is childs play, plenty of vids on youtube I used https://www.youtube.com/watch?v=onorIa2b5oA
    Atfer fitting the SSD and firing up the mac,(I also enabled trim with TRim enabler https://www.cindori.org/software/trimenabler/ which worked no problems.)
    It seem marginally faster but not what I had seen on some of the vids in youtube, maybe because I’d already got a 7250rpm HDD
    To conclude if you have a machine same age as mine already fitted with a 7250rpm HDD don’t waste your money this isn’t going to improve things much at all.
    The 1.5gbps data transfer rate that this machine has is limiting any improvments made by a SSD unless you have a 5400rpm drive fitted you wont fget any real world improvment.
    All is not lost I now have a 250GB hard drive 🙂
    I’ll say one thing the inside of a Macbook Pro is a work of art!

  • Enso

    If you’re running OSX Yosemite, Apple doesn’t allow for TRIM to be enabled for third-party drives. TRIM is however very important, so you should enable it. The problem there is that should you ever reset your PRAM (NVRAM technically) as you might do from time to time, this causes a lot of settings stored there to be reset, including the enabling of the TRIM kext. Cindori has the best solution called Disk Sensei ($20). Along with a treasure trove of other drive maintenance tools, it allows you to manually TRIM your drive without leaving it enabled. Though, it has that option if you like it.

    Long story short. If you put a third party SSD, spend the $20 on Disk Sensei and keep your investment performing well.

    Side note: My two cents on drive selection is that the Samsung 850 EVO or PRO is the best SSD option out there right now because of their 3D V-NAND technology. Plus, if you buy the 1TB version of the EVO, you get the same MEX controller that’s in the PRO drives.

  • tretuna

    Can definitely attest to this.. My early 2008 pre-unibody Macbook Pro has a 240 SSD as main drive and normal hard drive for storage. Old as it is, it boots in 20 seconds with the SSD. One of the best upgrades you can do is put an SSD in as your system drive and then have a separate storage drive, SSD or not.

  • Filippo

    if you have a macbook pro from late 2011 try data doubler with maveriks or yosemite and Raid 0 with 2 SSD.. and you will have allmost an 2014 macbook retina.

  • David Whalen

    Highly recommend the Samsung 850 EVO drives, or if you’re trying to ball out, the 850 PRO. I’ve installed over a hundred of these with zero problems. I personally run the 840 Pro in my Mid 2012 15″ MacBook Pro with a Seagate Momentus XT 1TB drive for the past year. Fantastic performance!

  • Martin Wilson

    I’ve go a 2010 MacBook pro. I want to do this. Is there a clear advantage to doing a clean install? Or is it not really worth cleaning out the old cobwebs to then have to reinstall everything?

  • Russell Cory

    I’d also like to add that best practices for data management suggest that your primary internal hard drive should only have software installed on it. Any other data should be managed via a secondary internal drive or external drives.

    Primary drives get hammered really hard because the computer needs the data on them the entire time you are using it. As a result the failure rate is significant when compared to secondary or tertiary drives. Plus if you are running software and data on the same drive you are asking it to do double duty which can slow down both the software and the data.

    Years ago an IT guy explained this to me and I changed my data management. Since then I’ve lost at total of 4 internal primary drives. None of which has resulted in me loosing any data. My music, documents, videos, photos, etc are all on external hard drives. So all I had to do was slap the new internal drive in, install the OS and software, plug in my externals drives and get back to work.

    Plus having things on external drives makes backup dead easy. Just daisy chain the drive you want to backup into the backup and drag & drop whatever you want to backup. Or use Time Machine, either way it’s super simple because it’s inherently more organized.

  • Chaser720

    For you budget minded folks, there’s always a hybrid SSHDs. The hard drive in my 2007 iMac crapped out and I bought a 2TB from OWC for <$120. Pretty snappy and twice the memory of the SSD listed above for a quarter of the price.

    "SSHD technology uses the right amount of ultra-fast NAND flash (the same type used in SSDs) to increase system performance. Seagate Adaptive Memory™ technology effectively identifies the most frequently-used data and stores it in the NAND flash. The results give you greatly improved boot times, application loads and overall system responsiveness." (http://eshop.macsales.com/item/Seagate/ST2000DX001S/)

    • Darren E Cowley

      Did the same on my old 13″ MacBook PRO, it’s been awesome ever since…

  • cyberfunk77

    Perfect timing. I just finished a double SSD upgrade on my trusty
    MacBook 2008 Unibody. This thing is a beast now with a system drive and a
    separate audio drive in the SuperDrive bay. I highly recommend this
    upgrade:-)

  • Shockley

    I did the same upgraded my 2010 with SSD and upped the ram to 8gb from 4gb the performance is amazing compared to time before it used to take 60 seconds to boot traktor up it is closer to 10.

    It is very easy to do I did also remove my cd drive into an enclosure and fit my old HDD to the slot so not I have doubled my memory and have a external USB cd drive

    I used carbon copy cloned free as it was better than time machine and dumping it all on at once took 5 hours to clone 250 gb of data but also was better as I could prove off the hard drive had correctly copied the files by externally booting off my hard drive before installing it

  • Arnold

    I’m having problem with my SPU What I can do ???? on a mac bookpro 2012 – do you recomend to do this ???

  • killmedj

    Any recommendations for a mid 2010 i7 iMac with a 2TB HD?

  • Turtleboy

    What about with a PC? Is this something I can do with my PC laptop as well?

    • synapticflow

      Absolutely you can. I have a Dell that is about 8 years old or so. I put a 64GB SSD in it, did some SSD optimizations I researched, and it runs just great. It starts up and shuts down super fast. My dj software runs perfectly. I highly recommend an SSD.

      I didn’t do any cloning. I back up my dj software and songs to flash drives. I just put the SSD in the laptop, installed Windows and then put my software and songs on the new drive.

  • James Burkill

    anybody know if seagate hybrid drives would work?

    • Russell Cory

      Seagate drives have fairly high failure rates when compared to other drives from WD or OWC.

  • radley

    Wow this is an extremely outdated article. First off, forget Carbon Copy whatever – nobody has used that since 2008. You should be backing up using Time Machine (it’s FREE and part of OSX). If you don’t have an external drive for Time Machine backups then forget upgrading to SSD, get secure back-up first! You can get a 1TB portable drive for less than $60. This applies to ALL Macs of any year. Back up your stuff!

    Once you’re using Time Machine you can upgrade to ANY bigger size SSD and get everything from your Time Machine back-up. Not only that, you’ll be able to recover music files and folders anytime you need (as long as you’re always backing up!!).

    • Ryan Dejaegher

      You’re correct, Time Machine is free and part of OS X. However Carbon Copy Cloner create a bootable backup right off the bat, without the need to backup and then restore with Time Machine. While you can restore your hard drive with a time machine backup it requires backing up with Time Machine then restoring to the new drive.

      • Jake Bergeson

        I believe his point was, if you’re not backing up with Time Machine already, you should be. And as he said, if you’re not, you should be!

        That being said, CC or Time Machine will work for this application, and both ways will take just as long (provided you have an up to date Time Machine backup, WHICH YOU SHOULD ALREADY HAVE PEEPS!)

        Great article though. I noticed a HUGE increase in speed and usability in my mid 2012 15″ macbook pro when I added a data doubler and an SSD. Great tech suggestion to get a lot more/ longer life out of your computer.

        • Dave

          MY 2C – Time Machine works fine in theory, in practice I have had much better experience with CC.

  • Tony Mitchell

    I haven’t used a mechanical drive in 4 years.

    • Comme Erçial

      Do you want a cookie?

      • Tony Mitchell

        Yes. And I’ll take it and feed it to your mother.

        • Comme Erçial

          She’s into fitness and not cookies but for you, her maternal instincts would kick in, and she would take it out of kindness.

  • Sandeep Kumar

    Another option for cloning your hard drive is SuperDuper, I’ve used that for years & been very happy with it

    • Ryan Dejaegher

      Hey Sandeep, good call, SuperDuper is another free option that works great!

  • Scott Frost

    This is a good article not just for DJ’s well done tutorial even for non DJs.

  • bkbikenerd

    The slowest part of computers for longest time has always been the hard drive. You have the system bus, memory, videocard, video memory all working at hundreds of MB/sec and a 7200rpm HD transferring data at about 40MB/Sec.

    You can buy the fastest processor in the world but if your computers has a standard spinning hard drive then you have a bottleneck in your machine.

    I use an Samsung EVO SSD. It reads/writes about about 400MB/sec. Best investment I made.

  • Oddie O'Phyle

    Even though I am using PC, there are a couple general rules with making an SSD switch. As stated in the acticle, it is not the same technology as platter drives. It is not sector based storage and does not fragment data that gets stored, there is no longer a need to defrag. your hard drive. The life span of an SSD is determined by the amount of times that it is written to and then deleted, if your system has enough RAM (absolute minimum 4Gb, but expect problems if you push it) you can turn off your page file (Win users) or swap file for Mac users to cut down the write/delete cycle. If you have another drive in your laptop for storage and feel that you still need a page or swap file, you can place it there. If you do run a secondary (platter) drive remember that they are not equal either, recommended is 7200rpm.

  • Rob Ticho,Club mU

    I’ve been running an SSD for three years and will never go back. It makes so much sense for a DJ computer considering track load times, durability, and operation in environments with intense low-end vibration.

  • David Alexa

    Don’t forget to enable TRIM with software like “chamaleon ssd” to increase performance and reliability of your SSD (less writing/read activity for each access). Apple disables TRIM for third-party SSDs installed which is a shame.. The optimizer can also change “suspend” for “hibernate” when closing your laptop, it takes 5 seconds at most to wake up (because SSD is faster) but it doesn’t use battery while it’s on sleep mode.

    • Rayanaldo Nikola Brkljacic

      No more need for trim enabler! 😀

      • David Alexa

        True, TRIM support was enabled in osx 10.10.4, you need to enable it though with the command “sudo trimforce enable” in the terminal

  • Ian Williams

    Carbon copy cloner is very easy to use, but you can also clone a disc from within Disk Utility (use the “restore” tab along the top).

    • Ryan Dejaegher

      Hey Ian,

      You’re correct you can do this with Disk Utility, if you haven’t already used up the trial period i’d stick with Carbon Copy Cloner for the ease of use.