If you produce electronic music in 2015, chances are you will need to apply sidechain compression to some of your instrument tracks. It’s the technique that melds the bass to the kick drum and creates a rhythmic pulsing to the music that has moved dancefloors since at least ’97. Since the technique is so ubiquitous, what is the best plug-in for the job? Three affordable short-cut plug-ins to sidechain compression make the process easy. Ride the waves of their results after the jump.
What Is Sidechain Compression?
Sidechain compression gained infamy with the extreme pumping sounds of French house (think “Around the World” or “One More Time” by Daft Punk for well-known examples) and is now just about required of any dance or pop music, especially music using four-to-the-floor quarter-note kick drum patterns.
The technique uses the audio signal of one track to trigger a compressor (or sometimes a gate) placed on a second track so that the second track is silenced or quieted when the first track exceeds a certain dB threshold. You can think of it like the kick drum scooping out the frequencies from the compressed tracks.
Most commonly, you feed a quarter-note kick drum track into the sidechain of a compressor that attenuates the volume of a synth pad, bass or whole group of tracks when the kick drum sounds. With the right ratio set on the compressor, this can produce a subtle-to-extreme pumping sound to the music.
But more importantly, sidechain compression can be a vital mixing tool for stopping low-frequency tracks from interfering with each other in the mix and producing bass mud in the music. When sidechaining the kick drum to a compressor on a bass track using a mid-range compression ratio, you may not even realize it’s there, but will realize if it’s taken away because the articulations of the bass and kick drum will become less clear.
Sidechain Compression Setup
A lot of DAW programs these days include stock plug-in effects that include sidechain functionality built in. For example, Ableton Live 9 has six stock effects with sidechaining built in: Auto Filter, Compressor, Corpus, Gate, Glue Compressor and Multiband Dynamics. It’s pretty easy to set up sidechaining with those effects.
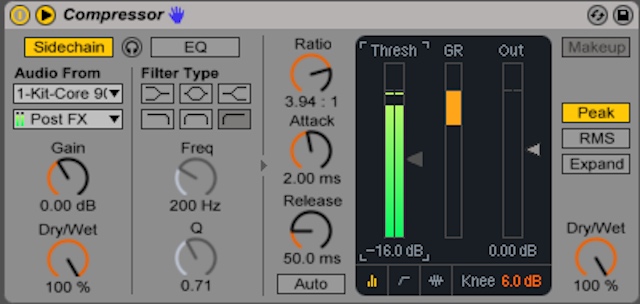
While it’s not that tough to learn to setup sidechain compression in that way, and it helps to understand how to manipulate a compressor’s controls, two of the coolest boutique plug-in developers for electronic music have crafted tools that were purpose built to perform sidechain-style compression with minimal setup and tweaking.
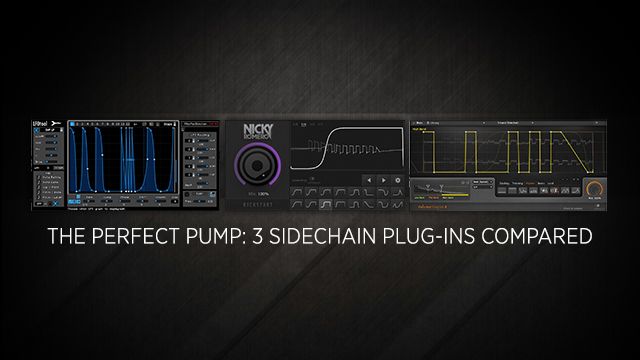
These plug-ins bypass sidechaining altogether and instead just apply rhythmic compression (or other effects) to the track, giving you the same (or better) results with less set-up. They are also more visual and intuitive to manipulate. Here are the 3 sidechain compression plugins we looked at:
- Nicky Romero Kickstart
- Cableguys VolumeShaper4
- Xfer Records LFOTool
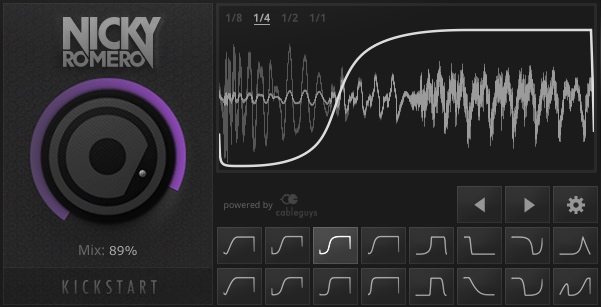
Nicky Romero Kickstart
Plug-in: Nicky Romero Kickstart
Price: $15/€10
Formats: Windows 7 or 8/Mac OS 10.8 or later, 32-/64-bit, AU/VST
Demo Conditions: Fully functional with no time limit, but limited to one instance per song and the save function is disabled.
What It Does
Drop this on a DAW track, and Kickstart immediately applies sidechain-style compression to that track. It has four timing settings (1/8 note, ¼ note, ½ note and whole note) and 16 waveshapes for choosing the timing and severity of the effect, which you’d otherwise have to dial in with compressor controls with less visual feedback. You can also shift the waveshape from left to right to alter its timing. One advanced setting lets you trigger the effect from incoming MIDI notes.
The Bottom Line
Kickstart accomplishes its goal of making pulsing, sidechain-style compression super fast to set up, with great results at a very low price. The selectable waveforms cover most of the uses you’d have for this effect in dance music, including moderate-to-extreme pumping, reverse timing and some rhythmic gating effects. You don’t get as much flexibility as with the others because the name of the game here is just fast results. Superstar producer/DJ Nicky Romero helped design it for that purpose along with Cableguys, who also make the more feature-rich VolumeShaper 4.
Audio Examples
Kickstart Classic Chain
Kickstart Subbass Chain
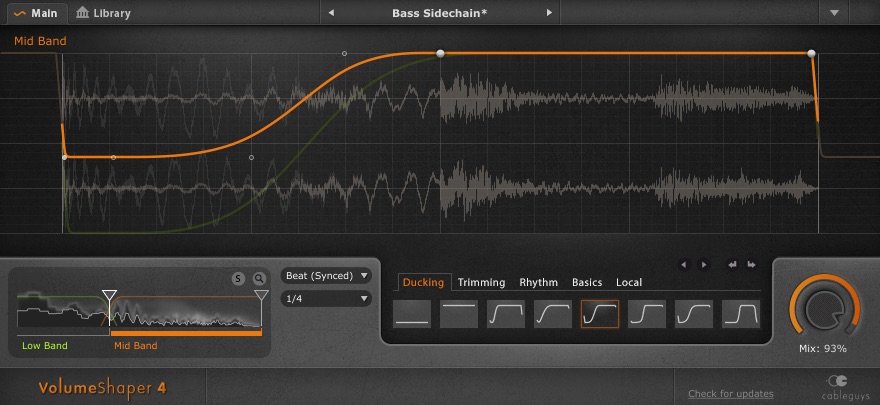
Cableguys VolumeShaper4
Plug-in: Cableguys VolumeShaper 4
Price: $40/€30
Formats: Windows 7 or 8/Mac OS 10.8 or later, 32-/64-bit, AU/VST
Demo Conditions: Fully functional with no time limit, but limited to one instance per song and the save function is disabled.
What it Does
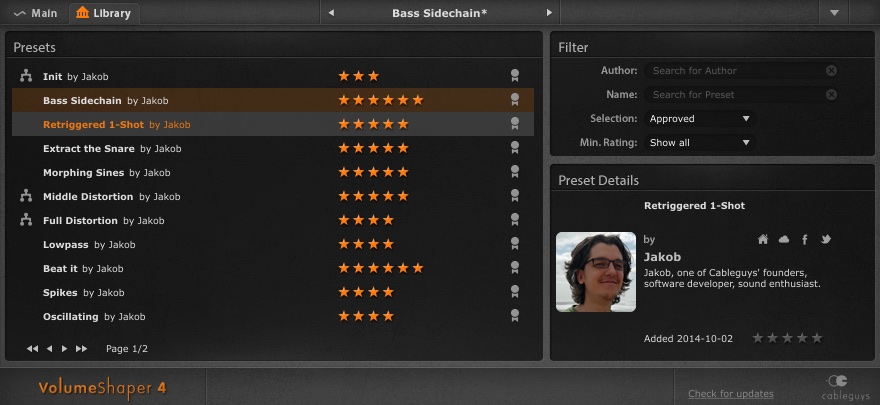
Kickstart is basically the bare-bones version of VolumeShaper 4. If you want to simply use VolumeShaper 4 for basic sidechain-style compression, you can do that using either the included presets or by quickly choosing one of the Ducking waveforms in the menu under the main wave display. However, VolumeShaper 4 lets you create and save your own waveshapes my clicking and dragging points on the grid. The points will either snap to the grid values, or you can fine-tune them by holding Shift while moving the point.
Not only that, but you can create three waves for applying to three frequency bands—low, mid and high—and set your own frequency range for those bands to cover. That’s a handy innovation, because while you could place VolumeShaper 4 on lots of individual tracks—as Madeon says he does—you could also try creating a track group containing every track you wanted to compress in it and then construct three waves within the plug-in to handle rhythmic compression for different frequency elements. Or by putting the plug-in on individual tracks, you could use the low and high bands to zero-out frequencies above and below your chosen range, while applying sidechain-style compression to the remaining mid range.
VolumeShaper 4 also has many more timing options for triggering its looped waveforms with 18 beat-synced settings, Hertz or incoming MIDI.
The Bottom Line
If you want to get creative with your sidechain compression or like the idea of treating three separate frequency bands with different waveforms, VolumeShaper 4 is worth the moderate extra cost.
Audio Examples
VolumeShaper 4 Custom 3 Band Chain
VolumeShaper 4 Tighten Beat
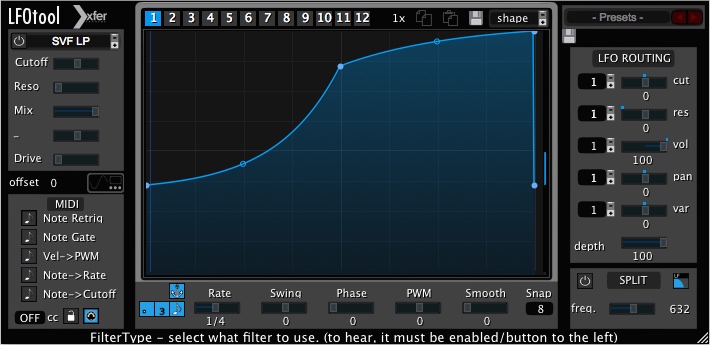
Xfer Records LFOTool
Plug-in: Xfer Records LFOTool
Price: $49.95
Formats: Windows XP or later/Mac OS 10.5 or later, 32-/64-bit, AAX/AU/VST
Demo Conditions: Limited to 15 minutes per use.
What it Does
Sidechain-style compression is just one of the tricks that LFOTool has up its sleeve. Xfer Records, creator of the beloved Serum wavetable synth plug-in, dreamed up LFOTool to apply a similar waveshape simulation of sidechain compression to vary a track’s volume, but in addition to volume, waves can also control track panning and the cutoff and resonance of one of dozens of filter types.
There are also dozens of useful presets onboard, including six Sidechain presets. The brand-new v1.5 uses the Sidechain 1 setting as it’s default, so you can be up and running right away. Of course you can save your own presets, as well as save individual waveshapes you create.
There are 12 LFO waveforms slots per setting, so you can route parameters to any LFO, and copy/paste waveforms to different slots. LFOTool gives you the most timing options for your waveforms, allowing them to repeat over a languid 16 bars to a ridiculously fast rate of less than a 1/256 note. You can also vary the LFO’s swing, phase and pulse width modulation (PWM).
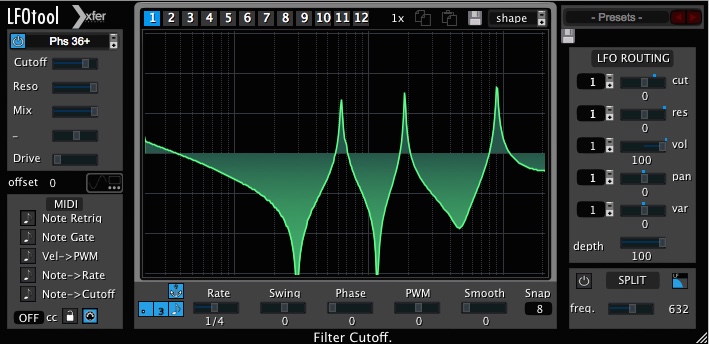
You can switch the filter off, but turning it on opens the door to some transformational sound design. Playing with the different filter types, waveshapes, LFO rates, etc. can turn some statically played synth chords into an entirely different beast. And a Split function lets you process only a high or low side of the signal, which can let you preserve the integrity of part the sound, while mangling the other. LFOTool does this all while requiring a very low CPU load.
This plug-in isn’t completely intuitive at first, but mousing over the elements of its interface brings up some brief help messages at the bottom of the window, which helps you navigate it before you learn everything it can do.
The Bottom Line
The most sonically expansive plug-in of the three here, LFOTool doesn’t have the same frequency separation or fine-tuned waveshaping for sidechain-style compression of VolumeShaper 4. But it does have plenty of potential there, so if you’d like your sidechain compression plug-in to also function as an imaginative sound-design tool that can transform your sound with filters, consider investing in LFOTool.
Audio Examples
LFOTool Filter Pan Sidechain
LFOTool Sidechain 4
–Markkus Rovito
Do you use the stock compressor or a third party compressor?
Let us know in the comments below!