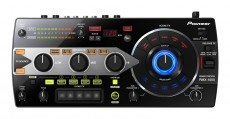
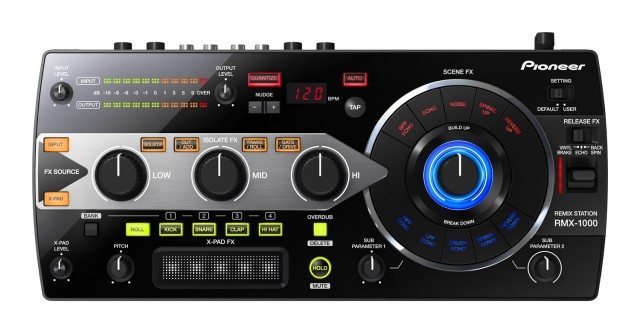
In a world of computers and controllers, Pioneer has stayed fast by their postion that dedicated hardware still has a major place in the DJ landscape. The RMX-1000 is no different, providing controllerism-style effects and remixing in a single dedicated FX unit that relies on excellent beat detection to keep it in time with any music source. How does it fare? Let’s take a look.
Reviewed: Pioneer RMX-1000 Effects Unit
Price: $799 street
Communication: Audio in and out
Available: Soon
Ships with: Remixbox (TM), RMX-1000 Plugin
Weight: 2.86 lbs
Dimensions: 13.14″ W x 6.18″ D x 2.24″ H
THE GOOD:
The beat detection algorithm and syncing is quite impressive for electronic music. Pioneer’s three stage workflow of shaping, building, and then killing effects is intuitive and very effective in producing good sounding results. The overall tones and creativity of the effects is excellent with a wide range of unique sounds.
THE BAD:
The unit should come with more drum sounds and samples built in (we did have a pre-production unit, which might not be typical). The beat area was highly addictive but there is a lot of room for improvement as a live drumming instrument. At $799 it’s a tough price pill to swallow for just effects – especially with so much effects diversity into Ableton and Traktor these days.
THE BOTTOM LINE:
Even though they may be one of the biggest dj manufacturer in the world, Pioneer actually does some pretty innovative things in their hardware. From multi banded cross fading to sound color – the “industry standard” hardware is armed with some surprisingly fun performance features. The RMX is no different. They have really stepped up their game here creating a traktor/controllerist style dj interface for djs that are using any source of music.
SOUND INTEGRATION

There are three ways we might suggest you would work this into a DJ setup:
1. Send and return via mixer
The most logical use for this device is as a send and return FX unit that affects the master channel of all audio sources. With most mixers you can easily route the send, return to indidual tracks in order to isolate the results. This is how we tested the unit, and it worked well.
2. Master output from controller or sound card
If mixing internally in DJ software, you could easily route the output of your controller or sound card to the input of the RMX, and then send that output to speakers or a mixer. The RMX would then be your final master stage affecting all tracks at the same time.
3. Input from a deck source and back out onto a single mixer channel
Since the beats are really a sound source of their own, you may want to use a AUX send on a controller or mixer and then route the RMX back in on a dedicated line allowing you to blend in the beats or effects in a more effective wet/dry manner. Since they can be overpowering at times, it would be handy to have an easy blend that builds them in or out of the mix. Elements could be grabbed and essentially “saved” and mixed into the decks even after you have loaded a new song.
BUILT IN RHYTHMS

The RMX-1000 boasts an internal sample playback section with four banks and four voices per bank. These are polyphonic, so you can play them at the same time. There is an overdub which – while primitive – does allow you to record your patterns and loop them. This rhythm section can be quantized to the master tempo and beat phase (determined automatically by beat detection) making it easy to tap out some decent beats without practicing like Jeremy Ellis.
With pitch control and independent volume level, everyone at the DJTT office that played with the unit ended up jamming on this section the most. It was disappointing that there was only one bank of sounds that shipped with the RMX, but you can load your own via a built-in SD-card slot. Here LaidBack Luke uses some custom loaded samples in a Pioneer promo video:
AUTO BEAT DETECTION
In Traktor and Ableton we have the benefit of knowing exactly what BPM a song is and where it’s beats are within the tiniest of fraction. This allows effects and beat fills to be timed perfectly to every song- every time. Sometimes I take it for granted how well the beatgrid system is until I try to perform a beat roll on a CDJ-1000. Without some really smart audio technology – hardware will always have a hard time beating software with beat detection and beat grids.
That being said, the RMX-1000 gets REMARKABLY close. They have 2 easy to use features that make syncing affects to any audio source (like turntables or CDJ’s) a breeze.
- 1 – Auto Tempo detection, which in combination with tap works REALLY well. I was surprised how accurate it go the BPM and the phase of the beat
- 2 – Nudge. If the phase of the beat rolls is off, just nudge the RMX-1000 just like a tempo match and it will be in time.
With these features it was easy to reliably get a rhythm rolling in time with a song or play drums along with any track.
SHAPING ISOLATORS

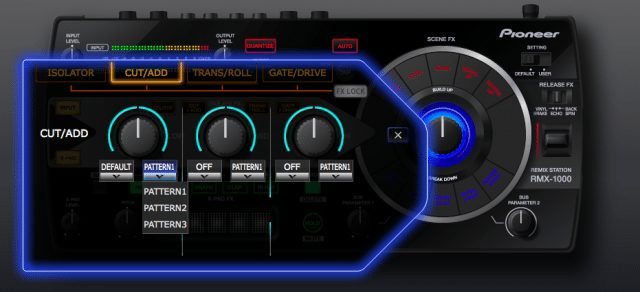
This section was a great hybrid of old school EQ isolation with modern tempo based effects. The CUT/ADD feature cuts the frequency to the left, but adds an echo to the right. Watch the walkthrough video below for a demo of each of the Isolate FX sounds. We loved that you can select the input of this section, either the inbound music or the X-PAD beat section.

The big, old-school isolators are great and really fun to play with. Pioneer ups the game by doubling EQ and FX on one knob with the CUT/ADD and 2 other combo effects. While the sound of the second two was not to my personal taste, you can customize how the effects sound using the free RemixBox software. The parameters you can adjust are fairly limited but it does allow anyone to load their own personal “presets” on an SD card and update any RMX unit with those parameters. It would be nice to change out the effects, especially on this isolate FX section, but the software only supports tweaking their values for now.
CORE DJ EFFECTS

The isolators lead to the main focus of the RMX, its sound shaping effects. These are selected by the ten presets around the central knob, which controls wet/dry and fades in each effect. There are two sub-parameters shown above, which can be used to tweak each effect’s sound. The ten effects were interesting, and while I found myself missing a beat repeat (this is intended to be done in the FX pad section, which doubles as a non-obvious beat repeat area and sample player), most of the effects you would expect from a Pioneer unit are present.
The only work that could be done here is in tuning the wet/dry knob. It didn’t seem to blend the effects in and out as well as we’re used to with Traktor’s effects, and could be sweetened up a little bit. Personally, I would make it a wet/dry macro knob that both altered the effect, turned it on, and balanced the wet/dry all in a single sweep.
That being said, these are some wild sounds that provide epic build ups and drama out of almost anything.
ALL STOP!

This is my favorite part of the unit, and the most clever from a workflow perspective. The large toggle switch on the right can be pressed down to engage the selected “Release Effect”, kill the music and upon release: turn everything back to normal. The unit is basically set up to create the following musical workflow:
- Start to shape the sound with the isolator
- Add a shaping effect to create a build up
- At the end of the phrase, kick in the release effect for a big moment
- Then release on the one and the music is back in without any effects
it works really well and with a little practice is easy to get good results. There are three hold and release style effects:
- Vinyl Brake. Sounds like: Hitting stop on a record
- Echo: Sounds like: Our popular echo freeze trick
- Back Spin: Sounds like: A vinyl backspin.
Finally, since DJ effects are so popular in music production these days, Pioneer provides the RMX-1000 as a VST/AU plug-in for your DAW software. Since the RMX works as a MIDI controller when connected to the computer via USB, we presume you could use it to create DJ style effects in your songs and then edit the results at will!
VIDEO WALKTHROUGH
Because this is an effects unit, a review only in writing seemed out of place, so I recorded a short walkthrough of the unit to demonstrate each section’s sound.


