


Download the Midi Fighter Utility

MIDI FIGHTER TWISTER
Midi Fighter Twister User Guide (PDF): everything you need to know about configuring and mapping your Midi Fighter Twister.

TRAKTOR
- Download the Midi Fighter Utility, it is an essential tool for configuring and updating your Midi Fighter
- Midi Fighter Utility OSX – 10.7 or newer
- Midi Fighter Utility Windows – Vista 32/64 or newer
- Plug in your Midi Fighter Twister via USB (not to a USB hub) and follow the onscreen instructions on the utility.
- Once the firmware is up to date you need to download one of the mappings available here
- Import your mapping.
- If you are using only one controller, click the big “Import” button in the Preferences menu (“Import” is between “Export” and “Setup Wizard”) and check all available boxes under “Select Categories to Import”
- If you are using your Midi Fighter Twister with another controller read this article importing multiple TSI files
- Go to Preferences > Controller Manager and select the Midi Fighter mapping in the “Device” drop-down menu. There may be more than one. Select one line at a time and set the “In Ports” and “Out Ports” to your Midi Fighter Twister.
- If your effects aren’t working correctly, then you need to import the effects settings a second time (this is a well-known issue with Traktor mappings). Use the same big “Import” button. Import the .TSI file again and only check “Effects Settings” when the “Select Categories to Import” screen appears.
Traktor Sequencer guides:

ABLETON
- Download the Midi Fighter Utility, it is an essential tool for configuring and updating your Midi Fighter
- Midi Fighter Utility OSX – 10.7 or newer
- Midi Fighter Utility Windows – Vista 32/64 or newer
- Plug in your Midi Fighter Twister via USB (not to a USB hub) and follow the onscreen instructions on the utility.
- Open Ableton Live
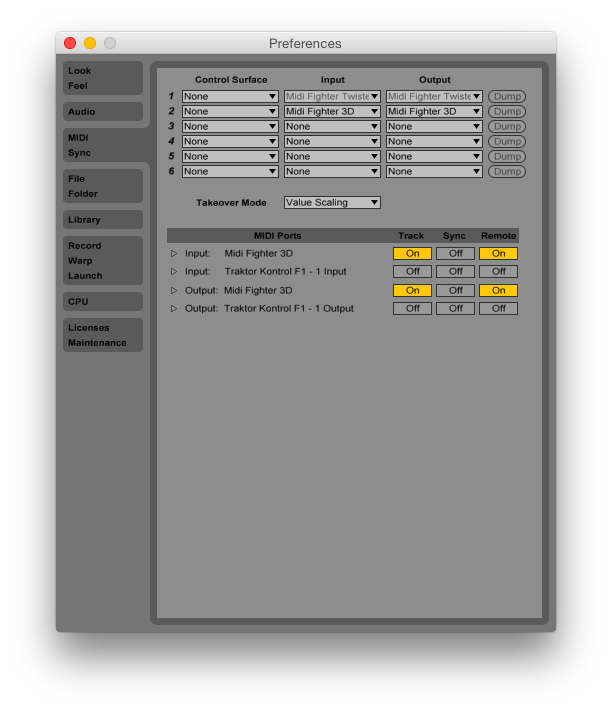
- Go to Preferences > Midi/Sync
- Go to the Midi Ports section and turn Remote on for the input and output of the Midi Fighter. You will also need to turn Track and Sync of the Midi Fighter to be able to use the sequencer. More information about what this means
- Learn more about MIDI mapping your controls

MIDI FIGHTER SPECTRA
Midi Fighter Spectra User Guide (PDF): everything you need to know about configuring and mapping your Midi Fighter Spectra.
TRAKTOR
- Here is a quick guide to get started:
- If you want to use your Midi Fighter Spectra with Traktor’s Remix Decks, read this guide:
ABLETON
- Download the Midi Fighter Utility, it is an essential tool for configuring and updating your Midi Fighter
- Midi Fighter Utility OSX – 10.7 or newer
- Midi Fighter Utility Windows – Vista 32/64 or newer
- Plug in your Midi Fighter Spectra via USB (not to a USB hub) and follow the onscreen instructions on the utility.
- Make sure your Midi Fighter is in “Ableton Mode” in the Utility. Find out what Ableton and Traktor mode mean in the Midi Fighter Utility
- Open Ableton Live (If you are using Windows ensure the MF Utility and any other MIDI related software is closed before opening Ableton).
- Go to Preferences > Midi/Sync
- Go to the Midi Ports section and turn REMOTE on for the input and output of the Midi Fighter. You will also need to turn TRACK on for the input and output of the Midi Fighter if you wish to use yours for finger drumming as seen here. More information about what this means is available in this article.
- Learn more about MIDI mapping your controls
- If you want to launch clips in Ableton with your Midi Fighter Spectra, download the Spectra Clip Launcher Script
- If you are using a Mad Zach Sound Pack:
- Quit Live
- Double click the live pack
- Select the destination to save the file
- Find the file you saved and open it in Live
MIDI FIGHTER 64
Midi Fighter 64 User Guide (PDF): everything you need to know about configuring and mapping your Midi Fighter 64.
ABLETON
- Download the Midi Fighter Utility, it is an essential tool for configuring and updating your Midi Fighter
- Midi Fighter Utility OSX – 10.7 or newer
- Midi Fighter Utility Windows – Vista 32/64 or newer
- Plug in your Midi Fighter 64 via USB (not to a USB hub) and follow the onscreen instructions on the utility.
- If you need to map your unit to something else than a Drum Rack make sure “Notes+CCs” is selected as MIDI Type in the MF Utility.
- Open Ableton Live (If you are using Windows ensure the MF Utility and any other MIDI related software is closed before opening Ableton)
- Go to Preferences > MIDI/Link
- Go to the Midi Ports section and turn REMOTE on for the input and output of the Midi Fighter. You will also need to turn TRACK on for the input and output of the Midi Fighter if you wish to use yours for finger drumming as seen here. More information about what this means is available in this article.
- Learn more about MIDI mapping your controls
- If you are using a Mad Zach Sound Pack we made a great video to show how to easily set them up on Ableton available here.
TRAKTOR
- Download the Midi Fighter Utility, it is an essential tool for configuring and updating your Midi Fighter
- Midi Fighter Utility OSX – 10.7 or newer
- Midi Fighter Utility Windows – Vista 32/64 or newer
- Plug in your Midi Fighter 64 via USB (not to a USB hub) and follow the onscreen instructions on the utility.
- Make sure your Midi Fighter is in “Notes” in the Utility.
- Once you have the firmware up to date you need to map the unit or find a mapping for it. You can find MF64 mappings by following this link
- Import your mapping
- If you are using only one controller click the big import button in the preferences menu between export and setup wizard and check all available boxes under “select categories to import”
- If you are using your Midi Fighter with another controller read this article on how to import multiple TSI files
- Go to Preferences > Controller Manager and select the Midi Fighter mapping in the Device drop down menu. There may be more than one. Select one line at a time and set the in and out ports to your Midi Fighter.
- If your effects aren’t working correctly then you need to import the effects settings again. Use the big import button between export and set up wizard in the preferences menu under controller manager. Import the *.tsi file again and only check “effects settings” under “select categories to import”.

MIDI FIGHTER 3D
Midi Fighter 3D User Guide (PDF): everything you need to know about configuring and mapping your Midi Fighter 3D.
TRAKTOR
- Download the Midi Fighter Utility, it is an essential tool for configuring and updating your Midi Fighter
- Midi Fighter Utility OSX – 10.7 or newer
- Midi Fighter Utility Windows – Vista 32/64 or newer
- Plug in your Midi Fighter 3D via USB (not to a USB hub) and follow the onscreen instructions on the utility.
- Make sure your Midi Fighter is in “Traktor Mode” in the Utility. Find out what Ableton and Traktor mode mean in the Midi Fighter Utility
- Once you have the firmware up to date you need to download a mapping. Here are the mappings
- Import your mapping.
- If you are using only one controller click the big import button in the preferences menu between export and setup wizard and check all available boxes under “select categories to import”
- If you are using your Midi Fighter with another controller read this article on how to import multiple TSI files
- Go to Preferences > Controller Manager and select the Midi Fighter mapping in the Device drop down menu. There may be more than one. Select one line at a time and set the in and out ports to your Midi Fighter.
- If your effects aren’t working correctly then you need to import the effects settings again. Use the big import button between export and set up wizard in the preferences menu under controller manager. Import the *.tsi file again and only check “effects settings” under “select categories to import”
If you want to use your Midi Fighter 3D in Remix Deck Mode, please see the Remix Deck Mode Guide
ABLETON
- Download the Midi Fighter Utility, it is an essential tool for configuring and updating your Midi Fighter
- Midi Fighter Utility OSX – 10.7 or newer
- Midi Fighter Utility Windows – Vista 32/64 or newer
- Plug in your Midi Fighter 3D via USB (not to a USB hub) and follow the onscreen instructions on the utility.
- Make sure your Midi Fighter is in “Ableton Mode” in the Utility. Find out what Ableton and Traktor mode mean in the Midi Fighter Utility
- Open Ableton Live (If you are using Windows ensure the MF Utility and any other MIDI related software is closed before opening Ableton)
- Go to Preferences > MIDI/Link
- Go to the Midi Ports section and turn REMOTE on for the input and output of the Midi Fighter. You will also need to turn TRACK on for the input and output of the Midi Fighter if you wish to use yours for finger drumming as seen here. More information about what this means is available in this article.
- Learn more about MIDI mapping your controls
- If you want to launch clips in Ableton with your Midi Fighter 3D, download the Midi Fighter 3D Launcher Script.
- If you are using a Mad Zach Sound Pack we made a great video to show how to easily set them up on Ableton available here.
MIDI FIGHTER PRO
TRAKTOR
- Download the Midi Fighter Utility, it is an essential tool for configuring and updating your Midi Fighter
- Midi Fighter Utility OSX – 10.7 or newer
- Midi Fighter Utility Windows – Vista 32/64 or newer
- Plug in your Midi Fighter Pro via USB (not to a USB hub) and follow the onscreen instructions on the utility
- Make sure your Midi Fighter is in “Traktor Mode” in the utility. (What does Ableton and Traktor mode mean?)
- Once you have the firmware up to date you need to download a mapping. Here are the mappings
- Import your mapping.
- If you are using only one controller click the big import button in the preferences menu between export and setup wizard and check all available boxes under “select categories to import”
- If you are using your Midi Fighter with another controller read this article on how to import multiple TSI files
- Go to Preferences > Controller Manager and select the Midi Fighter mapping in the Device drop down menu. There may be more than one, select one line at a time and set the in and out ports to your Midi Fighter.
- If your effects aren’t working correctly then you need to import the effects settings again. Use the big import button between export and set up wizard in the preferences menu under controller manager. Import the *.tsi file again and only check “effects settings” under “select categories to import”.
ABLETON
- Download the Midi Fighter Utility, it is an essential tool for configuring and updating your Midi Fighter
- Midi Fighter Utility OSX – 10.7 or newer
- Midi Fighter Utility Windows – Vista 32/64 or newer
- Plug in your Midi Fighter Pro via USB (not to a USB hub) and follow the onscreen instructions on the utility.
- Make sure your Midi Fighter is in “Ableton Mode” in the Utility. Find out what Ableton and Traktor mode mean in the Midi Fighter Utility
- Open Ableton Live
- Go to Preferences > Midi/Sync
- Go to the Midi Ports section and turn remote on for the input and output of the Midi Fighter. You will also need to turn track on for the input and output of the Midi Fighter. More information about what this means
- Learn more about midi mapping your controls
- If you are using a Mad Zach Sound Pack:
- Quit Live
- Double click the live pack
- Select the destination to save the file
- Find the file you saved and open it in Live
- Download the Midi Fighter Utility, it is an essential tool for configuring and updating your Midi Fighter
Other Useful Information And Resources
- How to make remix deck sets with Traktor
- How to build remix decks in your sets
- Find out what Ableton and Traktor mode mean in the Midi Fighter Utility
- Ean discusses an easy way to remix songs on the fly in DJ sets
- Get some tips on your first controllerism routine
Please visit our support page for technical and order support, or check out our forums to join the thriving community discussion.