In the light of Bento San’s excellent Mapulator patch for Max for Live, many of you will be looking just that little bit harder at Ableton Live and what it can do for you. If your interest was piqued but you’re not quite ready to take the plunge into Max for Live yet, today’s article will be right up your street as we take a look at how Live’s audio effects rack can be used powerfully and how to add randomization to an Ableton DJ set.
IMPERFECT SOLUTION
One thing to clear up before we even start: Live out of the box can’t match Mapulator’s capabilities for a few key reasons:
- Live can’t assign a MIDI mapping to just part of a controller’s range of values
- Live can only create a linear curve for mapping purposes
- Live can’t mix and match MIDI randomization and audio tracks
Live does have a decent amount of potential when it comes to MIDI mapping, though; the secret is the audio effects rack.
RACK UP THOSE EFFECTS!
Ableton’s audio effects rack is a way to stack a collection of effects, which can not only be saved for later but also control the effects and how they interact via powerful macro knobs. The most powerful function of the effects rack is the ability to set up ‘chains’, which are separate banks of effects that can be split and stacked into zones across a 0-127 range – this allows them to be switched on and off as a control is taken through its range of motion. Using this technique we can approximate, albeit somewhat less elegantly, the way that Mapulator can have different effects values in different positions of a control range.
CHAIN GANG
It’s a shame that the audio effects chains can’t have automation for controls stored in them, that’s the thing that would be really needed for one of the important concepts of Mapulator to ‘come as stock. Whilst we can’t do anything about that, we can still have some fun with our effects racks by setting chains up that contain a variety of different effects, or even the same effects with different parameters to give us an approximation of the kind of automation Bento San created.
For every effect (or group of effects) that you add into an effects rack, a chain is created. You can move around these chains anywhere along a 0-127 range so that they’re enabled at various points of a MIDI control. There are a couple of things to note about chains, though:
- Set up an empty chain if you want to have a dry signal at any point, or no audio will play.
- Audio is sent to every chain, so if you have multiple effects chains active at once you’ll end up with a loud signal. Adjust the volumes of each chain or their crossfade, which is done with the line above the main chain.
There are a couple of ways we can move through the effects chains, but first we need to use the macro mapper to attach the chain selector to a macro control by right clicking the selector slider and assigning it to a macro knob like so: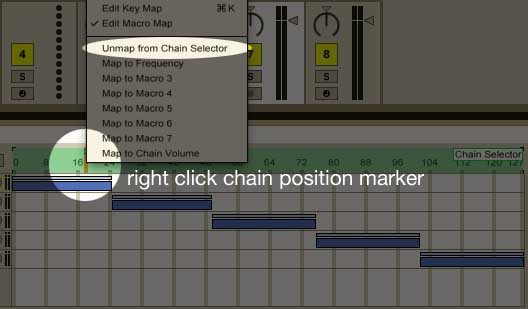
Once that’s done, we can use Live’s MIDI mapper to attach that chain selector to a control we want. A knob or slider is an obvious choice, but we can also use a range of keys to give us instant access to specific points in the chain range by pressing the lowest and highest key we want to use. This is handy for, say, setting up eight discrete points in a chain and assigning a key, or button, to instantly jump to each effect.
LET’S GET RANDOM
Now we’ve got a saveable effects bank that we can use individually or have a superknob ready to skip through available sounds. If we go one step further and think outside the box for a second, we can do something even cooler. MidiPipe and MIDI OX (one for Mac and one for PC, both free) both let you randomise controls. Instead of getting a smooth movement from 0-127, turning a knob, sliding a fader or pressing a key gives you a different value every time.
If we set up MidiPipe to randomise a key, we can use just a single key to jump to a random point in the chain range for completely unpredictable effects every time you press a single key. Combine this with a knob that adjusts all the effects at once, from subtle to monstrous, and we get an amazing random effects button that, despite not being totally sure what’s going to come out, we’re in total control of the strength of.
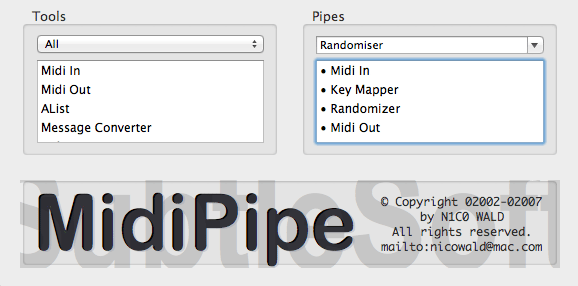
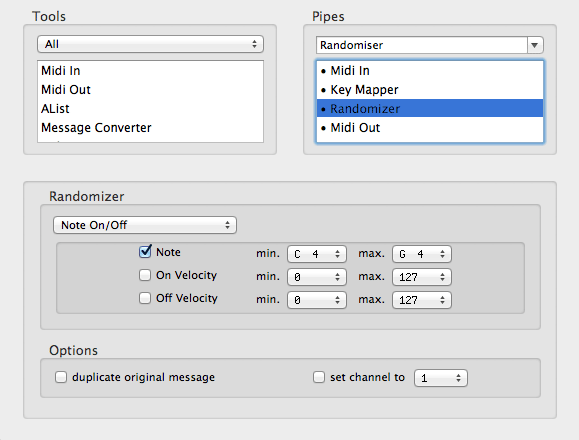
This is really simple to do too, and just needs two commands. I’m going to use MidiPipe as an example:
As you can see, all we need to do is set up a key mapper to grab a key, and then a randomiser to turn that key into a random choice of a select number of keys. Here are a few key points to remember:
- It’s important to ensure that we only randomise a specific key, or else we’ll ruin the rest of our mapping! To do this, we ‘solo’ the input key in the key mapper.
- Rather than setting MidiPipe/Midi OX to ‘hijack’ the MIDI port we’re using, we need to set it to just work alongside its normal operation, allowing it to intercept the command but at the same time let everything else through.
- Set up the buttons you’re assigning to your random input in Live first! (unless sitting through a completely random number of button presses until you get to the right one is your idea of a good time.)
THE END RESULT
There you have it, a primer on Live’s Effect Racks, and a crafty look at how to go outside the box (for free) and create a little random excitement. Before we go though, have a couple of freebies on me: an effects rack with a chain already set up and waiting for you to map however you like, and a MidiPipe file that will give you the basic idea of the randomisation technique in case anything’s not clear.
Download Live Effects Rack
- Starts off 100% dry
- Moves into Erosion distortion
- Blends with Reverb
- Switches to Phaser
- Blends with Beat Repeat
- Filter Delay blends in
- Finishes on huge Reverb
Download MidiPipe Randomiser
- Set the MIDI in/out to your controller
- Grabs C4
- Turns C4 into any note from C4 to G4


