Some DJs would prefer to not hear this, but sync exists. In fact, while it may be new to some people (Scratch Live users), the technology has been around for years. Sure, plenty of DJs eschew it, but for those who don’t, it’s important to have the resources and knowledge to use it properly. In this piece, you’ll learn how to set beatgrids and use Simple and Smart Sync in Serato DJ.Serato have had a sync option in their software ever since Itch launched back in 2008, but that has been kept out of their DVS software, Scratch Live (SL), until now; with SL being retired in favor of Serato DJ (SDJ), a platform that combines DVS and controller support in one program, sync has come along with it.
SDJ’s sync implementation is very different from, say, Traktor’s. As is often the case in the software world, it wins out in some areas, and loses in others. But whether you’re new to sync altogether, or coming from a different platform, this is the stuff you need to know.
LOOKING FOR THE PERFECT BEATGRID
Beatgrids aren’t just about sync. Without beatgrids present, SDJ will default to its own transient detection for autoloops, quantizing, and synced visual effects in Serato Video (and Inklen’s MixEmergency plug-in). While that automatic detection is largely reliable, it’s not 100% accurate, and using beatgrids allows you to correct any mistakes manually.
So whether you intend to use sync or not, I wholeheartedly recommend you check Set Beatgrid when analyzing files in offline mode. And, again, even if you’re not planning to use it, have Simple Sync and Snap To Beatgrid enabled. You don’t have to actually turn sync on, but that will ensure your grids are displayed, and you can edit incorrect ones, either in prep or on the fly, while playing.
FOUR TO THE FLOOR

Serato’s beatgrids are all about bars. Whereas Traktor’s grids are simply about beats, and care not for bar structure, the grids in SDJ rely on the first red downbeat marker being set on the first beat of a four-beat bar in order to be correct. Most of the time it will get that right, but sometimes, especially if a track has a weird intro or a drop at the start, it will be off. (Note: In their latest manuals, Serato has started calling them “warp”—instead of “downbeat”—markers. I’m going to stick to their original terminology, as it makes more sense to me.)
My preferred method for editing grids is via the computer keyboard. A lot of SDJ equipment offers the ability to edit grids via the hardware, but using the keyboard is consistent, whatever kit you’re using, and I find it quick and intuitive.
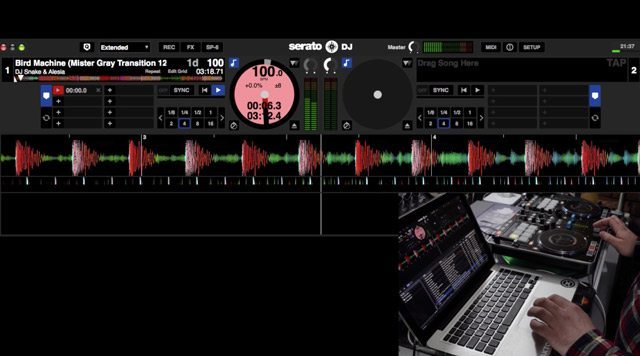
Once you’ve loaded a track with a beatgrid, the first thing to do is make sure that the first downbeat marker is in the right place. If it hasn’t been detected correctly, Alt + Space will get you into grid-edit mode. Then hit Delete to clear the existing grid, move the playhead to the beginning of the first downbeat, and hit X to set a new one and start the grid from there.
FUNKY DRUMMER

With quantized material, that will often be enough to lock the grid town tight. Usually, I’ll just skip along to the last four bars of a track, and check if the numbered grid lines (the start of a bar) are still on point. If not, dropping another downbeat marker should do the trick. Where you have tracks like old funk or disco tunes, which have live drumming and aren’t rigidly quantized, things get a little more tricky. But Serato’s gridding system is very flexible, and will allow you to grid the most funky of grooves with a little work.
The key to gridding such material is using those downbeat markers—scrub your way through the track, and as the tempo wavers, drop another one. You’ll notice the BPM displayed on the deck will change as you do so, although the software is only capable of showing a single BPM in the library itself. As I demonstrate in the video, it’s possible to even grid transition tracks, with a deliberate massive tempo change, using this method.

A word of warning: If you are using Smart Sync, and you’ve gridded a track with a fluctuating BPM, playing it back while synced to another deck will keep the tempo quantized rigidly to that other deck. There’s an argument to be made that in doing so you’ll kill the vibe of the track by removing the original swing in the recording. If you play a lot of that kind of music, you might wish to just grid the first and last few bars tightly, leaving the bulk of the track to its own devices. That will mean you can achieve a super-slick mix in and out, but the track will retain its essential funkiness.
Another thing to keep in mind is that not every track retains a strict 4/4 bar pattern throughout. Sometimes a producer will add an extra couple of beats before a drop, or something similar, and that can throw the gridding right off. No need to panic, though—if that happens twice in a track, then you’ve actually got a whole bar’s worth, and by the outro, all will be well again. If that’s not the case, though, a workaround is to choose a point a few bars before that drop (I like at least 16), set a downbeat there, then drop your next downbeat marker immediately after the extra beats. That means you’ll have 16 bars during which the grid will be off, but it will be back in place correctly for the more important mix-out points.
THAT SYNCING FEELING
If you do wish to explore the sync functionality in SDJ, then it’s important to understand the two different modes. Simple Sync is the equivalent to tempo sync in Traktor. It will match the BPM of a deck to that of the tempo master. In SDJ, the software will automatically designate the tempo master deck.
You can have SDJ sync the tempo automatically on loading a track, or not—there’s a checkbox in the preferences. If you only plan on using sync occasionally, it’s best to leave that unchecked, rather that having to constantly hit Shift + Sync on your controller to disable it.
The Snap To Beatgrid option (also in the preferences) is worth leaving checked, though. Not only will that ensure your beatgrids are shown, but if you hit sync during playback, the playhead will jump and the grid will sync up with the master deck. That’s especially useful when using sync on DVS, where a dodgy needle or bouncing stage can throw your mix off.
AS THE TABLES TURN…

Speaking of which, a large portion of the Serato user community went wild when it was announced that the ongoing development of the company’s DVS software would include sync. That’s understandable—for a lot of DJs, there was still some cache in being able to say, “I use Serato. No sync button for me.”
Those people might be pleased to hear that the implementation of sync when playing with timecode vinyl in SDJ is really not going to be much of a threat to their skills. There’s no Smart Sync—as per Traktor Scratch, where the equivalent, Grid Sync, is unavailable with DVS. However, in Traktor, although the grids aren’t synced, the sync engine takes into account the wow and flutter of a vinyl deck. So, as the timecode on deck A plays, the BPM will fluctuate a little—not loads, if you’ve calibrated correctly, but still up and down a few tenths of a BPM. In Traktor, the BPM for deck B will be constantly adjusted to match that of deck A. That’s why you see DJs like Craze and A-Trak doing long mixes without headphones, and also without looking at their laptop screens.
In SDJ, that on-the-fly adjustment doesn’t happen. So deck A will match the BPM of deck B when it’s loaded, or at the precise moment you hit the sync button, but almost immediately, the fluctuations of the decks will mean that the tracks will drift. That means that you’ll need to be working in the traditional manner, nudging the pitch of the decks and keeping them in time. Anybody who thinks they’ll be able to use sync with turntables in SDJ without needing beat-matching skills is in for a shock. It’s even the same with spinning platter controllers (the NS7, the V7). That fluctuation means drift will happen sooner rather than later.
GET SMART

All that is in stark contrast to Smart Sync, which is available with all-in-one controllers in SDJ. Smart Sync is the full-on, super-tight option for synchronizing multiple decks together, not only in BPM, but also to their beatgrids. And, if those grids are correct, it really works. You can load up two, three, or four tracks, set them running, and they’ll stay locked in time until they end.
It’s not without its own quirks; the software is very quick to take itself out of Smart Sync and back into Simple Sync. If you’re the kind of person who used to play on CDJs, and does the cue-cue-cue-cue-play technique when dropping in a track, you’ll find that as soon as you hit that cue button, Smart Sync is deactivated. You’ll have to get used to doing cue-cue-cue-sync-play instead, if you want to have Smart Sync active when the track starts playing. Similarly, jumping to a different cue point in the track, even with Quantize enabled, will take it out of Smart Sync. This might not be the end of the world, but it’s a pain, especially if you’re wanting to take advantage of what Smart Sync can do—like the ability to change the BPM of multiple decks at once while synched. You’ll need to keep an eye on the screen to ensure none of the sync buttons has gone yellow (Simple Sync).
WRAP UP

Even if sync is of zero interest to you, beatgrids are still worth checking out in Serato DJ. They can be very handy, and can help make other aspects of your mix (besides beat-matching) far cleaner and tighter. During the Scratch Live days, there was a sizable contingent of users who had Ableton Bridge installed, not intending to use it but simply to get access to beatgrids. So do experiment, and if you’ve got any gridding tips for us, please share them in the comments below.


