Want to sequence Serato DJ’s sampler? A Roland DJ-808/505 controller is the easiest solution, but for anyone with a copy of Ableton Live and a MIDI controller,DJTT contributing writer Teo Tormo made a tutorial on how to set up an easy sequencing solution using the power of virtual MIDI devices.
Although Traktor and Rekordbox have integrated simple sequencers for their sample players, Serato DJ unfortunately still lacks that feature. However, since the software allows you to map the sampler’s trigger functions, it’s a problem easily solved. Plus, With the help of the Ableton Link protocol, DJs can launch perfectly synced rhythmic sequences, mix them with the tracks in the decks, and also record sequences in real-time during a session.
To make it all happen, in this tutorial we’ll use Ableton Live together with Serato. I chose Live as it is so commonly used, but it can also be done with other “clip launching” based DAWs (like Bittwig or ModStep on iOS).
When finished with this tutorial, you’ll be able to do something like this (or much better):
Why Sequence Serato’s Sampler Instead Of Using Ableton?
There are a few reasons:
- Use the Serato DJ FX banks with the sampler – these effects are much more DJ and club-oriented than those in Live.
- You’d need an extra audio interface for Ableton Live, and integrate in your Serato setup a way to mix the sound that comes from Live.
- The Serato sampler can also be used with loops, and it makes use of the Pitch’n Time expansion, easily one of the best timestretching algorithms around.
- If you have an organized library of samples built for Serato DJ, you don’t need to move that library to Live.
Things You’ll Need
I have made this tutorial using the following software and hardware tools:
- Serato DJ – latest version (v1.9.5 at time of writing)
- Ableton Live – I used Live 9.7.5 – use the Ableton Live demo if you just want to try.
- A MIDI controller with at least 8 pads or keys. I used my Akai MPC Element.
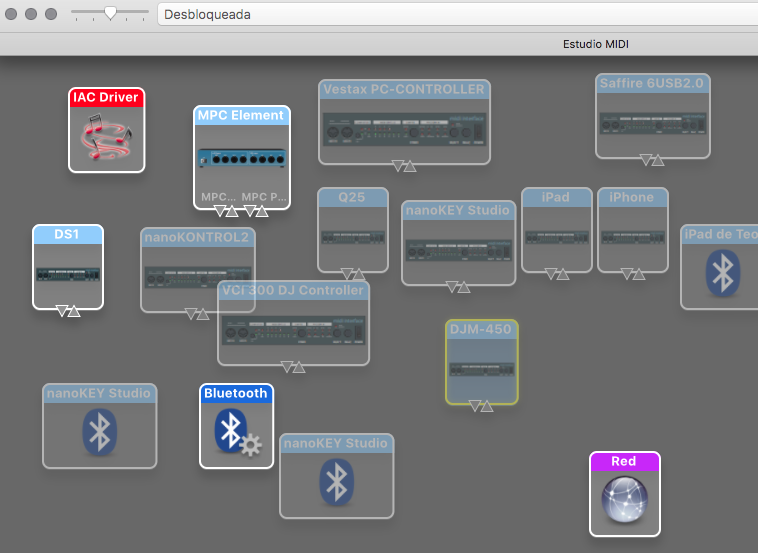
- A virtual MIDI port for transferring MIDI data between Serato DJ and Ableton Live. If using a Mac, you’re covered because you can use the integrated virtual MIDI port of macOS (IAC is the default name of that virtual port). If you’ve never used this virtual port, you’ll have to enable it – go to Applications > Utilities > Audio/MIDI Setup, open the app and in the MIDI Studio window, double-click on the IAC icon. Hit the “Enabled” option, and you’re done.
- Using Windows? You can download and install LoopBe1, a freeware virtual MIDI port software. It does not need any configuration after installation.
- Some electronic percussion samples. If you don’t have any you can download this Loopmasters free sample pack from the Serato website.
Preparing Ableton Live
First, you’ll need to create a Live project for sequencing the Serato DJ sampler. Open Ableton Live, and create a new project with File > New Live Set.
The project needs at least one empty MIDI track, if your default project does not have one, click on Create > Insert MIDI Track. You can rename the track to something like “Serato Sampler Beats” if you like (just right-click to rename).
Now, go to the Live devices on the left, click on Drums, and from the column on the right drag an empty Drum Rack (the first device) to the MIDI track.
Plug your controller in and go to Preferences > Link MIDI. Make sure the controller appears in the “MIDI Ports” input list, if it’s there check YES in the “Track” column.
On the MIDI track, we’ll now check which notes your controller sends. This might be obvious if you’re using a common MIDI keyboard, but less so for other controllers. Go to the MIDI track, and in the “MIDI From” drop-down menu, select your MIDI controller, click on the name of the track, and watch the Drum Rack plugin while you press the pads/keys of your controller. The notes of every trigger will light up in green in the left side of the Drum Rack.
After that, in the Live devices list click on Instruments, and drag an External Instrument to every trigger of the drum rack that your controller uses.
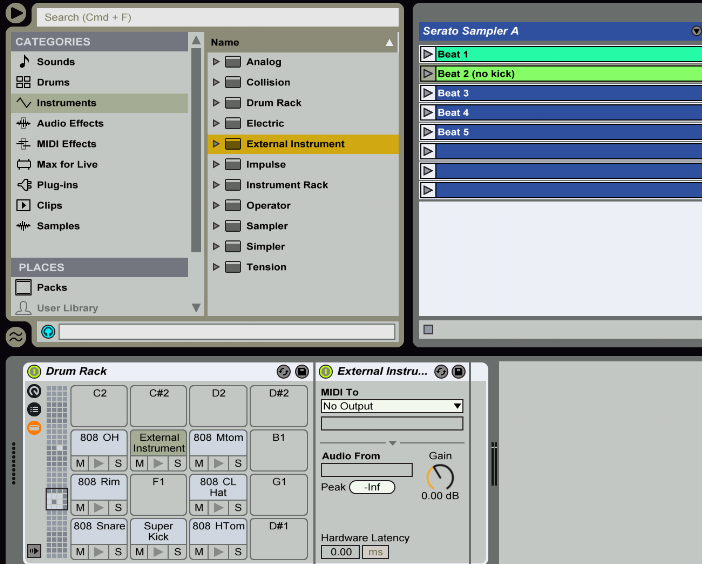
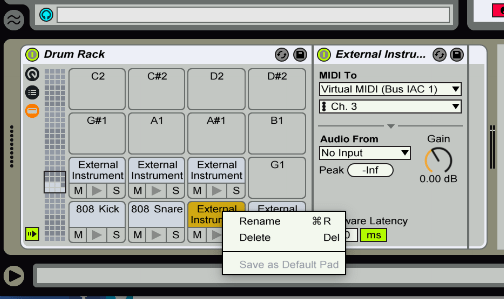
Now, right-click on every External Instrument you dragged in, select Rename in the drop-down menu, and write the names of the samples you will load in the sampler. Also select your virtual MIDI driver under each External Instrument’s MIDI To drop down menu, and choose a different MIDI channel for every External Instrument (every External Instrument will send the same note message, and we need Serato DJ to be able to differentiate the notes).
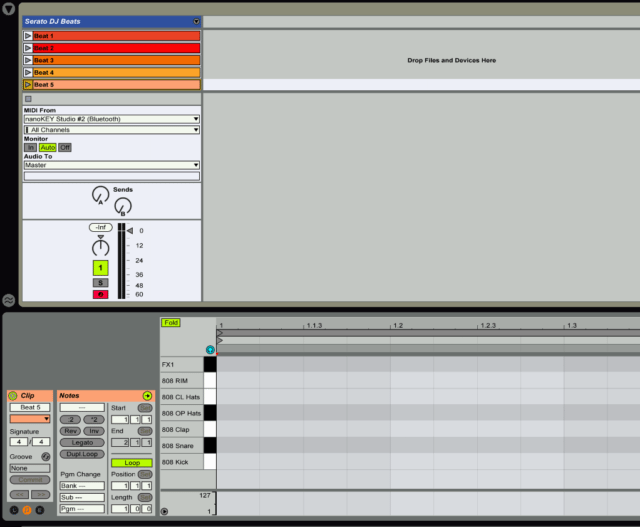
Now we have to create some 2 bar clips in the empty slots of your MIDI track. Just double-click on every empty slot. You can add names to the clips and change the colors if you right-click on them. When you finish, you’ll have something like this:
Before finishing with Live, it’s helpful to map some Live controls to your MIDI controller. We recommend mapping the Record Session button, the Scene Launch button, the Clip Stop of the MIDI track and the Scene Select control. Never mapped controls in Live? Here’s how:
- Preferences > Link MIDI and check that under input MIDI ports, your controller has a YES in the Remote option. After that, close Preferences.
- Click on Ableton’s MIDI button in the top right corner (next to the CPU load meter). This enables MIDI-mapping mode.
- The Record Session button is the record button next the NEW icon, at the center of the top transport controls in Ableton. This button must be mapped to a MIDI button with a toggle behavior.
- The Scene Select and Scene Launch controls appear below on the Master channel only when MIDI mapping mode is enabled, Scene Launch is the first icon, Scene Select is the fourth. Scene Select is best mapped an encoder control to move through the scenes.
Preparing Serato DJ
We have finished with Live, but don’t close it yet. Instead, open Serato DJ.
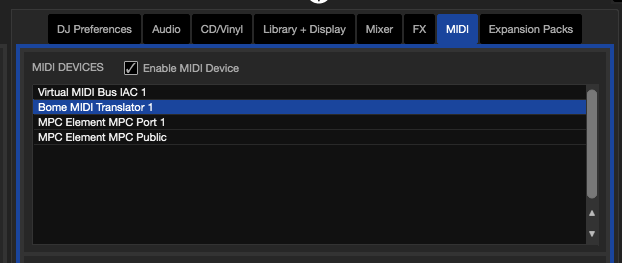
Once Serato DJ is launched, go to Setup > MIDI tab, and check that your virtual MIDI port appears on the top list. Select the virtual MIDI port by clicking on it and check the Enable MIDI device box. Disable the “Enable output lighting” option for now – it will cause repeated notes on some controllers.
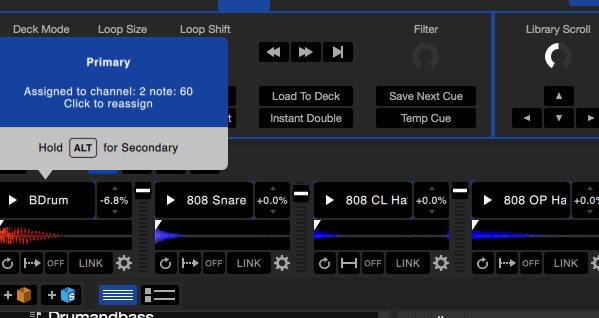
Close the Setup window, open the Sampler panel and click on the MIDI mapping mode (blue MIDI button in the top right). Now remap every sample trigger of Bank A by clicking on the sample, then pushing the desired pad/key on the controller. Ensure that the sample triggers aren’t being mapped to your controller directly – they should be getting mapped to messages from the virtual MIDI port. That’s what is being used as the output from Live!
Now load your samples to the Sampler (just drag + drop). Enable the Link protocol in Serato with icon at the top, and the icons present in every deck. Then, enable Link in Live – everything should run synced without hassle. I suggest you enable Recording Quantization in Live at a sixteenth note level (it’s in the Edit menu). You’re done! Well, not quite, go to Setup > MIDI and save your Serato DJ MIDI mapping so you can use it later.
Is Everything Working?
If you’ve done everything right, you’ll be able to have Serato and Live opened on the same computer, triggering samples from your controller, and recording patterns. Play in samples with the Ableton recording enabled, and then the patterns keep playing in time with the music. It’s essentially like having a Roland DJ-808’s sample sequencing functionality on any controller.
If you record something you don’t like and want to delete it fast, just hit command/ctrl+Z while recording (if Ableton is open) and Live will delete the latest played notes. If you’re not very good at finger drumming you can also prepare all your beats offline and just launch them as clips.
Don’t be afraid of using Live and Serato DJ at the same time! Using Live only as MIDI sequencer will not consume too many resources of your computer. Practice with it first at home and watch the CPU meter to be sure it won’t be an issue.
Need help? Have questions? Comment below and Teo or other DJTT community members will help you get your Serato DJ sequencing figured out.


