Written By: Freddy F
Traditional DJs using vinyl decks or CDJs can now achieve a number of amazing tricks but there are a few techniques which they can still only dream of. Long, feedback-style, dub delays is one of them. Taking advantage of Ableton’s feedback system, we can create lush, evolving sound effects. These are perfect for a chip jockey to transition from the previous DJ or to create instantaneous build-ups that will thrill the crowd. The high frequency content of these sounds alone, will make your ears tingle on the dance floor.
Here is how it works: By sending a delayed sound back into itself, the signal accumulates, feeding back into a return track. This generates an ever growing pad sound that hangs in the background, creating a “carpet” of sound that fills up the space. There is a real danger of overloading the signal when experimenting with feedback delays and you could cause damage to your equipment, sound systems and most importantly – people’s ears! So follow this step-by-step to set it up properly, and watch your levels!
BASIC SETTINGS

We first have to load a tune onto a regular Audio Track so we have some kind of signal to send into our delay unit. Rename the track “Deck1”.
Load a Ping Pong delay onto a Return Track. Check if you have a free Return Track using the shortcut (CMD+ALT+R (Mac) or CTRL+ALT+R (PC)), this will show/hide them. Create one if necessary using this shortcut (CMD+ALT+T (Mac) or CTRL+ALT+T (PC)) and rename it “feedback”. Load a Ping Pong delay onto it and set it as follow:
- Dry/wet ratio on 100% wet
- Feedback at 51%
- Synced Delay time on 3
- Filter frequency from 600Hz to 7KHz
Basic Mapping

We now need to map some parameters to our controller to turn this technique into a hands-on effect. If your MIDI controller allows it, set one of your controller switches into “momentary” mode; so that when you press it, it sends an “on” message and when you release it, it sends an “off” message (this is done via your controller’s internal control panel or via a software editor). Then, assign it to control the send dial on “Deck 1” (the one which goes to your “feedback” return track) by entering MIDI map mode (select Edit MIDI Map from the program’s Options menu). Once done, this mapping will enable you to send short bursts of sound into your delay unit.
Now, let’s enable the send dial on the Return Track itself. This knob comes disabled as a default so right click onto it and choose “Enable send”. So if you used “Return Track A”, right click on the corresponding “Send A” knob. To control the amount of signal you send back into your effect, map one of your controller faders to this “send dial”. When the mapping browser window pops open you will want to reduce its range from -20dB to -8dB in the relevant boxes.
![]()
That’s it – the basic settings have been done. Run the tune and send a short burst of sound into the delay using your momentary switch. Once the delay is working (you will see the signal in the return track meter), raise your fader (the one assigned to the send dial on the return track) all the way up to feedback the sound. Be ready to turn it back down if the sound grows too loud – it will happen.
KEY TIP: Playing with your fader, you can hold the feedback in place but like everything with controllerism this takes a little practice to get it right.
Safety measures
Firstly, let’s set up a safety system to prevent our signal to overload our Master Track. We could load a limiter right after the Ping Pong delay itself but this will strongly colour the sound of the feedback (you might actually want to try this as this coloration helps the sound cutting through a mix nicely) so we have to do a little work around here.
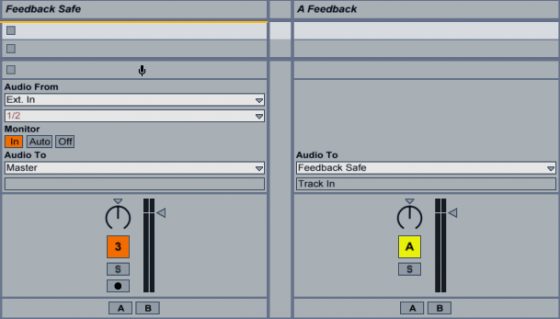
We need to send the signal from Return Track into a regular Audio Track. To do so, create a new Audio Track and rename it something like “feedback safe”. Open the “in/out” section of the mixer ((CMD+ALT + I (Mac) or CTRL+ALT+I (PC)) and send the “feedback” Return Track to the “Feedback safe” Track using its “Audio To” section.
Enable the “Feedback safe” Audio Track to receive this signal by setting its monitor switch to “In”. That’s it – the feedbacked signal will now flow through this audio track before hitting the Master Track.
Now, let’s add two effects onto this “Feedback safe” track:
- An Auto-Filter effect set as a high pass, to help us shape the colour of the feedback
- A Limiter after the Auto-Filter to prevent our signal from overloading our Master Track
To control these, you should map your Auto-Filter frequency to a controller fader and reduce its range from 200 Hz to 20 KHz. This setting will remove any unwanted low frequencies that could muddy up your output signal.
Now, you should be able to control your feedback using the two faders you have mapped so far. These two levels of sound shaping enable you to play around with the sound and adapt it to your performance.
Delay time

Finally, you can enhance your setup further by changing the delay time while the feedback is happening. The Ping Pong delay allows us to choose three different behaviors when changing its delay time. Right-click onto its name to find the three functions:
- Repitch: mimics the behaviour of an analogue tape delay where the pitch of the sound changes with the delay time.
- Fade: creates a crossfade between the old and new delay times.
- Jump: immediately jumps to the new delay time, though this setting will create audible clicks.
We could simply map a controller fader to the Ping Pong delay time but we wouldn’t be able to reduce the range so instead we need to load our Ping Pong delay into an Audio Effect Rack.
- Right click onto the Ping Pong delay name and choose the “Group” function.
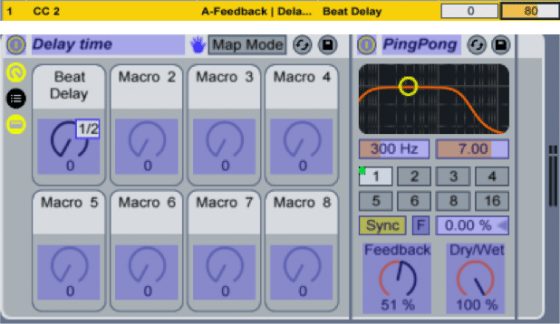
- Once the Ping Pong is in the rack, right click onto its sync delay time area and map it to Macro 1.
- Map Macro 1 to a controller fader and reduce its range in the mapping browser.
- A range from 0 to 80 gives you delay times from 1/16 to 1/3 of a bar but should experiment with various settings to get it to work the way you want.
Congratulations! You have just added one of the most powerful Live performance techniques to your arsenal. Using this momentary switch and the three faders we have mapped, you can now create instantaneous feedback loops over your set. Once you have mastered this basic implementation, you could develop it even further by creating a multi-delay effect rack or add some side-chaining to your return track.
Have fun and beware of the feedback demon!
This article was written by Freddy Frogs, an instructor at Point Blank. To find out more and get 1-2-1 feedback on your music check out Freddy’s DJ/Performance online course with Ableton Live at http://www.pointblankonline.net/dj-and-live-performance—ableton.php


