Ableton Live’s MIDI mapping is a double-edged sword: super-easy, but somewhat limiting. What if we could go beyond basic mapping? The fact is that complex MIDI translations in Live shouldn’t require a doctorate in computer science to pull off, which is exactly why we’ve created Mapulator, a new Ableton Max for Live patch that allows you to map knobs in ways that we could only have dreamed about with the standard mapping system. We’re giving this first version out for free – see inside for more about this incredible device.
Mapulator is the first in a series of new DJ TechTools devices that we’re calling Smart Tools. This first version of Mapulator is absolutely free to DJ TechTools readers! Mapulator’s super-simple interface and utilitarian functions can be appreciated by all users, from veteran MIDI mappers to first-timers.

Mapulator: What Does It Do?
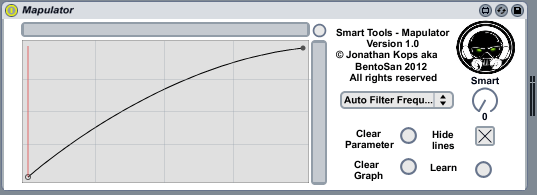
Mapulator allows any control in Ableton to be controlled by a knob in almost any way – controlling multiple parameters of an effect or synth, or even multiple parameters of a chain of synths and effects is a breeze. Mapulator enables the user to go beyond the limitations of mapping in Ableton live in a very simple and easy to use fashion.
What’s Wrong With Ableton’s MIDI Mapping ?
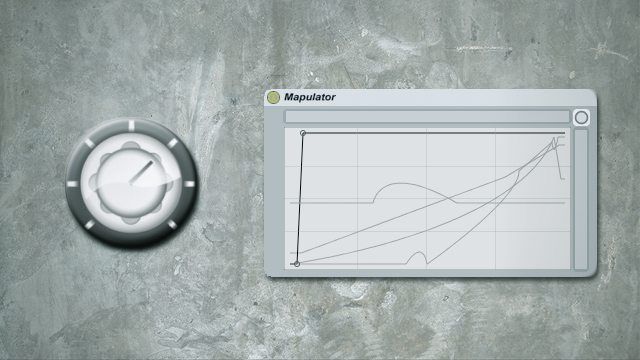
If you visualize how Ableton would normally map a control, it’s a straight line from one origin value at the start of your knob to another destination value at the very end of the knob. If you want the knob to go up slowly incrementally and then exponentially ramp up quickly towards the end of the knob, it’s simply not an option. What if you want a value to ramp up, then down again? Also not possible.
Wondering why you’d want a knob to be able to raise in value just to fall again? It’s ideal for controlling multiple parameters of an effect at different rates, which is the heart of what an expressive smart knob is all about. This can be a useful function for packing multiple effects across a knob. For example, if you wanted to create a delay effect that morphs into a phaser, then cuts out and finally morphs into a reverb with an awesome freeze effect, you would be able to do this with just a single knob, as Mapulator lets you create these sorts of effects!
How Do I Get Started Using Mapulator?
Download the patch here!
Current Version: 1.02
*to run Mapulator, you’ll need to have Max For Live
All support inquiries regarding Mapulator should be directed to Bento@DjTechTools.com
You first need to download the patch – we only ask for your email in exchange, which allows us to keep you up to date with the latest versions and releases of our Smart Tools. After signing up, you’ll receive your copy of Mapulator in your email.
Update: V1.01 – there was an issue affecting windows users which is now fixed in this latest version. If you havent updated already check your email for a link to the latest version.
Update: V1.02 – there was an issue affecting the ability to save parameters inside of a live set which has been fixed in this release
See the ReadMe.txt inside of the download for the full changelog.
Installation:
- First, unzip the file (need help? please visit here)
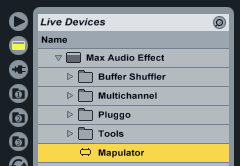
- Open Ableton Live and locate Max Audio Effect in the Live Devices tree (usually under Audio Effects).
- Find the folder you unzipped the .zip file into and locate Mapulator.amxd
- Drag Mapulator.amxd onto the Max Audio Effect device
- Congratulations! Mapulator is now installed and is ready to use.
How to use:
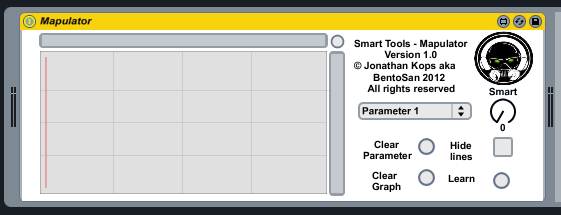
Double click on Mapulator in your Max Audio Effect device and it will open up just the same as any other audio effect.

Before we get started mapping out what is controlled, we need to assign the knob on our MIDI controller to this instance of Mapulator. Start Ableton’s MIDI mapping mode by clicking MIDI in the top right, then click on the “Smart” knob inside of Mapulator. Finally, move the knob on your controller that you want to control Mapulator with, and it should show up in the list of MIDI mappings.
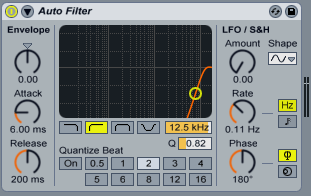
Let’s continue by creating a simple and useful highpass filtering effect that controls both the frequency and the resonance at the time. Load up an Auto Filter effect into a track of your choice. We want a highpass curve, so select the highpass icon. Your Auto Filter should now look like this:
Let’s bind a couple of properties of the filter to the knob. The two parameters we’re interested in are the frequency (kHz) and the resonance (below the frequency, labeled as Q). Click on the filter frequency parameter and the box around the frequency will get a slightly thicker line around it, showing that it is the currently selected parameter – when we click learn in the next step you will see this is how we select a parameter that we want Mapulator to control.
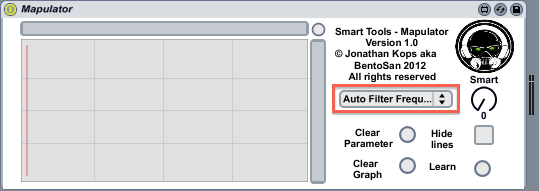
Back in Mapulator, click the learn button: note that when you do this, the parameter name appears in the drop down list as shown below.
Next, let’s tell the knob how to interact with the parameter. Mapulator relies on curve drawings – so start by clicking and inside of the grid – you’ll see a line appear that you can raise and lower. This corresponds to the parameter value, and you can continue to click on that line and adjust different points to change the curve. In this example, we’ll start with a simple curve – so two points will do fine – one in the bottom left and one in the top right.
Now when you turn the knob on your controller, you should see the filter follow the line of the graph as you turn the knob. This linear mapping is pretty bland, so let’s spice it up to give you greater control over cutting of the lower frequencies.
Hold control on your keyboard, and click and drag down and to the left on the point in the top right of the graph. See how the graph morphs to to create a exponential curve.
This is how you create all different shapes of curves in a super simple and easy to use way, have a play around to see what different shapes you can come up with! When you’re done playing around make your graph look like this:
Time to assign a second control – click on the drop down list and select “Parameter 2”, this will let you control a second parameter in the patch: note that you can control up to 8 parameters with a single knob. Go back over to the filter and this time click on the resonance setting (labeled as Q), then once again hit Mapulator’s learn button.
Now you’ve selected two parameters to be controlled by Mapulator, at the same time! What we want to do now is have the resonance increase as the filter filters out the lower frequencies, really allowing those high frequencies to sing. We want to create a line again, but this time we want to start at the 0.2 position on the left and ramp up to about 0.7 on the right.
If you look at the top left of the graph when hover over or drag a point in the graph, you’ll see that the patch gives you XY coordinates for the point. With this in mind, create one point at X:0.0 / Y0.2 then another point at X:127 / Y:0.7, then control-click on the right-most point again and create a curve so your patch ends up looking like this:
You have just created your first knob using Bézier curves! This is a simple example, but this is a great first knob that will be useful for pretty much anyone out there.
Now play around with the tool: maybe try adding an effect that kicks in near the end of the filter. For this, just map something like the wet/dry parmeter of a reverb effect that only starts churning up halfway though the graph. Or perhaps even add a little delay near the end to spruce up the filter into something unique.
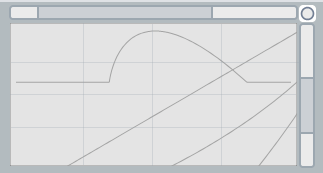
Additionally, you can zoom into areas by clicking and dragging on the bars above and to the right of the graph. To reset the zoom back to normal, just click on the circle button in the top right of the graph. If you mess up a graph and want to start fresh, just click the clear graph button.
Full list of the commands you can use on the graph:
- Left Click = create a new dot; select & move a dot; deselect a dot
- Left Click + shift = restrict movement to vertical
- Left Click + shift + alt = restrict movement to horizontal
- Left Click + ctl (+ drag left of right) = create a bezier curve point
- Left Click + ctl + shift = create symmetrical bezier curve points around the point
- Left Click + alt = delete a dot or a bezier point
- Double Click + Command/Win + shift = lock or unlock all dots
If you need to see these commands in Ableton, just hover your cursor over the graph. You will see these commands in the Ableton hint window, or you can open the patch in the Max editor to see a list of the commands in presentation mode.
What Can I Use Mapulator For?
The most obvious use for Mapulator would be to control a bank of effects to create a smart knob. Each paramater will follow your own user-defined response curve to create a highly expressive effects knob that sounds exactly how you want it to at any position the knob is in.
There are quite simple but powerful uses for Mapulator as well- turn your APC-40 into a turntablist’s scratching battle mixer, the line faders could be edited to allow for the track to cut in much quicker, the bottom third of the fader representing more than half of a regular fader. This would mean it only takes a slight fader move to produce a very large increase in volume. Using the Bezier curves drawing in Mapulator will allow you to get any shape you desire, so you can tweak the fader just how you like it.
You can also use this patch to control any parameter of a synthesizer, a totally indispensable tool if you’re playing some live synth. A small twist of the knob can control multiple parameters including your wavetable position, pitch bends, tuning, filters or any other automatable parameter your synthesizer can throw at you. This is a great way to active degrees of a new preset on a device – let me turn up my Awesome knob!
As with most things in Live, Mapulator is not just limited to stage use, it certainly has uses in the studio. If you’re a producer who likes to get their hands dirty with MIDI controllers and finds yourself recording automation using a MIDI controller, you’ll find that setting up a mapping will make your complicated actions much easier.
Thinking outside the box, you could even automate the knob in Mapulator so you can give Ableton some much-needed Bézier curve automation crafting!
We’re super excited to see what you all can make with this tool.
Who Made Mapulator?!
After spending years creating these sorts of effects using other MIDI translation tools like Bomes MIDI Translator controlling Traktor or Ableton, I really grew frustrated at why it couldn’t be easier and much less time consuming. When making this patch, my primary focus was to make a smart knob as simple as possible to create yet without skimping on any functionality.
Some fun facts about BentoSan:
- I’ve been creating digital music since I was 13. Started with production and then moved to Controllerism when DJTT was still an infant.
- Been around DJTT since the early days and was even lucky enough to be DJTT’s first ever employee!
- In my time at DJTT, I’ve administered the forums, replied to hundreds of DJTT support emails, organized writers for the blog, and written my own articles.
- My popular other previous DJTT projects include the Native Live 7 Smart Mixer and routing audio from Traktor to Ableton.
Find me on Facebook; Twitter; and stay tuned for my new website, www.BentoSan.net.
Mapulator has a really bright future ahead – we’ve got a ton of planned features that will come in future releases. If you like Mapulator please consider making a donation here – a lot of time and energy has been spent creating this patch and was even totally recoded at one stance to bring you the best user experience possible.


