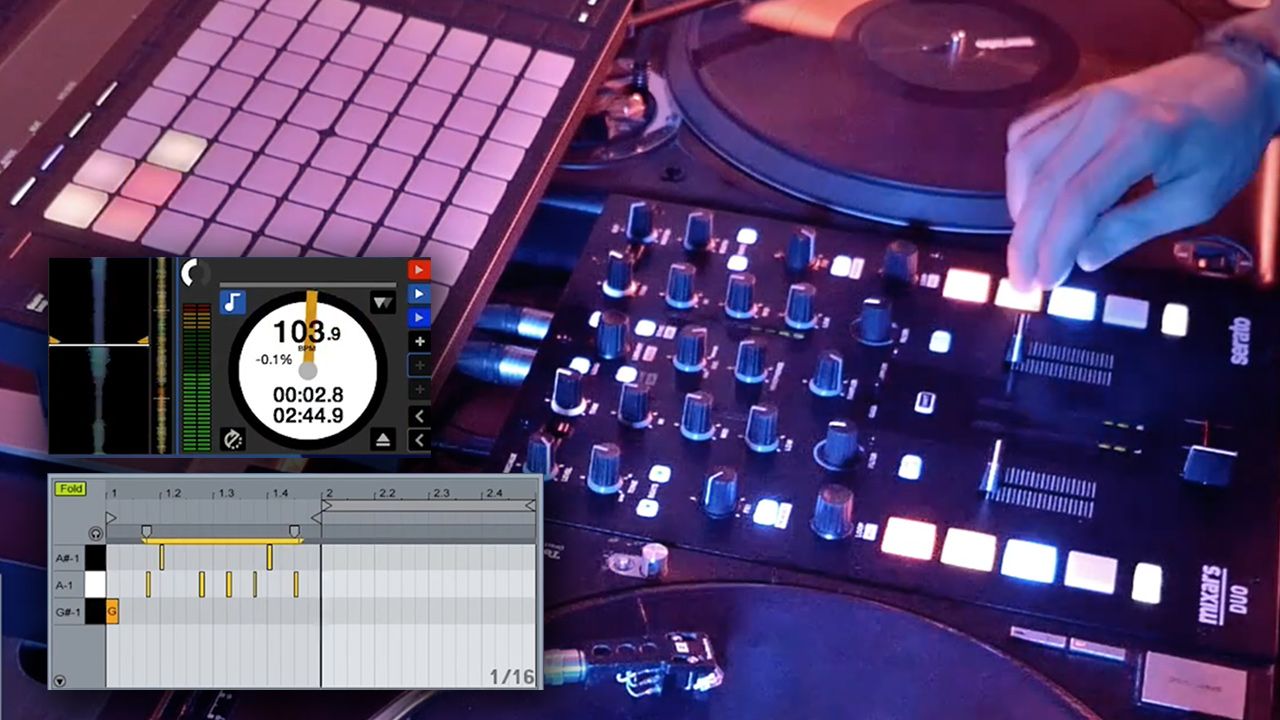
Two months ago we featured a unique way of recording + sequencing Serato cue points by using a hardware sequencer. The DJ behind the idea, John Type, is back with a new concept: using Ableton to sequence cue points played on a MIDI mixer (or any cue point controller).
Ableton Controltablism In Action:
John Type is an Italian “DJ, turntablist, composer, and record producer” who has recently been coming up with unique ways to combine his various skills. Sequencing cue points in a vinyl set is his latest obsession – and this concept of combining Ableton and Serato makes it accessible to many more DJs.
In the performance video above, Type is sending the MIDI messages from his Mixars Duo DJ controller to both Ableton Live and Serato DJ. This allows him to record the exact sequence of cue points in Ableton, and using a IAC driver (virtual MIDI device), can play that sequence back.
It’s a great proof of concept that deserves to be showcased here – and at our request, Type has writen up a full guide of how it was accomplished:
How To Record + Sequence Serato DJ Cue Points
The performance video is significantly simplified so that the concept is easy to understand. That’s also the reason behind using the famous “I Want You Back” by Jackson 5.
The video has four main sections:
- Ableton Cue Point Mapping: recording cue point triggering MIDI notes, directly from a mixer (or other controller) into Serato and Ableton
- Cue Point Sequencing: the MIDI notes are recorded in Ableton live in a MIDI clip, which loops to act as a sequencer
- Controllerism: launching + recording clips in Ableton Session View; playing synth chords with the Push’s Note Mode
- Turntablism: scratching on guitar Cue Point Sequencing on Deck 2 and a sax solo on Deck 1

Syncing Serato DJ with Ableton Live
The original speed of “I Want You Back” is 98 bpm, with the turntable pitch is sped up to 104 BPM. However, you can synchronize the BPM of Ableton and Serato with the Ableton Link technology. The original key of the track is preserved with the Key Lock function Serato, or Pitch ‘n Time DJ.
Ableton Cue Point Mapping Tutorial
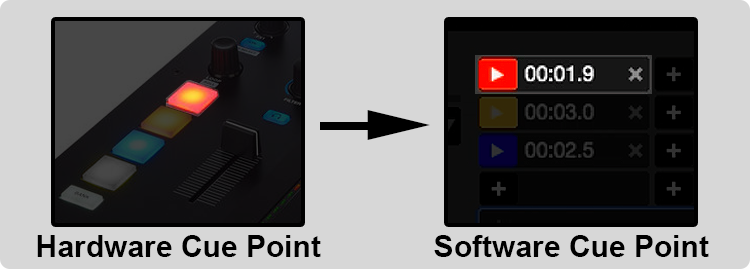
It’s important to understand the same cue points are divided into 2 parts:
- Hardware Cue Point > physical button on the mixer
- Software Cue Point > virtual button in the software
When you press the cue buttons on the MIDI controller, the same signal is sent to two places: the factory Serato mapping and the Ableton Cue Point Mapping. We’ll use IAC Driver to emulate a virtual MIDI device to allow Ableton to retrigger cue points in Serato DJ.
Requirements
- Mixer or controller with MIDI cue point buttons
- Serato DJ software
- Ableton Live software
The Push 2 used in the video isn’t essential for the concept, but it makes triggering sequences of cue points easier in a performance
Settings
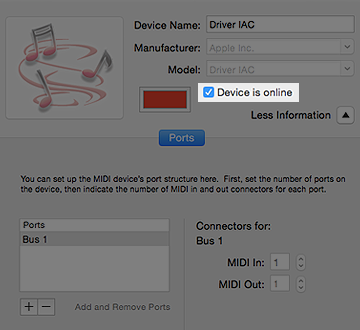
Enable IAC Driver in Mac OS X:
- Applications > Utilities > Audio MIDI Setup
- Menu > Window > MIDI Studio > Driver IAC
- Click checkbox: “Device is online”:
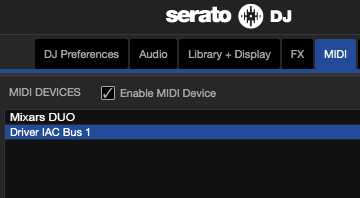
Enable IAC Driver in Serato DJ:
- Serato DJ > Setup > MIDI > MIDI Devices
- Select: Driver IAC Bus 1
- Checkbox: Enable MIDI Device
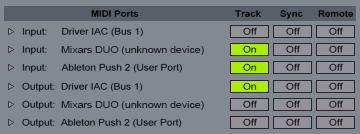
Enable MIDI ports in Ableton Live:
- Ableton Live>Preferences > MIDI
- Input: Ableton Push 2 > Track > On
- Input: Mixars DUO > Track > On
- Output: Drive IAC (Bus 1) >Track > On
Set Up Ableton’s Session View for Sequencing:
- Create MIDI track and name it “SERATO”
- MIDI From: select Mixars DUO, All Channels
- Monitor: Off
- MIDI To: Driver IAC (Bus 1)
- Ch. 8 (select a free MIDI channel)
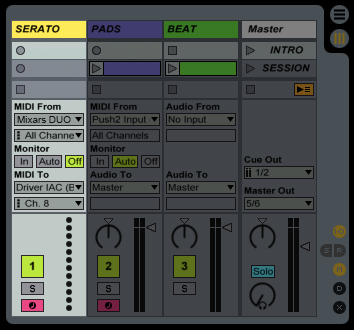
Depending on requirements, create one or more MIDI tracks with the same settings, to control more Serato decks independently.
Mapping Ableton Clips For Each Cue Point
Before starting with the mapping, load any audio track on the Serato deck, with some cue points stored.
1. Select the cue point you want to map in Ableton. For example: Hardware Cue Point 1 (red) to be mapped with Software Cue Point 1 (red).
2. In Ableton, arm the MIDI track “SERATO” and click in an empty slot to start recording a clip
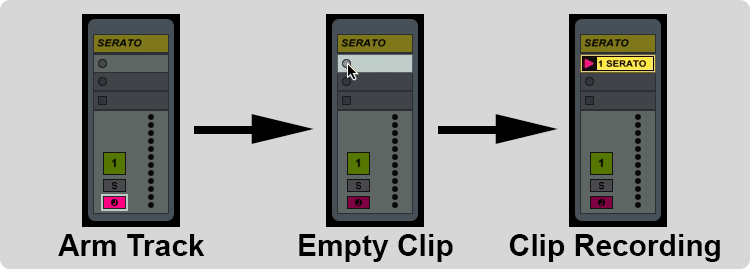
3. When it starts recording, press the physical Cue Point button to record MIDI data into Ableton clip

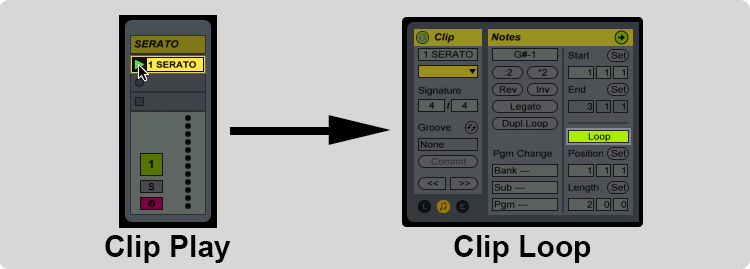
4. Press the clip again – to switch from recording to playback, you’ll want to keep it playing constantly. Turn on the Loop mode before moving into the Serato window.
5. Open the MIDI mapping state in Serato DJ (next to Setup button)

6. Click the Cue Point in Serato that will receive the MIDI message from Ableton clip and the cue point is mapped (as Ableton is sending out that note via IAC)
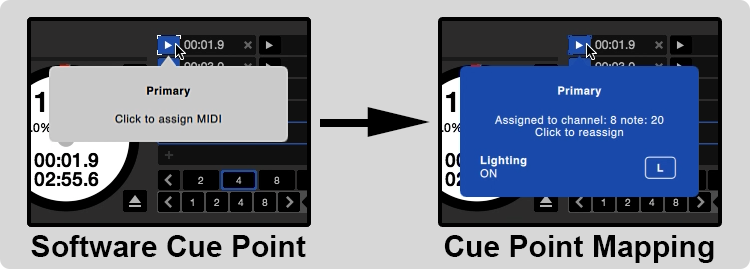
7. Close the Serato MIDI mode and repeat the operation for the other cue points on your mixer
Final Recommendations
In Ableton, you can use the audio outputs of some mixers that have built-in soundcards, like the Mixars Duo. Be warned that using this audio routing at the same time as an IAC Driver, can overload the USB bus data flow and might cause audio dropouts/glitches in Serato.
If you do get these dropouts from Ableton, you can always instead use your laptops mini-jack audio output connect it to Aux In of the your mixer, or use a FireWire / Thunderbolt audio interface. This gives more bandwidth for the USB data stream of Serato. This is only useful if you’re also layering audio from Ableton on top of your Serato set.
If your computer is underpowered for this setup, you might want reduce the CPU usage. Try disabling the Expansion Packs of Serato DJ when not in use: Serato Video, Sampler, Flip, Pitch ‘n Time DJ, FX, etc.
Learn more about John Type on his artist website here.


