One of the most fun ways to use a DAW is to add outboard devices – synths, MIDI controllers, and more. Today’s article is a guest post from Ableton Certified Trainer Mark Burnett sharing a few clever ways to use out-of-the-box devices alongside Live. Keep reading to learn how to experiment with MIDI-mapped VSTs, triggering FX with external sequencers, and more.
Why Experiment With Ableton + External Gear?
You might have experimented with MIDI controllers and run external synths through Ableton Live. Only when you start getting to grips with some of the more advanced capabilities will you have begun your journey down the rabbit hole. Be it hacking an old drum machine to act as a MIDI controller, or mashing together the signals of different external devices to create a Frankenstein’s monster of a synth, Ableton brings nearly endless possibilities to the table.
Apart from being a lot of fun, getting ‘off-grid’ with a hacked sequencer, or having a completely unique synth signal allows you to escape generic sounds and approaches to composition. It is this sort of experimentation that leads you to those bespoke beats and unique sounds that will give your music its own identity. So here are five tips for stepping outside the box with Ableton Live. (If you find yourself wanting more there’s an entire course available here)
Get creative, be inspired, go all the way!
Tip 1: Map VSTs to MIDI Controllers
What? There are many ways to route and manipulate MIDI information in Ableton Live. This tip is especially useful if you want to create customised Live devices for your favourite virtual instruments. Using this technique, it is possible to create a hybrid software/hardware instruments, turning your MIDI controller into a hands-on synthesiser, drum machine, or effects processor.
Why? Unlike a mouse or trackpad, manipulating more than one parameter at a time immediately opens up more creative possibilities. You can customize default patches in your User Library and also combine multiple controls from one or more complex virtual instruments into unique, powerful and easy to manipulate devices. Additionally, you can create sounds without looking at the screen – helping you to focus on the sound itself. This is especially useful if you are performing.
There are only 8 macros in a standard rack but there are many ways in which you can expand on this principle to build dynamic patches and unique control templates for your virtual instruments.
Tip 2: Stack External Synths, Drum Machines, Sound Modules
What? You’ve probably tried layering samples to create new sounds, but have you ever considered layering external synths or drum machines in the same way?
Why? Layering sounds from different pieces of hardware not only offers expanded sound design possibilities but it also brings new sonic textures, different from combining software instruments in the same way. This is because all hardware devices have unique output stages, some are very clean and transparent whereas others are dirty and bitty. Throwing all these sound sources into a single patch can result some very large, expansive and unique sounds.
How? First, insert an empty Instrument Rack into a MIDI track in Live
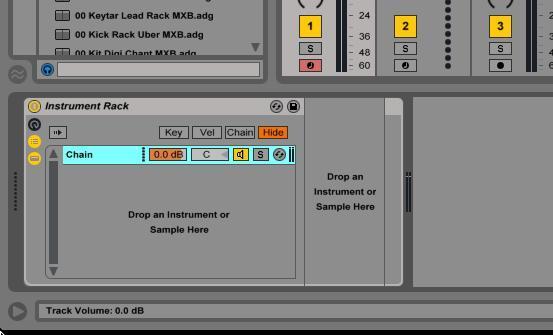
Populate the chains within the rack with one External Instrument device for each MIDI destination you want to send the MIDI to.
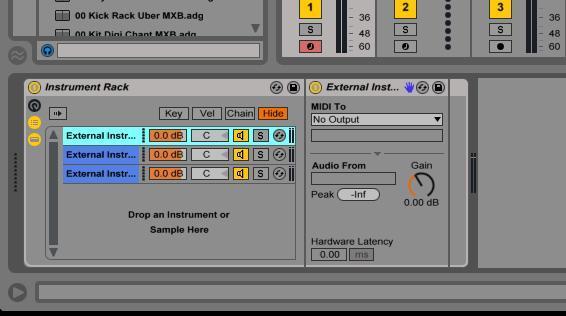
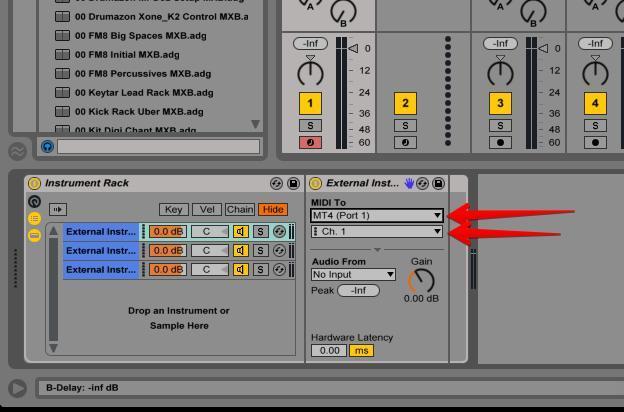
In Live, select your MIDI destinations within the External Instrument devices on the chains and the appropriate inputs for the connected hardware devices.
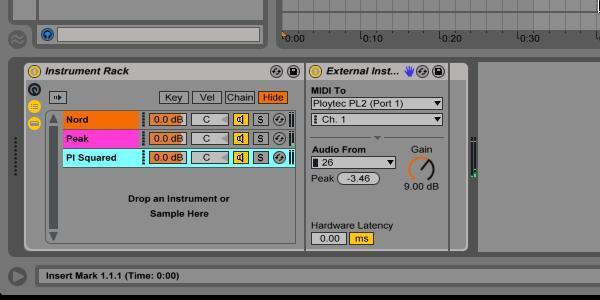
Label each chain to make navigation easier and it doesn’t hurt to add a little colour. Finally, name your new Instrument Rack according to your preferred filing system and place it in your User Library.
You can now send the same MIDI signal from a single clip or external source to several hardware devices, all within one track. Here’s a quick video example of the setup.
Also, try adding MIDI effects before the rack and audio effects after (ex: create a lead sound, then add Arpeggiator, Amp, and Compressor to the chain.)
This technique allows you to create huge sounds and dynamic multi-layer patches through layering external instruments while keeping all the processing in one track. Using different chains in combination with the Instrument Rack Chain Selector it’s possible to play a huge number of external instruments, layer them and switch between them all from one master controller.
Bonus Tip for Push users: If you place your custom racks and devices in folders within the User library that have the same name as the ‘categories’ in Ableton Live’s browser, then your custom devices will also appear in the sound categories in Live’s browser, along with all the default and installed Live Packs. This is especially handy if you are a Push or Push 2 user.
Tip 3: Create + Store Complex, Multi-Device Patches Within One Clip
What? One of the problems with stacking sounds is that when you want to recall complex stacks of patches from multiple devices you generally have to refer to notes or load up several different tracks. This tip allows you to create, send and store multiple program change messages all from one MIDI clip
Why? Most hardware MIDI instruments respond to Program Change messages; these messages tell a MIDI instrument to switch to the next, previous, or a specific patch number. Within the note tab of a MIDI clip it is possible to assign a Program Change but this will be sent universally to all devices on that particular MIDI track.
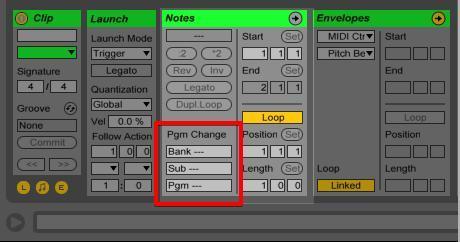
If you want to be able to send separate changes to different devices on the same track, such as the Instrument Rack created in the previous tip, then you need to use a MaxForLive device.
How? The device used in this tip is called ‘DialToProgramChange’ and is available on the MaxforLive website. It’s a very simple device with one dial and two buttons that enable you to navigate up and down through the program numbers. You need to insert this device before the External Instrument device on each chain in your Instrument Rack.
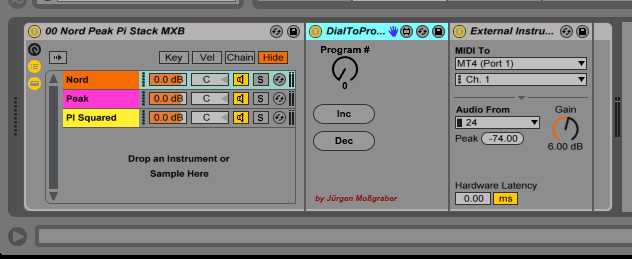
Be sure to label and colour things appropriately, it will make using the device much easier and improve its usefulness once you have saved it in your user library.
Map the Program Change dials in each chain to macros in the rack, again labelling them appropriately. Doing this makes applying envelopes to the correct parameters much easier.

Using envelopes, it is now possible to create clips that use different patches from multiple external devices. Draw a break point somewhere in the clip and drag up or down to select the Program Number you want to send, remember there is a different envelope for each device. Once completed these clips can be saved with or without MIDI notes for easy recall of your external hardware ‘stack’.
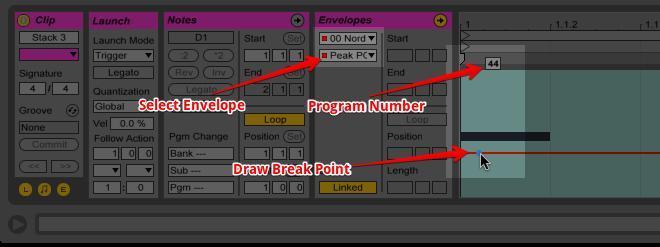
Once you have created your clips with the various program combinations you can save them in your user library. It is always a good idea to save your custom content in a sensible place within your library, create new folder where necessary to help you find things and keep them in order.
Aside from notes and program changes there are many more kinds of MIDI information you can store and transmit from a MIDI clip. Once you begin to understand how this information works you will be able to get a lot more out of your setup.
Tip 4: Trigger FX Using an External Sequencer
What? If you have a drum machine, synth, or groovebox it’s quite likely to have a sequencer built-in – but chances are you’re using Ableton Live as your sequencer. Usually, this renders many hardware sequencers obsolete. However, there are some fun and creative things you can do with this otherwise redundant tool. In the example above, we look at using an external sequencer to automate FX changes.
Why? Just for the hell of it basically. Seriously, many hardware sequencers have their own little idiosyncrasies, quirks, and functions that may not be easily replicated in the DAW.
It’s also often possible to use them without sync so they will run independently of the clock in your DAW. This ability to run ‘off grid’ often results in those happy little accidents that add a little bit of magic to a song.
Tip 5: Process MIDI Thru Using Dummy Clips
What: This tip can be used for adding automation to any MIDI input which is then being sent to external hardware such as a synthesiser, drum machine or sound module. The example in the video shows MIDI coming from a TR-505 drum machine being sent to a Novation Peak synthesiser but this is by no means the limits of application.
Why: There are many possible applications for this technique but one of the best uses is when playing live. If you are busy playing a keyboard, Push, drum pads or other MIDI device that requires two hands, you can trigger a sequence of effects and modulations that would otherwise be impossible without more arms than an octopus.
Do you have your own ways that you incorporate external devices with Ableton? Share in the comments below.
Mark is a producer, DJ, and Ableton Certified Trainer based in Leipzig. He has just produced an online course called ‘The Ultimate Guide to Using External Devices with Ableton’, and he dispenses Ableton advice at TheLiveLab.


