Since Native Instruments added the step sequencer to Traktor’s remix decks, the German company has not provided much info to users on how to take advantage of the MIDI mapping potential of this highly underrated feature. The only documentation shares how to use the step sequencer with the D2 and F1 controllers. That’s fine if you have one of those controllers, but what about if you want to use any other MIDI controller?
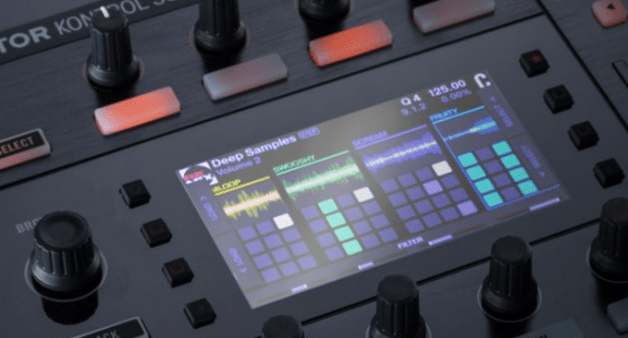
Today we’re going to help you understand the step sequencer mapping functions and show you how to map a common pad MIDI controller. It’s not an easy task because, among other things, the step sequencer has no graphical interface. The only on-screen feedback for the sequencer is the actual sample cells that are being triggered.
The Step Sequencer In Action
After reading this tutorial, you’ll be able to do something like this:
APC Element Traktor Step Sequencer
With some work, you can map the Traktor Remix Deck Sequencer to any suitable MIDI controller. Learn how in Teo Tormo’s new tutorial on DJTT here: http://djtech.tools/TraktorStep
Posted by DJ TechTools on Sunday, January 28, 2018
The New Mappable MIDI controls
When the step sequencer was added to Traktor, NI also introduced six new assignable MIDI controls and a new (and essential for this tutorial) modifier in the Controller Manager. Almost every new control is under the “Add In” / “Add Out” drop-down menus, inside the Remix Deck/Step Sequencer submenu. The one exception is the “Current Step” control – that one only appears in the “Add Out” menu.
Here’s what each new control can do, and the smartest way to use them:
- Sequencer On: This control activates and deactivates the step sequencer. The best way to use it is by assigning it to a button on your controller and setting the interaction mode as “Toggle”, so that each push of the button will turn on and off the sequencer. Keep in mind that even with the sequencer turned off, if the Play control of the Remix Deck is turned on, the sequencer is running in the background and the current step is constantly changing.
- Swing Amount: Sets the swing level of the sequencer. You can assign this control to two buttons (one for increasing and the other one for decreasing) or to a fader, knob, or rotary encoder. The swing level is managed by Traktor using values from 0 to 80, those values are shown in the Kontrol F1 display (0.0 to 0.80 in the Controller Manager).If you assign this control to an encoder or a pair of buttons, every button push, or step of the encoder, will increase or decrease the swing amount in approximately 6.2 units. This means it takes 13 button pushes or encoder steps to go from zero to full swing level.
- Selected Sample: Despite the name, this control really selects the cell to which the control is assigned. If you select an empty cell, nothing will sound until you switch to a cell loaded with a sample. The best way of using this control is (again) by assigning it to a pair of buttons or a rotary encoder. Every button push / encoder step will move the triggered cell forward or backwards. Increasing the value of the Selected Sample one unit means you’ll go down one cell in the slot. Decreasing one unit means you go up one cell.
- Pattern Length: By default the pattern length is 8 steps for each slot, but with this control it can be set to a minimum of 1 and a max of 16. You can also set different pattern lengths for each slot. Usually the “standard” pattern length for a step sequencer is 16 steps. I use this control by assigning it to the same physical button for the Sequencer On control, and setting the interaction mode to a direct value of 16. This way, when you activate the sequencer for the first time, you also set the pattern length of every slot to 16 steps.
- Enable Step (1-16): These are the 16 controls (all are equal) that activate / deactivate the sample trigger in each step of the pattern. These controls also handle the lighting of the buttons or pads assigned to them.
- Current Step (control): This control only appears in the “Add Out” drop-down menu. It’s intended to give visual feedback of the step that is currently playing. This control has 16 different lighting states, so the only effective way of using it is with a display that can show numbers. I suspect this control was specifically created for the F1 display.
About the new Sequencer Current Step modifier: This new modifier appears in the drop-down menu of the two optional modifier conditions. The value of this modifier changes automatically to show the position of the step sequencer in the pattern. It’s essential to control the lightning of your MIDI controller, because it will serve to recreate the “moving light” effect on the pads or buttons.
Limitations of Pad Controllers
An important thing to remember: with a common 4×4 pad matrix controller it’s not possible to create a single step sequencer mapping that can control more than one specific deck. This is due to the limitations of the Controller Manager; you’d need to manage three different modifier conditions at the same time, and Traktor only allows two.
If you have a controller that supports several layers of messages, or a controller with a large pad/button matrix (perhaps a Midi Fighter 64?), it’s totally possible.
Minimum Requirements for your MIDI Controller
To properly map the step sequencer, make sure your controller has these functions:
- 16 pads / buttons with lighting – In this tutorial. I’ll use an MPC Element controller. The pads can change the lighting color when they receive different velocity values in the MIDI messages.
- Four buttons for switching from one slot to other – Assign one modifier to each button and use them to showing the lights of the pattern.
- Two buttons or an encoder for switching between slot cells
- Two more buttons or an encoder for setting the Swing Amount.
- One button for turning on/off the step sequencer (and also setting the pattern length of the four slots to 16 steps).
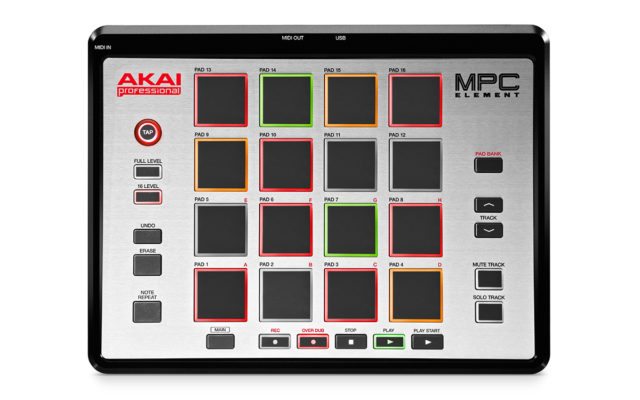
The MPC Element I used has six buttons under the main 16 pads. Four of them were for switching slots, one for the Sequencer On control, and the last one to for Play/Pause on the deck. Track buttons on the right were assigned to the Selected Sample control, and the Full Level and 16 Level buttons on the left were assigned to the Swing Amount control.
How To Actually Map The Step Sequencer
The mapping process isn’t difficult, but it’s a very long process. It could take you a few hours to perfect your mapping.
Let’s start the process by making an easy assignment. Click on Add In > Remix Deck > Step Sequencer > Sequencer On, and use the Learn function to assign it to the desired button of your controller. Remember to select the desired deck in the Assignment drop-down menu (in this tutorial we assign everything to Deck A) and set Interaction Mode to Toggle. In our MPC controller the button sends an E3 note message.
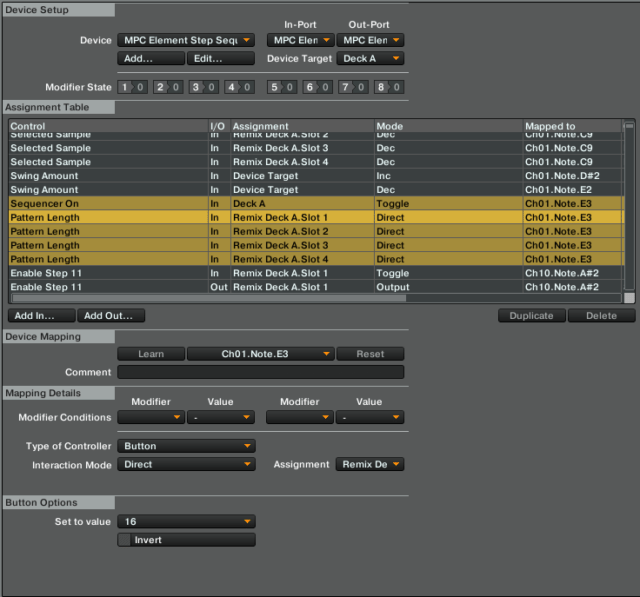
Now, we have to create four assignments for the same physical button that will set the pattern length of the four slots to 16. Click on Add In > Remix Deck > Step Sequencer > Pattern Length, then click the Duplicate button three times (you’ll have four new entries in the assignment table). Using the Learn function, assign the four controls to the same button used for Sequencer On. In each entry, select a different remix deck slot from the Assignment drop-down menu. Also set Type of Controller to Button, Interaction Mode to Direct, and Set to Value to 16. You will have something like this (look at the yellow highlighted assignments):
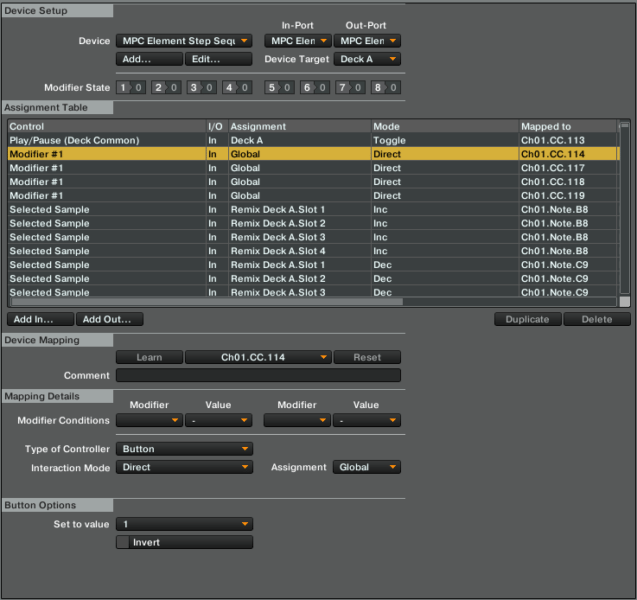
Now let’s create the four controls for switching between slots. Those controls only affect a modifier value that has to be used as a condition for the lighting controls. We are going to use the Modifier 1 (M1), so click on Add In > Modifier > Modifier #1 and duplicate the new entry three times. Assign each entry to a different button in your controller (on my our MPC, the selected buttons send messages using CCs 114, 117, 118 and 119). After that, on each of these modifier entries set Type of Controller as Button and Interaction Mode to Direct. Also on the Set to value drop-down menu set different values from 0 to 3 for each button. When the modifier value is 0. we’ll be working with slot 1 of the remix deck (it will also be the default slot when turning on the controller), when the value is 1, it’s slot 2, and so on.
At this point, your Assignment table should have something like this – note the yellow highlighted entry and the three below it:
For this task, you will have to create more than 1,000 entries (I warned you this would be long). Instead of explaining every single one, I’ll describe the process to follow.
Mapping The First Pad
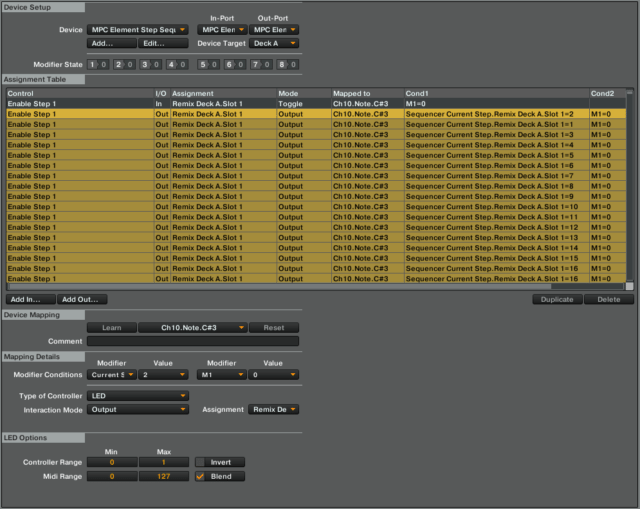
So, click on Add In > Remix Deck > Step Sequencer > Enable Step 1, and use the Learn function to assign it to the first of your pads or buttons. The first pad of our MPC controller sends a C#3 note message. Select Remix Deck A Slot 1 in the Assignment drop-down menu and set Interaction Mode to Toggle. In Modifier Conditions select M1 and set Value to 0 (because we’re mapping the first slot). Your first step enabler pad/button is assigned, now let’s set up the lighting for this control.
Lighting
Create a new entry with Add Out > Remix Deck > Step Sequencer > Enable Step 1. Duplicate this entry until you have 16 entries. Use the Learn function and assign the first new entry again to the first pad. In the first modifier condition, select Sequencer Current Step and set Value to 1 and in the second modifier condition select M1 and set Value to 0. To select the color, most controllers use different velocity values when sending note messages, with velocity value set at 0 the lights are off. For the MPC I used, a value of 127 the color is red, and all the values below it are various tones of yellow and orange. I used 127 (red) for marking the enabled steps, 0 (no light) for marking the disabled steps, and 30 (a beautiful orange) for marking the current step position. When an enabled step and the step position overlap, we’ll let the orange color prevail. So, back in the mapping, under LED Options of the entry we were editing, set MIDI Range Min to 30 and MIDI Range Max to 30. That will light the first pad in orange every time the current step position is at 1.
Now, in the second new entry of the 16 we have created, use the Learn function to assign the first pad again, but this time in the first modifier condition select Sequencer Current Step with a value of 2, and choose M1 for the second modifier condition and 0 as the Value. This time, in the LED Options set MIDI Range Min to 0 and MIDI Range Max to 127. That lights the pad in red if pushed, or leave it off if it wasn’t. Of course that will happen when the step position is 2, but not when the sequencer advance to other positions, so… repeat the process of this entry with the remaining entries, remembering to increase the value of the modifier Sequencer Current Step by one unit on each entry. Finally you will have something like this:
Rinse and Repeat
Now you have to repeat the whole process for the first pad with the remaining 15 pads. For each pad, you have to create:
- one entry for the incoming MIDI message when it is pushed
- 16 more entries with the outgoing MIDI messages for the lighting control of the pad
The difference is that the entry with the value of 30 (orange color that marks position) in the LED Options will be different with each pad. With pad 2, the entry would be the one with the Sequencer Current Step modifier with a value of 2, with pad 3 the entry is the one with a modifier with a value of 3, and so on…
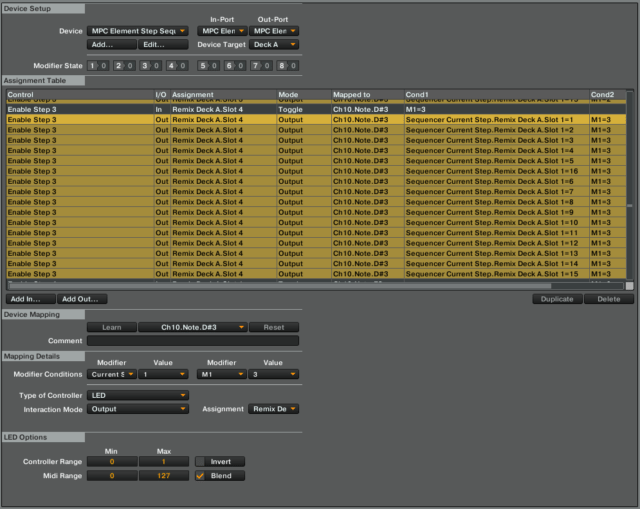
Once you finish the 16 pads, you will have to repeat the whole process for slots 2, 3, and 4. This time the difference is that the Assignment must be changed to Remix Set Slot 2, 3, and 4 depending the slot pads you are mapping. Also, every time the M1 modifier is used, the value must be set to 1, 2 and 3 (for slots 2, 3 and 4 respectively). When setting the Sequencer Current Step modifier, you can assign the modifier of any slot because the 4 slots have the same length.
For reference, you can see the assignments for pad 3 and slot 4 below:
Selected Sample
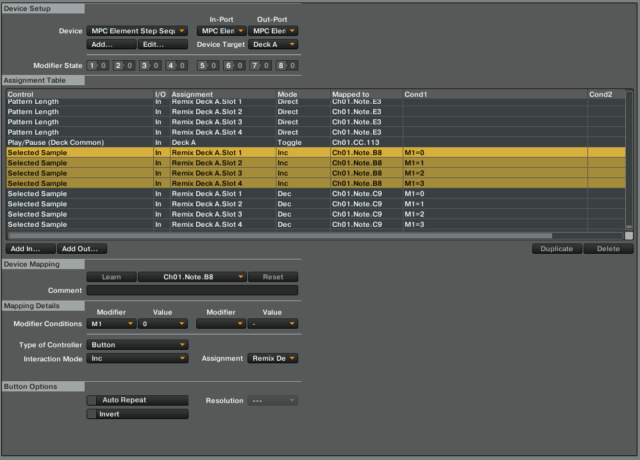
The Selected Sample controls are easy to create. In our mapping, we used two buttons – just click on Add In > Remix Deck > Step Sequencer > Selected Sample, duplicate the entry, and use the Learn function to assign each entry to a different button.
On the first entry, set Type of Control to Button and set Interaction Mode to Inc (increase) and Assignment to Remix Deck A Slot 1. You need to set a modifier condition, select M1 and Value 0. Now repeat the process with the other entry, but set the Interaction Mode to Dec (decrease).
This completes the the controls for selecting samples on the first slot. You’ll need to select samples on the other slots with the same buttons, so repeat the process three more times. You’ll change the Assignment to the other slots, and the M1 modifier condition value to 1, 2, and 3. At the end, you’ll have something like this (see at the yellow entries):
Swing Amount
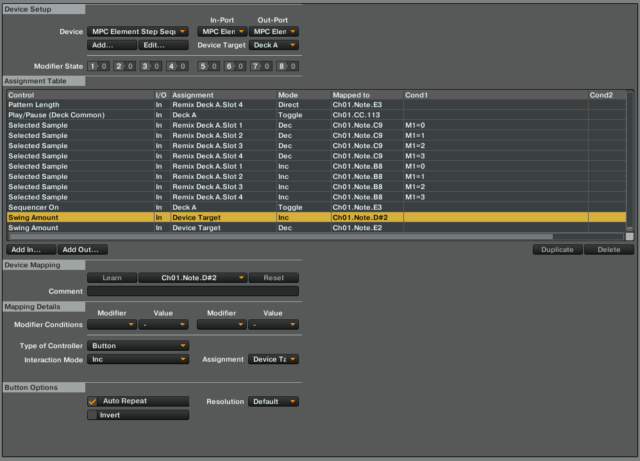
The Swing Amount controls are quicker to map. Again, it only needs two buttons. Click on Add In > Remix Deck > Step Sequencer > Swing Amount and duplicate the entry. Use Learn to assign each entry to one of the buttons, set Type of Controller to Button and Interaction Mode to Inc in one entry, and Dec in the other. For this control I like to enable the Auto Repeat option.
That’s all you need to map! I know It’s a very long and a little boring task, but the result is a very fun and easy to use step sequencer for live performing that syncs with your music in Traktor. Isn’t that a fantastic thing? If you have questions, please ask in the comments and I will try to help you. Have fun!
DJTT Challenge: Instead of everyone having to do this process, wouldn’t it be great if we could have many popular controllers mapped? If you make one, upload it to our MIDI Maps repo and share it in the comments. We’ll add them to this list – we’ve already seen sequencer mappings for:


