To start: let’s paint a picture. You spent quarantine holed up away from shows and decided to get into synths, drum machines, samplers, and the wide world of hardware noise generators and effects. Now, you have a newfound love of live jamming on your shiny, blinky gear that you want to share with the world – but you’re not quite sure if you have enough original synthesizer material to fill out a whole set, let alone the fear that maybe endlessly tweaking the filter on your Moog might not be as fun for someone else to watch and listen to.
The solution: DJ Tracks.
Mixing fully-produced tracks into your live synth setup can be a huge boon, both to you and your listeners. It adds dynamism to your show, provides space to your set, and is a great way to not only supplement but enhance your personal content.
Here, we will explore how to integrate complete tracks into your existing synth rig using three different methods:
- DAW (i.e. Ableton Live)
- DJ software (i.e. Native Instruments Traktor)
- Hardware sampler (i.e. Elektron Octatrack) – for those truly looking to flex their DAWless membership card.
In this case, we’re assuming you’re already comfortable with a hardware MIDI device as your primary clock, so the software will be synced to that. There is also the option of using software as a primary clock, and the majority of the technical instructions below will still apply with slight adjustment.
Tools of the trade: what you’ll need
If you decide to go with software, you need three key elements:
- A MIDI interface for MIDI sync
- An audio interface to get the audio out of your computer and into your synth rig
- Preferably some kind of controller.
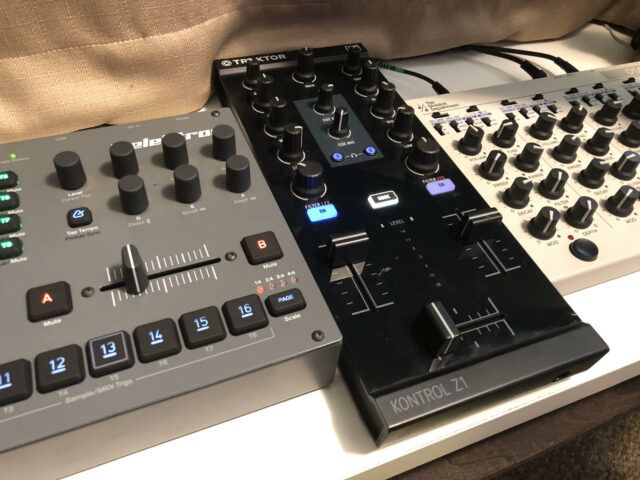
Here, a high quality audio interface is very important, as it will be played against your gear which is not being compressed at any stage. You may find getting songs and live synth tracks sonically matched is a more difficult endeavor than you may anticipate. In this case, let’s assume that you’ve already established a hardware MIDI device as your primary clock, so the software will be synced to that.
You will also need to plan out how you want to route the audio into your rig. In the case of Octatrack and other sampler/sequencer brains (Akai MPC, Synthstrom Deluge, Elektron Digitakt, etc), you have the option of using the audio ins of that device to route live audio through its effects. You can also send audio directly to your mixer. The studio mixer you likely already have will more than suffice; however, DJ mixers and their expanded effects and filter capabilities can be excellent tools in a synth rig, regardless of whether you’re working on completed songs or not.
Option #1: Adventures in MIDI Sync with Ableton and Traktor
Step 1: Setting up
Fortunately, MIDI sync is well supported by both Traktor and Ableton. First step here is to get them set up.
Ableton:
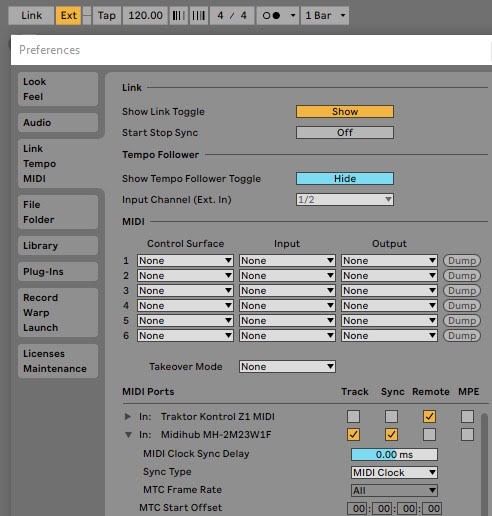
In Ableton:
- Open Preferences
- Click the Link/Tempo/MIDI tab
- Turn on Sync for your MIDI interface
- Click the Ext button in the top right of the main window to enable external sync
Traktor:
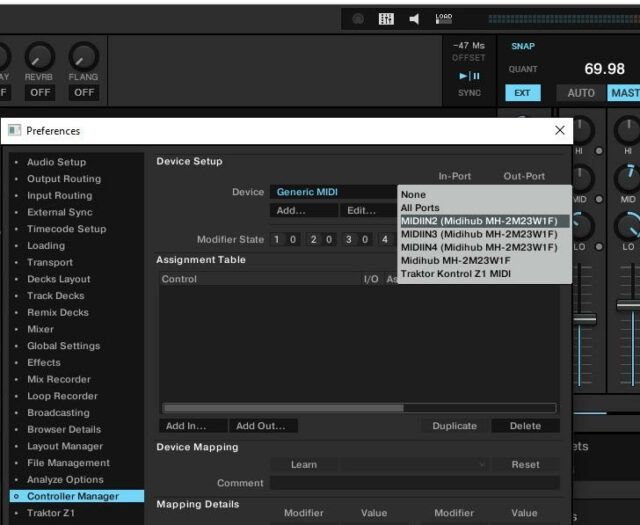
In Traktor:
- Open Preferences
- Navigate to the Controller Manager tab
- Click the Add button underneath the drop down list of devices
- Select to add a Generic MIDI device.
- Choose your MIDI interface from the Generic MIDI device’s In-Port drop down menu
- Go to the External Sync preferences tab to enable both EXT and MIDI Clock
- Close preferences
- Turn on the EXT button next to the master tempo readout.
Step 2: Starting the clock
You should now be able to start your software clock by pressing play on your master MIDI clock and seeing the BPM update in your software. If not, make sure you’re sending both MIDI clock and transport from your master device. You’ll notice the BPM jumping around quite a bit at first, but after 4 to 8 bars, the software should settle on a more static number. The BPM will continuously vary by a few hundredths (0.01) of a BPM, but this is normal and inherent to the nature of MIDI sync.
If the BPM is varying more than you’re comfortable with, you may want to try using a different device for your master clock, moving that device closer to your MIDI interface in terms of signal flow, or even trying a different MIDI interface if you have another available. Using USB hubs can cause sync issues with MIDI, so it’s best to have your interface plugged directly into one of your computer’s USB ports. There’s also the ERM Multiclock, which promises jitter-free MIDI clocking between hardware and software using some serious audio-to-midi-sync wizardry, however one might consider that to be overkill for this kind of a setup.
Once you’ve confirmed the clocks are properly speaking to each other and stable, delay compensation needs to be adjusted. Turn on the metronomes on your DJ software and one of your external MIDI devices, preferably one which will be doing the most important rhythmic work (or load up a track that has a very simple quantized beat).
In Ableton, go back to the Link/Tempo/MIDI tab in preferences and click the arrow to expand the options for your MIDI interface where you’ll see an adjustable slider for MIDI Clock Delay. In Traktor, you should see an Offset value to the left of the EXT button and BPM display. Slowly adjust these values until your two mentronomes are lined up, and you’ll be ready to start playing music! With this type of hybrid setup, it’s easy to get your sync locked and get going, since beat-matching and DJ-type EQ and filter setups are well worn territory for the software.
Option #2: is a sampler setup simpler?
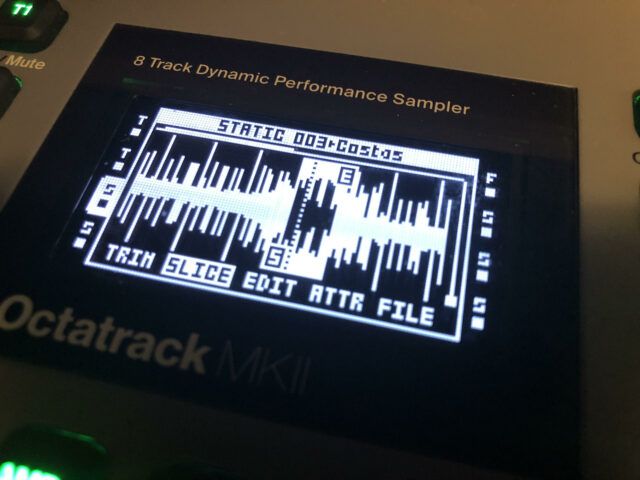
If you choose to go the sampler route, you’ve likely already got MIDI sync figured out. However, you have a different workload ahead of you. Most samplers, even if they have a beat detection algorithm built in, won’t be well adapted to keeping a track completely in sync for the full runtime. I found that chopping your tracks into manageable multi-bar “chunks” is the best way to get your tracks in sync.
This can be done by either using your sampler’s editor, or you can use your DAW of choice for a likely more ergonomic experience. Don’t worry – you won’t lose your DAWless clout if you do a little sample prep on a computer. This has the added advantage of forcing you to carefully consider your track selection and enhances your understanding of the track’s structure in relation to your own music. On the flip side, you are losing the spontaneity of a more traditional DJ setup allowing you to grab new tracks on the fly as the vibe sees fit.
Step 1: Chunking your tracks
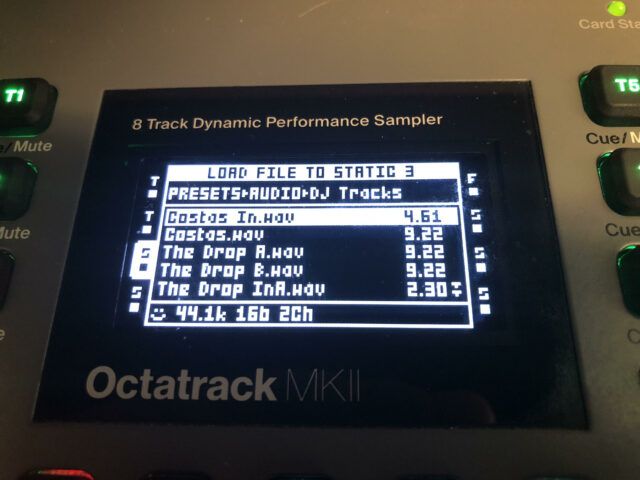
Ideally, you can split the track into a few different intro, bridge, and main sections of even bar lengths (2/4/8/16/32) that retain the majority of the sonic goodness you wish to impart to your audience. Don’t be afraid to loop a bar or two to get the sections even, you’ll thank yourself later.
For Octatrack, I like keeping my chunks to a max of 32 bars, as that is the runtime of a 64 step pattern run at 1/8th of the clock speed. Of course each piece of gear is different, so go with whatever works best for you and your gear. You can also choose to lock your tracks to a specific BPM here because the time-stretching algorithms in most samplers, while serviceable for loops, aren’t up to the par of more DJ-oriented software for full tracks. If you’re so masochistically inclined, you can even take this opportunity to use the equalizers in your DAW to get your DJ tracks more closely matching the frequency curve of your original productions, or pitch match to keys you’re planning on using.
From there, export your individual chops, set them to be rendered as loops so that start and end points are BPM-exact, and make sure to name them something short and simple, as most samplers have a limited character read out for file names.
Step 2: Sequencing your steps
Once loaded into your sampler, set up some patterns that play your DJ track chunks. You should be able to set a bar length for your sample so that your sampler properly matches the tempo of the rest of your gear. It’s great if your sampler has an auto-slicing function so that you can get super granular with your sequencing.
One technique that is particularly useful with Octatrack is to sequence out every step of the chunk, parameter locking each slice sequentially. This way, you can manipulate parameters like the rate and pitch without the track losing sync once you return to normal settings.
Start experimenting to find what kind of effects sound best on the tracks that can be manipulated live. Keep in mind that using the same effects on both DJ tracks and your original live productions can allow for the two to have a more cohesive sound.
Thoughts on track selection and manipulation
As you start experimenting with tracks against different patterns of your own work, you’ll quickly find that song selection can be even more important in this context than a pure DJ set. Sometimes fully mastered tracks can sound a bit out-of-context when played against a synth rig. Not having a main EQ over the entire output of your synth rig for DJ-style transitions and the lack of post-processing treatment (compression and limiting) that fully mastered tracks have are two difficulties you may contend with.
Starting with very minimal productions is easiest, as these will allow your synth elements to share some space and breathe. More full sounding productions – especially those that employ heavy sidechain compression and have flat dynamics – can be difficult to get sitting right against raw drums and melodies without significant pre-processing.
Tips, tools, and tricks
DJ tools, vocal loops, and ambient interludes can be well utilized in this context. They can help inform how to treat your synthesized material against the completed tracks. Think of it as a set built out of stems: first, use the drums and vocal loop from one of your songs as a lead-in to a DJ track; then, in the outro of that track, start peppering in the melody from your next song and build your song from there.
Adjusting your synth envelopes is a great technique here: start with very short decay, sustain, and release, then slowly increase those parameters, bringing in the sound until it commands your attention. One technique specific to Octatrack that is a boatload of fun is making use of it’s live resampling capabilities. This tutorial is a good beginner’s guide if you’d like to delve deeper into the Octatrack’s capabilities: Octatrack Crossfader Transitions Trick – YouTube
Make use of risers and other time-based samples for build ups and drops. Tease a recognizable track as you work in your own remix. Spend a minute or two glitching out a drum break. Most of the same techniques that you would use in a “normal” DJ set are applicable here – you’ve just got significantly more control over each element.
Mind Games
This freedom can allow you to compartmentalize different sections of your rig, and ultimately lead to a more focused set. For example, you can have a designation between playing back more sample based songs of your own, live synth jams with lots of filter tweaks and riding grooves, and DJ tracks to interlude between the former two.
Obviously, this division doesn’t need to be hard and fast – experimentation is key! It can keep your mind active and promote novel approaches to your set to be able to shift into a different way of playing as you explore sonic territories. Not only does this give you a mental break from the constant activity of a live synth set, but it provides your audience with a bit of a cleanser, and allows them to see you interact with your gear in different ways for a more dynamic and engaging performance. Everybody wins!
Give this a shot at home and share your experience. Any other tips or tricks you’d share? What other questions do you have? Let us know in the comments below.


