Getting the best sound you can when playing live could require a little more work than a tweak here and there on your EQ knobs. If you use music from a variety of time periods, genres, and sources, you may experience noticeable disparities in tonality, loudness, and general quality. Luckily, there’s something you can do.
Final stage compression and EQ can totally transform the sound you get from your system, and automatically level out different sounding tracks – and the best news is, you can dip into the basics right now.
THE MISSING LINK
You may be lucky; if you use Ableton Live, Torq, or another piece of software that can host VST/AU plugins, this step isn’t necessary. If you’re using Traktor or another piece of kit that doesn’t, though, then you’ll need to read the rest of this section.
 JACK is a simple tool that allows you to send audio between different software, and it’s available for free for Windows, Mac, and Linux. With Jack, we can send the outputs from our DJing software to another software with almost zero latency. There are alternatives of course, but Jack is cross platform and simple to use. This extra link in the chain allows us to colour and shape the sound before it reaches the speakers, and could turn your setup from so-so to sweet.
 Setting Jack up is simple – after installing, run JackPilot and confirm your audio device and settings (‘send’ from your host software to your plugin software, and ‘receive’ the other way round) . Once you’ve done that, you’ll notice that Jack will appear in your softwares’ input and output menus. Select it in your DJ software (Traktor pictured) and configure it as normal.

When we get to the input stage in a minute, all you’ll need to do is select the Jack output as the input and voila – a Jack shaped tunnel through your system.

You’re now ready for the next step.
MASTERFUL POTENTIAL
Time to look at what we can actually do with our sound! Here are some basic terms you’ll need to know:
- Compression is a process in which peaks in loudness are reduced to create a more even volume in an audio signal. Compressors work by reducing any audio that breaks the defined threshold by a ratio of itself. The master gain is then increased, and because the mean volume can now be higher, as the peaks are no longer as pronounced, the signal can be louder and more uniform.
- Limiting is the logical conclusion to compression, whereby the ratio that the peaks are reduced by is infinite and so essentially the audio is squashed below a maximum loudness. This ensures that no audio can ever reach above a certain level and so is great for matching volume throughout a set, especially if the limiter has an ‘auto gain’ function that ensures the dB level is always pushing against that maximum line.
- Graphic EQ is probably familiar to anyone who bought a stereo in the 90s (or has ventured into their iPod’s EQ setting, at least). A number of frequency bands at predefined points are available for tweaking and can be used to stamp character onto audio and adjust for how a room affects sound.
- Parametric EQ is a form of EQ where the bands can be freely set to any frequency, and their bandwidth can be played with to be as wide or narrow as you choose. These are really good for sorting out a room’s acoustics.
- Amp/Tape/VCA/etc Emulation is a huge buzzword in the digital audio world, because for all the advantages that digital audio brings the thing that’s missed the most is the character that analogue equipment can bring to audio. The above processes can be done absolutely perfectly in digital, but with analogue processing there’s always some kind of colouration. Especially when compressing a signal, saturation occurs. This is when pleasant harmonics are created as the signal overloads and folds back into itself, whereas digital overloading is just a mess.
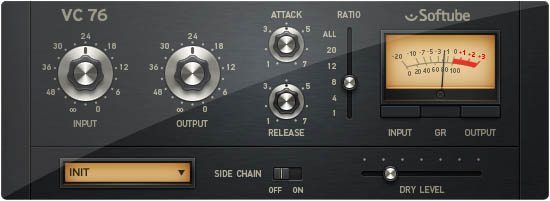
It takes practice to get good results from mastering tools, but the key is to be subtle. The more extreme your compressor threshold, the more the signal will be affected even as overall volume takes a dip – and the greater the ratio the more squashed things will sound.
Which way round you route your EQ and compressor is up to you and your experimentation. If you EQ first, it will affect how the compressor works and with practice you can use this to your advantage – pushing up the bass in a signal will have the compressor kick in on that bass and can give that ‘pumping’ sound. EQ after compression allows you to be a little more precise and ‘even’ sounding, but you will still have to be mindful of peaks getting too pronounced.
Of course, there are a huge number of ways you can manipulate your sound – as you’ll no doubt discover as you start to dip your toe in the world of audio plugins – but I’d recommend you keep things simple and stick to compression and EQ for this task, with a little warming if that’s the sound you’re after.
STAND ALONE, OR UNDER MY WING?
When it comes to the software required for the actual mastering process, there are two main options: a plugin host or standalone software. If you’ve never run across plugins before, they are a pretty simple concept to grasp; software is often created with a mind to expansion by third party developers, who can harness a bridge that allows them to tap into the main software and augment its capabilities with their own software that – you guessed it – plugs in to the host. Computer music has a long history of plugins, and the two biggest types of plugins are VST (Virtual Studio Technology) and AU (Audio Unit), popular on PC and Mac respectively. Because a plugin can’t run standalone, you will need a host to use one; because a full DAW like Ableton Live, Cubase, or Logic is overkill for our purpose, a specialised plugin host that just hosts plugins is more suited – and as an added bonus we found a free one for Windows, VST Host, and a reasonably priced one with a free demo for Mac, Rax. If you do decide to go for the more fully fledged system, Reaper is always available at a very reasonable price.
There are so many plugins we couldn’t possibly make a definitive list, but a couple I like are PSP Vintage Warmer, which sounds excellent and really warms up and smooths out audio, as well as the VC76 from Native Instruments’ Vintage Compressors collection. EQ wise, the Fabfilter Pro-Q has absolutely excellent zero latency sound.
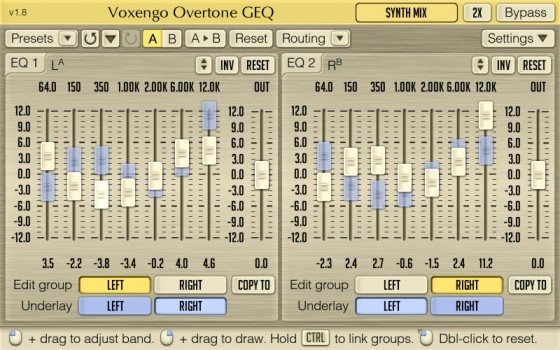
Most paid for software have demos you can try, but we scoped out some free options for you too – give Blue Cat Triple EQ, a ‘semi parametric’ EQ tool, Voxengo’s GEQ, a graphic EQ that adds colouration to your sound, and Molot, a low latency compressor a look (although your Russian might need brushing up, it does sound good). If you’re prepared to do a little searching of your own, KVR Audio has one of the biggest databases of standalone software and plugins on the net – if you really want to sound individual, it’s worth putting in the ground work (of course, if you’re the caring sharing type, why not let us know your finds in the comments?).
Standalone software is out there, and we’d suggest you take a look at IK Multimedia’s T-Racks and NI Guitar Rig. Each allow you to mix and match various different models of effects processors within their systems (like the aforementioned Vintage Compressors for Guitar Rig), and they both have low latency modes for direct playing as well as add ons and light versions.
LIMITATIONS
Perhaps the biggest limitation here is that all this relies on you mixing in the box. If you do your mixing in an external mixer then you won’t be able to apply these stages to your final output without running a cable back into your audio interface and then outputting from your audio interface to speakers… and that’s probably going to stretch the acceptable boundaries of latency. You’ll still be able to do it per channel in order to level things out before they get to the mixer though. If your software is like Itch or certain Traktor LE versions that lock the software to the audio interface, unfortunately you’re out of luck for this guide and will have to look into dedicated hardware if you want to give this a try.
Another limitation is with the software itself. A lot of DJ software is closed box because a large amount of R&D goes into creating the lowest possible latency and CPU saving processes to ensure a great user experience, and you might find that the better a plugin sounds, the more latency it introduces into the signal and the more CPU it eats up. This is just an unfortunate reality, and it’ll take some trial and error to find the perfect setup.
Finally, by the very nature of what you’re doing you may lose a little control over the mixer’s EQ, volume, and effects as the compressor works against them and keeps trying to make things smooth. Worse still if you really set things up wrong the sound will be completely flat and lifeless. For this reason it’s best to employ this technique subtly: Practice makes perfect.
Check out this video of Mr Scruff – pay attention to the latter part where he shows off his hardware final mix EQ and gain stages and gives his reasons… impressive!


