DJ TechTools
  • Blog
    • DJ Gear
      • DIY Projects
      • Gear Reviews
      • New Products
      • Controllerism
    • Techniques + Tips
      • Beginner DJ
      • Advanced DJ
      • Producer
      • Finger Drummer
    • News + Culture
      • Editorials + Opinions
      • Artist Interviews
      • Performances + Routines
      • How I Play
    • DJ Software Tutorials
      • Serato Tips
        • Traktor Tips
      • CDJ Tips
      • Ableton Live Tips
  • Store
    • Run by real DJs, not a corporation
    • DJ Controllers
      • Midi Fighter Twister
      • Midi Fighter Spectra
      • Midi Fighter 64
      • View All
    • Accessories
      • Chroma USB Drive for DJs
      • Chroma Caps
      • Chroma Cables Audio
      • Chroma Cables USB-A
      • Chroma Cables: USB-C
      • DJTT Gift Card
      • Midi Fighter T-Shirt
      • Keyboard Covers
      • Earplugs by V-Moda
    • Production Gear
    • Soundcards & Mixers
  • Community
    • Popular Forums
      • General Discussion
      • Buy & Sell
      • Reviews
      • Mixes
      • Music Production
      • Show Your Setup
      • Off Topic
    • Handy Links
      • New Posts
      • Private Messages
      • Register
      • Search
    • Midi Maps
      • Traktor
      • Ableton
      • Serato DJ
      • Midi Fighter 3D
      • Midi Fighter Twister
      • Midi Fighter Spectra
  • Midi Fighter
  • Chroma
No Result
View All Result
DJ TechTools

Recreating The EQ Section Of Richie Hawtin’s Model 1 Mixer In Ableton Live

DJ Soo by DJ Soo
May 12, 2016
in Ableton Live Tips, Advanced DJ Tips
Reading Time: 5 mins read
0
Recreating The EQ Section Of Richie Hawtin’s Model 1 Mixer In Ableton Live
1.5k
VIEWS
Post on FacebookTweet thisUpvote on Reddit

On the new PLAYdifferently Model 1 mixer designed by Richie Hawtin, there’s a unique approach to the actual mixing section. Instead of a ‘traditional’ 3-band EQ, there are two filters and a “parametric EQ”. But for many DJs, the only way they’ll be able to try this style of mixing is by shelling out over $3,000 on the mixer – so DJ Soo has created an Ableton device that allows anyone to try out a very similar workflow. Keep reading for a free download!

A Unique EQ Section On PLAYdifferently’s Model 1

With the much-hyped Ritchie Hawtin and Andy Rigby-Jones PLAYdifferently Model 1 mixer making its official announcement last week, we’ve gained another high-end audiophile mixer designed for a niche crowd of sound quality obsessed DJs. Alongside the Rane MP2015, Vestax/STP’s Phoenix, and the Funktion-One FF6.2, the Model 1 appeals to those looking for a throwback to the classic, rotary-style mixers of the past, but with modern features and design in mind.

Perhaps one of the most obvious changes on the Model 1 are the EQ controls, which are different from just about any mixer on the market:

Model 1 EQ Section

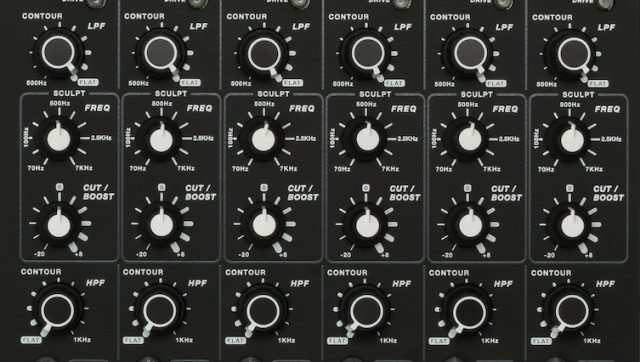
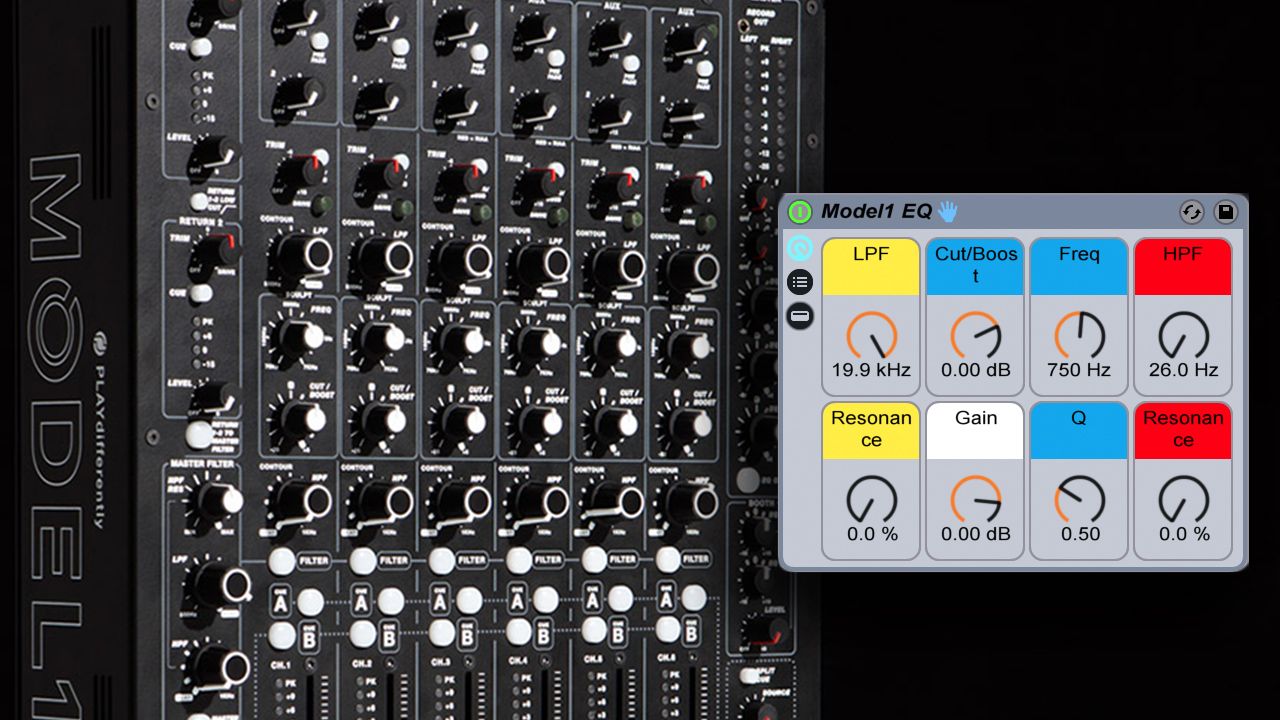
Rather than the standard 3 or 4 pots to allow either cutting or gaining a frequency spectrum band (generally highs, mids, and lows), the Model 1 uses high pass and low pass filters to cut out frequencies and then a single cut/boost knob alongside a sweepable frequency knob for the mids. Although this is fairly typical in studio and live sound mixing consoles (generally used to isolate feedback-causing frequencies and cutting them), it seems like a first for a DJ mixer.

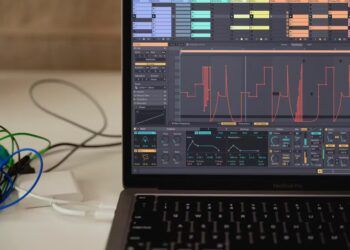
I was really interested in trying out this unique EQ setup, but shelling out $3600 just for the novelty of experimenting with the design wasn’t happening. Fortunately, the PLAYdifferently promotional literature – and even the labels on the mixer itself – is fairly specific with its parameters. Combined with the powerful macro features in Ableton, it’s not hard to create a reasonable emulation of the EQs using stock Ableton plugins.

Making the Model 1 EQ in Ableton

As mentioned, the Model 1 EQ consists of two filters and an EQ with a frequency sweep. We’ll start by adding the relevant Ableton plugins to controls those parameters:

  1. Start by loading up an Auto Filter, an EQ8, another Auto filter, and a Utilitystart-play-differently-Eq
  2. Select all the plugins and group all the effects in a single Effect Rack by right-clicking and selecting Group
  3. Start assigning controls to Macro knobs:

Low Pass Filter: Let’s map the Low Pass Filter first:

  • On the Auto Filter, switch the Filter Slope to 12 (see below) and turn the Resonance down to 0.

AF Slope

  • Assign the Freq knob to Macro 1 by right-clicking on the Filter Freq knob and assigning it to Macro 1.
  • For the most amount of transparency in the sound, we want the plugin to fully bypass when Low Pass is completely open – so assign the plugin on/off switch to Macro 1 as well.
  • Rename the plugin and Macro 1 to “LPF” by right-clicking it and selecting “Rename”

Sculpting EQ: Next, we’ll map the sweepable EQ:

  • Turn off all the filters on the EQ except for one Bell filter:

EQ filter

  • Select the activated EQ filter and map the Gain to Macro 2
  • Map the Freq knob to Macro 3
  • The Model 1 promotional material states that the mid EQ has a “wide” Q, so set the Q knob to a lower number – I used .5
  • Rename the plugin to “SCULPT” and Macro 2 to “Cut/Boost” and Macro 3 to “FREQ”

High Pass Filter

  • First, switch the Auto Filter to a High Pass filter
  • As with the LPF, change the Slope to 12 and the Res to 0
  • Map the Freq knob to Macro 4, as well as the device’s on/off button
  • Rename the plugin and Macro 4 to “HPF”

Gain

  • On the Utility, map the Gain knob to Macro 6
  • Since the Gain knob does not completely mute the sound (rather bottoms out at -35db), we should also map the Mute button to the same Macro, so that when the knob is turned all the way down, the volume is completely cut off.

Mapping Parameters

parameters

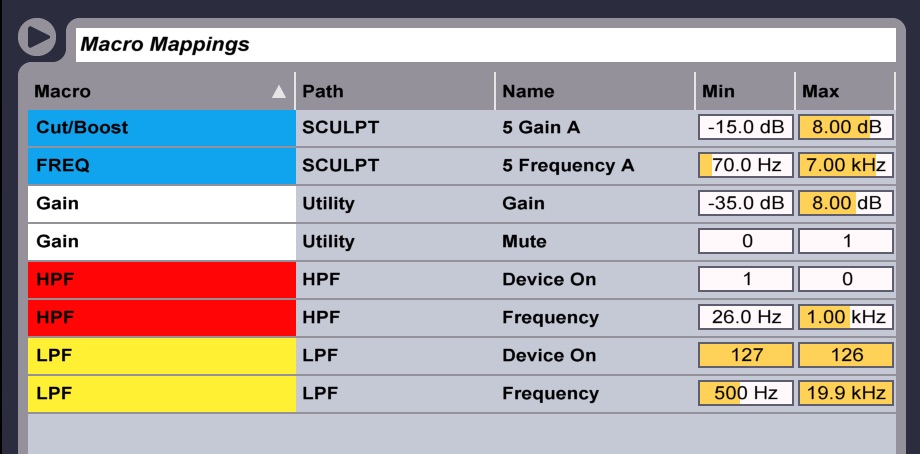
So once all of the Macros are assigned, we need to adjust the mappings so they function according to the Model 1 parameters. This will make sure that the final result is similar to the Model 1 in terms of what you’re able to control.

  • Click on the Map button at the top of the Rack to open the Macro Mappings window
  • On the SCULPT Frequency parameter, set the Min to 70 Hz and the Max to 7.00 kHz
  • On the SCULPT Gain parameter, leave the Min to -15 dB, and set the Max to +6 dB
  • On the LPF Device On parameter, set the Min to 127 and the Max to 126
  • On the LPF Frequency parameter, set the Min to 500 Hz and the Max to 19.9 Hz
  • On the HPF Device On parameter, set the Min to 1 and the Max to 0
  • On the HPF Frequency parameter, set the Min to 26 Hz and the Max to 1.0 kHz
  • On the Utility Gain parameter, set the Min to -35 dB and the Max to +8 dB
  • On the Utility Mute parameter, set the Min to 0 and the Max to 1

You’re done! This is now a reasonable facsimile of the PLAYDifferently Model 1 EQ section recreated in Ableton. You can map some more controls if desired: I mapped the Resonance controls of each filter to Macros as well as mapping the Q control on the EQ8 to its own knob to allow for greater control over the audio. You can also adjust the slope of the Filter cutoffs and filter types to taste.

The best way to play around with this would be to map to a physical controller with knobs – Midi Fighter Twister would work exceptionally well for a four-channel version.

This isn’t a frequency-for-frequency exact recreation of the Model 1, and due to limitations in the Ableton mapping design, finding the 0-point on some of these controls is a little tricky, but it will give you an idea of how the unique EQ section works.

Download DJ Soo’s Ableton Rack of the Model 1 EQ here for free! 

DJ Soo is a guest contributor to DJ Techtools, follow him on Soundcloud or Facebook. 

Tags: ableton liveeq mixingModel 1PLAYdifferentlyRichie Hawtin
Share12Tweet7Share
Previous Post

Secrets Of A Finger Drumming Champion: Coby Ashpis

Next Post

Mad Zach Sound Packs: Volume 5 Out Now

Related Posts

Ableton launches Live 12 Suite rent-to-own plan – and it’s not a subscription
Ableton

Ableton launches Live 12 Suite rent-to-own plan – and it’s not a subscription

October 1, 2025
Use your Midi Fighter Twister as an Audio-Reactive Visualizer
Ableton Live Tips

Use your Midi Fighter Twister as an Audio-Reactive Visualizer

June 23, 2025
Control an entire studio with Midi Fighter Spectra (like Mad Zach)
Finger Drumming

Control an entire studio with Midi Fighter Spectra (like Mad Zach)

May 9, 2025
Load More
Next Post
Mad Zach Sound Packs: Volume 5 Out Now

Mad Zach Sound Packs: Volume 5 Out Now

Want to reach DJTT's audience here?

Shoot an email to advertising@djtechtools.com

DJTT ads
DJTT newsletter
Midi Fighter
Chat with us
  • ABOUT DJTT
  • CONTACT
  • PRIVACY
  • MIDI FIGHTER HELP
  • ABOUT DJTT
  • JOBS
  • CONTACT US
  • ADVERTISE
  • PRIVACY POLICY
  • ACCESSIBILITY STATEMENT

© 2024 DJ Techtools all rights reserved by DJ TechTools on all content unless otherwise noted.

No Result
View All Result
  • Blog
    • DJ Gear
      • DIY Projects
      • Gear Reviews
      • New Products
      • Controllerism
    • Techniques + Tips
      • Beginner DJ
      • Advanced DJ
      • Producer
      • Finger Drummer
    • News + Culture
      • Editorials + Opinions
      • Artist Interviews
      • Performances + Routines
      • How I Play
    • DJ Software Tutorials
      • Serato Tips
      • CDJ Tips
      • Ableton Live Tips
  • Store
    • Run by real DJs, not a corporation
    • DJ Controllers
      • Midi Fighter Twister
      • Midi Fighter Spectra
      • Midi Fighter 64
      • View All
    • Accessories
      • Chroma USB Drive for DJs
      • Chroma Caps
      • Chroma Cables Audio
      • Chroma Cables USB-A
      • Chroma Cables: USB-C
      • DJTT Gift Card
      • Midi Fighter T-Shirt
      • Keyboard Covers
      • Earplugs by V-Moda
    • Production Gear
    • Soundcards & Mixers
  • Community
    • Popular Forums
      • General Discussion
      • Buy & Sell
      • Reviews
      • Mixes
      • Music Production
      • Show Your Setup
      • Off Topic
    • Handy Links
      • New Posts
      • Private Messages
      • Register
      • Search
    • Midi Maps
      • Traktor
      • Ableton
      • Serato DJ
      • Midi Fighter 3D
      • Midi Fighter Twister
      • Midi Fighter Spectra
  • Midi Fighter
  • Chroma

© 2024 DJ Techtools all rights reserved by DJ TechTools on all content unless otherwise noted.

This website uses cookies. By continuing to use this website you are giving consent to cookies being used. Visit our Privacy and Cookie Policy.