The basic principles of this technique will not require a rocket science degree. I know we usually just turn over the TKS file but in this case I would like to walk you through the basics so you can learn the principles yourself. I was asked the other day “why guitar hero”? The answer is simple, its a medium that the audience can relate to. Tapping on arcade buttons or keyboards may look cool and in many cases work much better but unless the audience can understand and relate to what your doing, they just wont get it. At this point just about everyone has either seen or played guitar hero so when you bust it out in the club the learning curve just got a lot shorter.
Pick your AXE
As you may have noticed there are a lot of guitars out there to choose from and several platforms as well. I recommend you get a wireless USB guitar made for the play station 3 console. Why? I can guarantee they will work perfectly without any fuss. Now that we have narrowed it down that still leaves several choices. They can basically be broken down into 2 camps.
The Guitar Hero Guitars
Pros:
- Looks more toyish and fun, impossible to mistake for a real guitar.
- comes with really bad decals that you can put everywhere including skulls on the neck buttons.
- The action on the strum bar is faster and cleaner
- its black!
- the neck comes apart from the body making it super easy to travel with
- the buttons are colored and visible from the front making it easier to see what you are doing
- the front plate is removable for easy painting and custom work
Cons
- the action on the fret buttons is squishy and not so enjoyable
- the wammy bar position sucks
- you cant do bass style thumb strokes
- it feels small and a tiny bit dinky
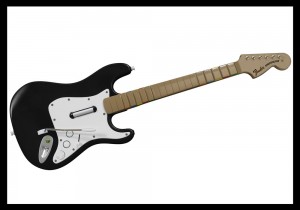
The Rock Band Guitar
Pros:
- The wammy bar has a much better feel and more comfortable position
- the neck buttons are much more crisp and clean
- there are 10 neck buttons BUT the 5 uppers duplicate the same messages so you really only have 5 buttons
- the strap is better
- its got a better size and feel
- it has a 5 position effects switch thats great for A/B focus
- the strum bar is much better for bass style plucks and thumb action.
Cons
- it looks too much like a real guitar.
- no detachable neck!
- taller strum bar makes 32 note strums harder to perform.
- the neck has no color on it so your 5 “notes” are not as obvious
Plug it in
All of the play station guitars transmit standard HID messages over wireless blue tooth to the included USB receivers. The device is instantly recognized by the computer and no drivers are required. HID (human interface device) messages are fast and accurate but there is no dj program that will listen to them so your going to have to convert it into MIDI or Key strokes. There are several tools that do the latter, many of which have been covered in this post. They are all a bit complicated and some are terribly expensive so if you are after a simple solution then convert your HID into key strokes. The program I used is obscenely basic, wonderfully free (for the trial period) and does the job just fine. Its called GamePad companion. (mac) This tutorial is explained using GamePad but you can follow along with a Windows equivalent such as xpadder.
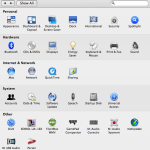
After installing GamePad companion you will never find the app because its been embedded into your system preferences at the bottom. Click there and you will find the settings.
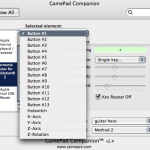
If your guitar is connected then you should see it show up in the left hand list. Simply select the Harmonix guitar icon and start assigning hot keys! First you need to select a element from the drop down list.
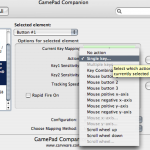
Then select the action you want to associate with that element. Once the action is selected you will see a dialogue that allows any key to be assigned to that element.
To keep us all on the same page please follow the assignments I have made bellow:
- button 1 = Single Key R
- button 2= Q
- button 3= W
- button 4= E
- button 5= T
- button 6 =5
- button 9= ,
- button 10=.
- hat switch= multible keys (y+u+i+o)
- Z axis= multible keys ( ; + ‘)
- Z rotation multible keys (a + s)
Connect the dots
Now you just need to hit start and gamepad companion will start spitting out keystrokes. The next step is setting up some Traktor hot keys. I will point you in the right direction so you can experiment with some of your own ideas out over the next few weeks. Then we will come back in part 2 and explain how to really take it to the next level!
You might consider:
- making each button jump to cue point 1,2,3,4,5 but not play
- making the down stroke play
- making the up stroke pause play
- finding creative ways to use the other buttons and wammy bar to engage layers or switch focus to different decks
- play around with using the strum bar to pitch bend a focused deck.
- experiment with the wammy bar as a super knob


