a note from the editor..
Timecode records are an amazing technology but sometimes their performance can be a fickle beast. DVS systems like serato and traktor scratch are subject to a wide number of variables including noise interference, cartridge quality and turntable calibration just to name a few. Its not uncommon to show up to a club and find one turntable is barely working with only a few minutes to trouble shoot before your set. For this reason I personally prefer the reliability of midi but turntable lovers must be able to diagnose timecode problems quickly and accurately. In this article Ranier, the author of the Traktor bible, will show you how to correctly identify almost all possible timecode problems.
TIMECODE BASICS
The magic of using timecode to control Traktor results from the interplay between the timcode decoder inside Traktor and the data format on the timecode media. This article covers the practical aspects and explains how to use the calibration feature to detect, analyze and solve timecode problems. Part 2 (to be published Friday) explains what’s inside the timecode signal and how Traktor extracts the contained information to control the deck playback.
If you are spinning with timecode then you should display the scratch panels for two reasons. One reason is that the scratch panel contains the RST button; this is the button you need to calibrate your decks with. The other reason is that scope view offers valuable information that can help solve timecode related problems.
Activating Scratch Panels in Traktor Scratch Pro
To do this open the dialog Preferences/Deck Details and activate the Scratch Panels with the check box for the decks with which you are using timecode. Scratch panels are always activated for two adjacent decks (i.e. A&B, C&D). The visibility of the scratch panels can only be set in this dialog. Traktor does not provide a MIDI command to do this. The Scratch Panels setting is stored within the layout definitions.
Activating Scratch Panels in Traktor Scratch Duo
Traktor Scratch Duo offers no direct way to activate the Scratch Panels. This can only be done by using the layout selector in the Traktor header and selecting the appropriate layout. There are two layouts where the scratch panels are enabled.
Those are: Ext. Mixer (Sync) and Ext. Mixer (Scope). If your layout selection list offers different layouts you need to start the Setup Wizard (click its command in menu Help). Select No or Other Controllers in the upper list of the Wizard and Traktor Scratch – A4DJ in the lower list. After clicking Apply the Wizard rebuilds the layouts you need to activate the scratch panels.
Scratch Panels: Vinyl View and Scope View

The scratch panels offer two different views: the vinyl mode and the scope mode. In vinyl mode (sticker view) the scratch panel looks like the adjoining figure. Vinyl mode shows a “virtual” vinyl or compact disc: the disc rotates if the deck is receiving timecode signals form the turntable or CD player. The direction and speed that the “virtual” vinyl is rotating corresponds to the direction and speed that the timecode vinyl or timecode cd is turning. (Part 2 of this series explains how Traktor detects this information.)
Click the scratch panel to switch between vinyl view and scope view. In scope mode the scratch panel displays information about the signal that the timecode decoder receives from the turntable or CDJ player. And: Scope mode displays the most important button when using timecode: the RST button. Clicking the RST button calibrates the deck. More information about calibrating can be found further down.
The Calibration Circle
The scope mode is an important source of information for detecting, analysing and solving problems with timecode control. The following table shows how the scope mode can look like and explains what to do to solve possible problems.
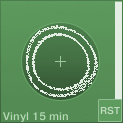 | This is how the calibration circle looks with timecode vinyl if everything is okay. Traktor displays information about the detected medium in the lower part of the panel (here the 15 minute side of the vinyl). |
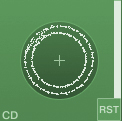 | This is how the calibration circle looks with timecode CD if everything is okay. Traktor displays information about the detected medium in the lower part of the panel (here CD). |
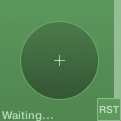 | Traktor is waiting for the timecode signal. This is a normal message and we don’t need to be worried. This scope is shown, for example if the needle is lifted from the vinyl. |
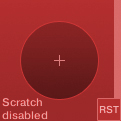 | The scratch functionality is deactivated. Reason is in 99% of all cases that in Audio Setup an audio interface has been selected, which is incompatible with Traktor Scratch. Solution: Open dialog Preferences/Audio Setup and select an audio interface compatible with Traktor Scratch. |
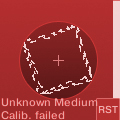 | Traktor receives a timecode signal from a timecode CD, but the input mode for Audio 8/4 DJ is set to Timecode Vinyl. Solution: Set the input mode on Audio 8 DJ to Timecode CD/Line; set the input mode on the Audio 4 DJ to Line (CD Control). |
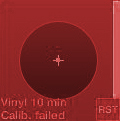 | Traktor receives a timecode signal from timecode vinyl, but the input mode for Audio 8/4 DJ is set to CD-Control. You can see a very small circle in the middle of the scope. It can be larger than in this figure if the cartridge has a high output level. Solution: Set the input mode on Audio 8 DJ to Timecode Vinyl; set the input mode on the Audio 4 DJ to Vinyl Control. |
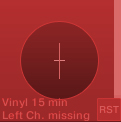 | Traktor has detected the control medium (vinyl, 15 minutes side), but it only receives the right channel; the left channel is missing. Solution: Check the cabling and check the cartridge connec-tions. |
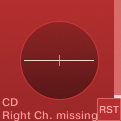 | Traktor has detected the control medium (CD), but in this figure the right channel is missing. Solution: Check the cabling and check the cartridge connections. |
 | This is how the scope view looks if a deck receives a normal audio signal and not a timecode signal. |
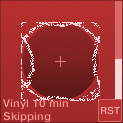 | Traktor has detected the timecode medium (here vinyl), but the medium is skipping. If you are using vinyl check if the needle needs cleaning. |
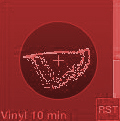 | Traktor receives a timecode signal from timecode vinyl, but the calibration circle isn’t really a circle. This happens when the balancing weight of the pick-up arm isn’t properly configured. Solution: Check if the zero marker of the balancing weight is properly configured. Check it the balancing weight itself it set to the correct value. |
 | Traktor receives a signal from timecode vinyl, and again the calibration circle isn’t really a circle. You also get this kind of view if the balancing weight of the pick-up arm isn’t properly configured and if the anti-skating wheel is set to 0. Solution: First check the balancing weight. Then set the anti-skating wheel to the same value as the stylus force. |
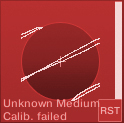 | This is how the scope view can look like if both cables have been removed. Traktor receives interferences only. Solution: Check cabling. |
 | And here is space left for your figure, if I still have forgotten one of the views. |
Calibrating
The scope view contains a button labelled RST (Reset, the official manual calls this the ON button). This button starts the timecode calibration of the deck.
When using timecode there are five important rules. These are:
- Calibrate your decks every time you start a new Traktor session. (This is a rule without any exception.)
- Calibrate your decks every time you change the input mode – this reinitialises the timecode decoder and it detects the proper timecode medium. (This is another rule without any exception.)
- Calibrate your decks every time after you switch between using normal records/audio CDs and using timecode vinyl/timecode CDs. (This again is a rule without any exception.)
- Calibrate your decks every time you change the cabling – this can help solve the issue where the tracks are playing backwards. (This again is a rule without any exception.)
- Calibrate your decks every time there is a timecode related problem and check how the scope looks by using the previous overview. (I guess you expect it now: This again is a rule without any exception.)
When a deck is calibrated Traktor analyses the incoming timecode signal. It detects the medium type (vinyl, CD) and whether both the left and right channels are connected. To repeat: You must calibrate every timecode deck every time you start up Traktor (if you want to use timecode control). This helps in detect-ing potential problems early. Additionally you cannot switch to absolute tracking mode if the decks aren’t calibrated.
HOW TO CALIBRATE
- Open the scratch panel and switch to scope mode.
- Drop the needle onto the timecode vinyl or start playback of the timecode CD.
- Click the RST button. The calibration process only takes some seconds. During the calibration the yellow bar at the right side of the scope view raises.
- Check if the calibration circle is okay. Also check if Traktor is displaying an error or warning message in the lower part of the scope view. In this case use the table on the previous pages to solve this issue.
Also you can use the MIDI command that corresponds to the RST button to calibrate your decks. The command is: Timecode | Calibrate.
Rainer G. Haselier is the author of the “Traktor Pro Bible“.
Dj TechTools readers are invited to use the following discount code to get 15% off the book in the CreateSpace e-store!
SWBLQERF


