Intro by Ean Golden
Not that long ago, it was somewhat far-fetched to expect a DJ to understand custom midi-mapping, let alone do any. These days, with the controller market expanding rapidly, most DJs are aware of the concept and have dabbled with a custom mapping here or there. You probably have discovered that although it is easy to map a button to anything in Traktor, it is a bit more challenging to make the button light up in a meaningful way. This involves understanding the second, lesser-known side of midi-mapping – sending midi OUT messages from the computer to your controller. In this article, Brad Cousins will show you how to control the LEDs on your controller using Traktor Pro, and will provide several excellent examples of how to use this technique, including how to show cue point states with multicolored buttons.
MIDI-OUT FUNDAMENTALS

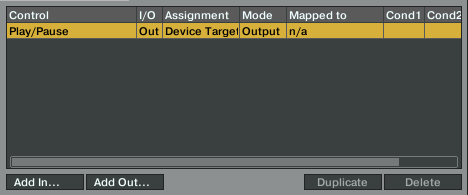
Some buttons light up on their own when pressed, but most need to get a message from the software that says: “HEY BUTTON DUDE, something just happened, quick – light up!” The button will stay lit until the software sends another message along the lines of “OK, everything’s over now, you can go home.” You, the grand midi-mapping maestro, get to determine what events send those messages to the buttons. These are midi-out mappings, and in Traktor Pro you can add one by clicking the ‘Add Out’ button. You then insert the event that will trigger the message, like ‘Play/Pause’ in the image above, assign it to a button, and voila – when play/pause is active, the button will light up.
One REALLY ANNOYING THING IN TRAKTOR PRO THAT SHOULD BE FIXED IMMEDIATELY, is the fact that you can’t ‘learn’ midi-out to a button, so you have to know what note the LED receives on and then manually select it from the list. This is usually the same note that the button sends out, so map it to something or use a midi-monitor software like midi-pipe.
GETTING INTO THE GOOD STUFF
Getting buttons to light up in interesting and more creative ways, such as using multiple colors to display various states, is a powerful trick you need to know. In my opinion the ‘Controller Range’ and ‘Midi Range’ are the main things you need to understand, as these tell Traktor and the LED how to interact with each other.

Controller Range
Despite the name, this is Traktors side of the equation. The ‘Min’ and ‘Max’ boxes basically control what state the function (for example, Play/Pause) needs to be in for when the LED is on (max) and off (min). With a lot of functions you’ll just get a range of 0 to 1, so the obvious thing to do here is set min to 0 and max to 1.
However, with some functions, ‘Hot Cue State’ for example, a wider range is available; in this case -1 to 4. Here, a simple on/off approach doesn’t always work, as setting the min to 0 and, say, the max to 2 would result in Traktor trying to output for the 3 states (0, 1, 2) across this range, leading to erratic LED behavior. In these cases I find it best to put the same number in the min and max, which gives nice solid on/off behavior.
The thing to remember is that each value directly relates to a state for that function; some of them are obvious and some will relate to a drop down menu on the GUI in exactly the same order. One complex example would be FX: you can choose a particular effect by selecting the number corresponding to where that effect sits in the group.
Midi Range
This relates to your controller’s side of things. In most cases I’ve come across you’ll see a range of 0 to 127. 0 would be off, and 1 upwards is on, with varying degrees of brightness (depending on the controller).
A lot of controllers have two LEDs under each button (the VCI 100, for example) so 0 would be the ‘off color’ and 1 upwards would be the ‘on color’. For a basic on/off output set the min to 0 and the max to 127.
Without getting too complicated, some controllers have more than the normal two states. The APC40 has seven: off, and then green, red and orange, in both solid and flashing states. So if you wanted an LED to be solid green for on and flashing green for off, the min would be 1 (flashing) and the max would be 2 (solid).
From here on, it’s time to decide if you need to check the invert and blend boxes.
Invert
- Does what it says on the tin; checking this swaps the output around so that the LED turns on and off the opposite way.
Blend
- This is used for controls like faders and knobs where you want the LED to get brighter/dimmer the closer you get to either end of the control’s range of travel.
- For this you would use a wide controller range (say 0 > 64, with a matching midi-range) and the range will blend into one smooth signal.
- If you want an on/off effect, either with a button or a knob/fader working as a ‘switch’, you don’t need this!
Assignment

This works the same as when mapping an input. However, in cases where it can only be assigned as ‘global’ but can be used across all decks (Deck Focus, for example), the range would be 0 to 3, in the order of deck A to D. This is similar to the drop-down on an input when you set it to ‘direct’.
You should now be able to easily map simple stuff like play/pause. But just to consolidate all this information, here are some examples.
Modifiers

The modifier section works exactly the same for standard mappings. To learn more about this subject check out our article on modifiers!
REAL-LIFE EXAMPLES!
Deck Focus
Let’s say you have four lights you want to use as a quick visual reference for viewing which deck is in focus. As I (conveniently) mentioned above, focus can only be assigned as ‘global’ – not to a specific deck.
- For this you would set the controller range min/max to:
- Deck A – 0/0
- Deck B – 1/1
- Deck C – 2/2
- Deck D – 3/3
- Midi range min/max for all would 0/127, and also uncheck invert and blend
APC40 cues
There are several threads relating to this on the forum, so for convenience I’ll put an example in. This gives a red LED when a cue isn’t set and green one when there is. For this controller, the range min/max need to the same because of the ‘wide range’ of states for this function, as I mentioned earlier.
- Set an OUT for ‘Hot Cue State [X]’
- Assign it to the relevant note
- Set the controller range min/max both to -1 (cue in drop down list of advance panel)
- Set midi range min to 4 (red)
- Set midi range max to 2 (green)
- Uncheck invert and blend
Modifier State
This is something I personally found very handy as my jog wheels have four functions, so I set up a couple of LEDs to show when they are in ‘browse’ mode and ‘C & D scratch’ mode.
- Set an OUT for ‘Modifier [X]’
- Assign it to an LED
- Set the controller range min/max to 0/1
- Set the midi range min/max to 0/127
- Uncheck invert and blend
This example is based on the one modifier being used to switch between two functions, in which one mode is active when the modifier is off and the other when the modifier is on.
As you can only map two conditions on an input I have modifiers 2 and 5 linked to my jog modes, both with ranges of 0–2. I then mapped both my LEDs for modifier 5 with control ranges of 1/1 (C & D scratch) and 2/2 (browse) in line, again, with the ‘wide range’ method.
Flashing LED on a controller that only has on/off states (such as the VCI 100)
This is a cool technique I found in the forum, courtesy of bassmeekens
- Set up the Play/Pause output as normal, but under the modifier conditions, set ‘is in loop’ and 0
- Now create an output for beat phase meter
- Map it to the same LED
- Set the controller range min/max to 0/0.1 (the phase meter range moves up in decimals from 0 to 1)
- Set midi range min/max to 0/127
- Set modifier to ‘is in loop’ and 1
- Uncheck invert and blend
Now when you hit the loop button on that deck, it changes the ‘loop mod’ state to 1 and this output map overrides the play/pause one, making your button flash!
WOW, THAT WAS LONG
Hopefully this has helped to shed some, er… light on how to map an LED, and has made things a bit clearer for you.
Thanks for reading, and have fun mapping your outputs!
Whether you create mappings or simply love using them, you’ll appreciate our new Mappings Database!
About the writer: Brad Cousins is a Traktor DJ and writer who has his own blog on DJing- check it out here


