Have you ever been inspired with an amazing idea of how to take your MIDI controller to the next level by making your own custom super DJ mapping only to find yourself confused, frustrated, and ultimately stumped when dealing with Traktor and its Controller Manager? Chances are, some of you got scared off before even attempting it. Today we’re going to break down the basics of Traktor mapping in a simple and easy-to-digest manner.
For the most part, it primarily all comes down to one key mapping feature in Traktor: the MIDI modifier. If you have some mapping experience, this may not be a revolutionary lesson, but don’t write it off just yet. The Traktor modifier is a fundamental component to any mapping beyond one-to-one function assignments, and there are often a lot of misconceptions in exactly how these modifiers work.
ALGEBRA 101
Put simply, a modifier is a basic variable. You know—like you probably learned in algebra, with some example like, “X+1=3. So what is X?” But more specifically, the Traktor modifier is a variable that can only be an integer value ranging from 0 to 7. Not only that, but for each mapping in Traktor, there are only a total of eight modifiers to work with, each named with an M (for modifier) in front of the number, like M1, M2, M3…M8. Don’t pay too much attention to the number name of the modifier, though, as that is simply to tell them apart. M1 doesn’t inherently act any different than M2 or M8, and there is no order of operations that has to do with their numbering scheme. Another important thing to know is that all eight of these modifiers are initialized to a value (also known as a “state”) of 0 when opening Traktor.
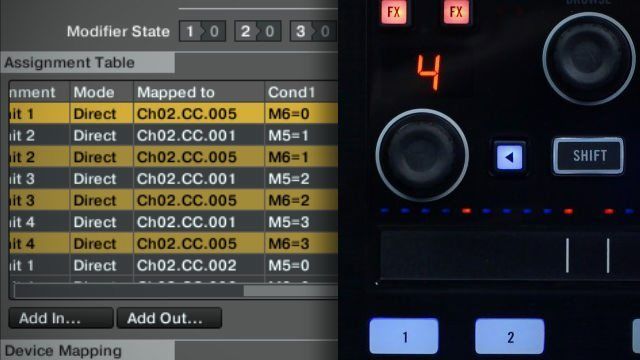
To get a better visual understanding of what we are working with, we are going to take a look in the Controller Manager of Traktor’s preferences and see the line of Modifier States above the Assignment table. This is a very important place of reference as it will always show the current state/value of each of the eight modifiers within the selected mapping. And see, as mentioned in the paragraph before, all the modifiers default to a value of 0 when starting up Traktor.
Now, if you’re thinking, “I don’t get it. How do these variable modifier things that have number values in them help me to make my controller do crazy DJ things?” Well, take a deep breath and be patient, we’re getting there. The next key element to utilizing modifiers in your mapping is knowing how to use modifier conditions on the commands in your mapping. This is really important, as it basically tells Traktor to only run certain mapping commands at certain times or in certain scenarios, which allows a button or knob to have more than one dedicated function. So, as you can see below, each mapping command has the capability of having up to two modifier conditions.
The function of these conditions is that they tell Traktor that when the assigned MIDI data is received, look to see if the modifier condition is true (which in the case of modifiers means when the selected M1-M8 modifier is equal to the selected state number 0-7) and if so, then carry out the mapping command. If you happen to be familiar with programming at all, you can think of these modifier conditions as an If/Then statement.
For an example (referencing the picture above), if M1 is equal to 2 when the Ch.3 C3 MIDI note is received, Traktor says to go ahead and carry out this command (in this case to toggle Sync on Deck A). However, you can also see that M1 equals 0 in the Modifier State table above. That means that no matter how many times you push the button that is sending out the MIDI note Ch.3 C3, the “Sync On” command won’t run because Traktor looks to see what the state of Modifier 1 is before thinking to run this command, and once it sees that M1 is not 2, Traktor is like, “Sorry, buddy—no can do. I’m on strict modifier conditional orders. If M1 becomes 2 and you press that button again, then we can talk (and actually carry out the command).”
In essence, the use of modifiers and modifier conditions is what enables any button, knob, or wheel to have multiple functions in different modes, settings, or while holding the (oh-so-common) Shift button. And just to be clear, generally there is nothing that differentiates the button used as a Shift button from any other button on the controller (except in some controllers where the button doesn’t send out MIDI but causes everything else to send out different MIDI data while held—but that’s a whole different story entirely relating to firmware). The button designated to be Shift is just set up to trigger a modifier, and all the Shift-related functions simply look for the associated modifier condition to be true before carrying them out.
SHIFT HAPPENS
With that said, let’s go about showing you how to create a Shift button in your own mapping as an example of how to put modifiers and modifier conditions to good use. I’ll break it down here into a few easy-to-follow steps. Alternatively, you can reference the video above for a more visual tutorial.
Step 1: In Traktor’s Controller Manager, create a new mapping by clicking “Add…” and select “Generic MIDI.” Have a MIDI controller ready and plugged into your computer via USB. Make sure your controller shows up in the In-Port section and that the In-Port is set to All Ports or to your specific device.
Step 2: Click “Add In…” and go down to select “Modifier” and then any Modifier #. In this case, we’ll just use Modifier #8.
Step 3: Click “Learn” (Learn tells Traktor to listen to whatever is in your In-Port for incoming MIDI signals) on your new Modifier command and click whatever button on your MIDI controller you want to be Shift. The MIDI signal for this button should now show up next to the Learn button. Turn off the Learn button (so you don’t accidentally press something else and reassign the command).
Step 4: For your modifier command, change the “Type of Controller” to “Button,” the “Interaction Mode” to “Hold,” and the “Set to Value” to “1.” Try pressing the button now while watching M8 in the Modifier State table. When you hold down the button, M8 should be 1 and when you release the button it should go back to 0. Pretty cool, huh? If you’d like, try changing the “Set to Value” to another number and notice how it works exactly the same.
Let’s put in some mapping commands now to utilize our brand-new working Shift button. The most common shift-friendly command that comes to mind is for Setting/Triggering a HotCue Point and then making the Shift function of it to Delete that HotCue.
Step 5: Click “Add In…” / “Track Deck” / “Cue” / “Select/Set + Store HotCue.” Decide on a new button to Control HotCue1 (or any HotCue for that matter) for Deck A and then press “Learn” on the command and hit your button. Turn “Learn” off. Set the “Type of Controller” to “Button,” the “Assignment” to “Deck A,” and the “Set to Value” to “HotCue1.” Lastly comes the important part. Set a Modifier condition on this command to be M8 = 0 (just select M8 in the Modifier listbox and 0 in the Value listbox).
Step 6: Click “Add In…” / “Track Deck” / “Cue” / “Delete HotCue,” turn on “Learn” and assign it to the same button that you used for Step 5. Make sure the “Type of Controller” is “Button,” the “Assignment” is “Deck A,” the “Interaction Mode” is “Direct,” and the “Set to Value” is “HotCue1.” And now, to make this command only work when Shift is being held, select a Modifier condition of M8 = 1.
And voila! You can now Set and Delete Cue Points using your own made Shift button. You can repeat steps #2 through #6 above to do this for up to all eight HotCues for each Deck if you like. Sure, MIDI mapping can be repetitive at times, but the end result is well worth the work.
If along the way you were confused about what the different mapping options like “Interaction Mode” or the options at the bottom of the window do, don’t worry. Those things just take a little bit of time to learn; let us know in the comments below if you’re interested in more detail, and we can go further in another lesson.
BONUS ROUND!
So, you have your HotCue buttons that change functionality with your Shift button, but you also want to make the LED under the button light up when there is a HotCue set? No problem.
First off, we need to make sure our “Out-Port” on the mapping is set to “All Ports” or your specific Controller to ensure that Traktor knows who to talk back into in terms of sending MIDI. (Think of it like Traktor is going to tell the button on your controller to light up and the Out-Port sets the connection between the two.)
Select “Add Out…” / “Track Deck” / “Cue” / “HotCue 1 Type.” Click “Learn” and press the same button you used before to Set/Trigger/Delete HotCue1 for Deck A (if you’re using a really old version of Traktor and can’t press Learn, you’ll have to manually select the Midi Channel and Note through the list dropdown). Change the “Assignment” to “Deck A.” The following options should be set by default, but just in case, the “Controller Range” should be from -1 to 5 and the “Midi Range” should be from 0 to 127 with Blend checked on (don’t worry what these range values all mean for now; they can differ for each command and take some learning).
And that’s it! You’ve now set up a single button to Set or Trigger a HotCue Point, Delete it with the help of your new Shift button, and set your HotCue button to light up when there is a HotCue marker stored for visual feedback.


