Track organization and preparation is key, especially as your library continues to grow. You want to make sure that your BPMs are correct, the beat grid is tight, and the file is locked to save these changes to the track. Today, Ean is going to share a very precious resource, his own personal track preparation keyboard mapping! Track preparation can be a time consuming process, especially if you’re just using your mouse to do all the dirty work. This will help you save precious time when preparing your tracks by letting you quickly set detailed beat grids in very little time. The mapping and track preparation process has been fined tuned over 7 years. There’s no need to reinvent the wheel, download the mapping and follow along.
Beatgrids: Not Just For Sync
You might be asking yourself, “Why should I care about beatgrids? I don’t use sync.” While beat grids are crucial for sync, there are other benefits to having perfect beat grids. Many Traktor effects are actually tempo synced and they rely on a tracks beat grid to ensure the effect is in sync. If the beat grid is off, then tempo effects like beatmasher 2 or Delay won’t be in sync with your track. Having perfect beatgrids also makes it easier to set hot cues and loops. With the Snap function, you can place a new hot cue or loop and it will automatically snap to the beatgrid. If the beatgrid isn’t perfect then you may get pops/clicks at the start or end of your loops.
Of course, if you are using sync, then having every beat grid aligned properly will mean that almost any song in your library will match phase every time without any additional pitch bending.
Step 1: Download and Import the Mapping
Download the free “Ean’s Track Prep” mapping for the keyboard here.
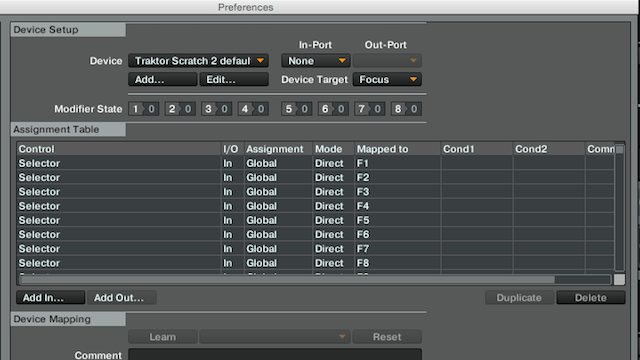
By default, Traktor already has a keyboard mapping loaded. To ensure the track preparation mapping works properly, you’ll want to navigate to the default Traktor keyboard mapping and set it the “in port” to “none”. You’ll also want to open Traktor’s preferences, go to the “Transport” section, and set “Sync Mode” to Beat Sync.
If you want to change this mapping, or if your keyboard is missing some of the keys – it’s very easy to re-map these commands to keys. The template is there for you to re-use in any way.
Step 2: Load and Lock
With the mapping loaded you can now quickly set a beatgrid, load marker, and a cue point at the beginning of a song. The mapping is designed to follow a very simple cycle of keys from left to right. Once you’ve loaded a track you can follow these steps.
- ~ – Jumps to the first marker of a song (this is usually Traktor’s auto grid marker)
- 1 – Sets a load marker and #1 hot cue at that position.
- = – Pauses the track, Zooms out and stops the metronome. (press twice to reset the master clock)
- delete – Plays the track, Zooms in and starts the metronome
- TAB – Skips through the song in 32 beat increments.
- { } – Moves the beat grid forward or back and zooms in very tight. (add shift for fine control)
- ( ) – Changes the BPM (with shift for fine control)
- 2 – Locks/unlocks the beat grid (prevents the beatgrid from being changed)
- 3 – Loads the next song
*Very important – The combo 1 function (sets multiple cue points) only works with new tracks that have no cue points and just one beat-marker. Freshly analyzed tracks are the best candidates. If your track has multiple beat-markers or cue points then delete all of them except the first one.
If you’ve been struggling with track organization and track preparation in Traktor then you’ll want to check out the full 25 minute masterclass from Ean. You’ll get a detailed walkthrough of the mapping, tips on managing your music collection, and how to find the perfect next track, even in a massive collection. This is the preparation/organization method you’ve been waiting for.


