The following Windows tutorial will get Traktor and Ableton all synced up and implement the concept of smart mixing into your set up. Some of you may be thinking, “What is smart mixing”? This is a good Question, and the Belvario Smart Mixer site answers it well. “”Smart mixing” is a term introduced by Moldover, a controllerist digital musician who uses a sophisticated software and hardware configuration that allows him to make fast changes to the mix with a minimum of control movement. One component of this is his “smart mixer” Reaktor ensemble, which makes it easy to do basic automated EQ mixing with a simple fader move in Ableton Live (in Live 7 it’s possible to do with only native audio effects).
This Tutorial is For windows users. There is a Mac version here.
You will learn how to:
1) Route Audio From Traktor and into an Ableton Live smart mixer.
2) Sync Abletons Midi clock to Traktor which will be hosting the master tempo
3) Allowing use of a midi controller in two programs at once.
You will need:
1) Midi-OX (free)
2) Midi Yoke Junction (free)
3) Asio4all (free)
4) Virtual Audio Cable (not free) – If you find a free alternative please leave a comment.
5) Traktor (not free)
6) Ableton Live (not free)
7) Belvario’s Ableton Live Smart Mixer (free)OR if you want to use moldovers smart mixer
Moldover’s Reaktor Smart Mixer (free if you own Reaktor5)
8) If using Moldover smart mixer you will need Reaktor5 (not free)
9) If using Belvario smart mixer you will need slim slow slider side chain compression VST(free)
Note: If your sound card that supports internal audio routing consult your manual for the steps that involve internal audio routing. Also do not use virtual audio cable or asio4all, instead use the software and drivers that came with your sound card
Edit July 2009: Instead of using the Belvario smart-mixer you can now use a completely rebuilt smartmixer we have made availible on the blog. See Smart-Mixing Setup for Ableton and Smart-Mixing explained.
Getting Started!
I suggest starting small and working your way up so start with the Belvario smart mixer. You will also find the Belvario smart mixer to be much more CPU friendly and simpler to use. After you have the hang of this you can use some of Moldovers effects in your effects chain, or change over to Moldover smart mixing if you prefer that. Both sets of files have an Ableton live file that you can open to help make setting up smart mixing easier.
Step 1: Setting up Virtual Audio Cable
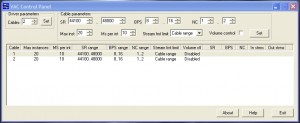
After installing the software mentioned above and rebooting your computer, The first thing we need to do is create two virtual audio in/out sets of cables that will enable Traktor to export its Audio to Ableton Live. You will need to open the Virtual Audio Cable Control Panel to do this. Change the set of cables to 2 sets(top left of control panel) – it should then look something like this :
Note: The more decks you want to work with the more sets of cables you will need, 1 set = 1 deck, 2 sets = 2 decks and so on. Here we are setting up two decks but this is easily scales to 3 or 4 decks.
Step 2: Setting up Midi-OX.
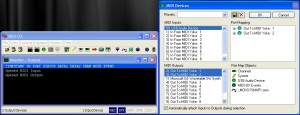
Windows does not normally allow two programs to access the same midi controller at the same time, so we will need to get around this by creating two virtual midi devices that export the data from your midi device. To do this we open Midi-OX and click Options then in the drop down list select midi devices, In the Midi Inputs box you need to select your midi device, then in the outputs box select midi Yoke 1 and midi Yoke 2 as shown above.
Step 3:Setting up Traktor
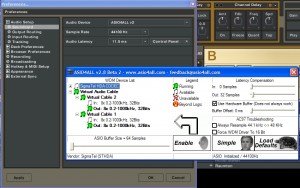
Open Traktor, Click File then Audio Setup. Set your Audio Device to ASIO4ALL. Next click Control Panel, click advanced to enable more options in the asio4all panel. You will need to disable all other audio devices besides Virtual Audio Cable signal outs. The more decks you want to work with the more Virtual Cables you will select here, one cable for each deck. In this instance we are using two decks as shown above
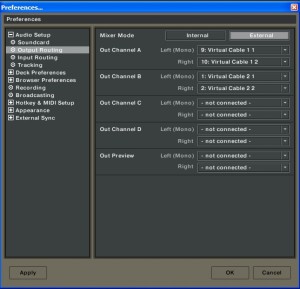
Next we need to route the decks to their respective Virtual Audio cables, exit the Asio4all panel after setting it up as shown above. Now on the left hand menu in the Traktor settings menu click Output routing as we will be mixing externally in Ableton the first thing you need to do is select external mixing mode. Now you need to tell Trakor which Virtual Audio cables to use on which deck, adjust with your settings so they look like whats shown below:
Note: The more decks you wish to use the more Virtual Cables you will have to select here.
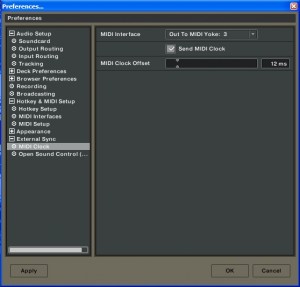
Traktor will be hosting the master tempo so we have to set the midi clock up to a midi pathway Ableton can access. Expand the menu and select Midi Clock, set the midi interface to ‘Out To MIDI Yoke 3’. Make sure to tick the send midi clock box as shown here. Once you have completed this tutorial you can come back and tweak the midi clock delay to get everything perfectly on time.
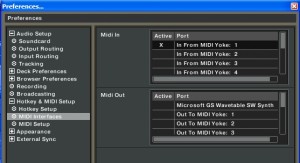
Now its time to select the midi device Traktor is going to use, on the preferences menu expand the “Hotkey and Midi setup” menu, then select Midi Interfaces from the Menu. Next set midi yoke 1 on just the in as shown below:
Step 4: Setting up Ableton Live
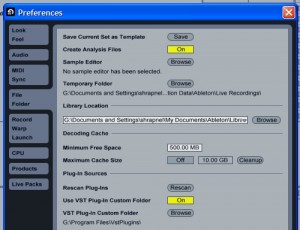
Open Ableton Live then open the Belvario or Moldover’s Ableton Live file. Make sure you put it into your Ableton VST directory and enable VST support in Ableton file settings menu like shown:
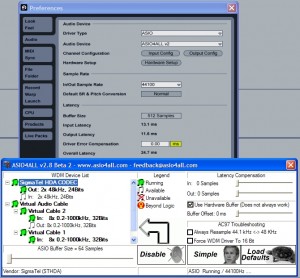
Click options on the Ableton Live menu, then preferences. You need to select the driver type to Asio, then the audio device to Asio4all. Click hardware config and set up your Asio Panel as shown in the diagram below. Once again the more Decks you want to have control of the more Virtual Cables Ins you need to select, for every one deck you need one virtual cable in activated. You also need to enable your main audio device this time, in my case this is the Sigmatel out which is the chipset on my laptop. If you have a sound card with two outs, you should enable both of these outs to allow monitoring in Ableton live. I only have a single channel out from my laptop at this time, this is why only one is showing and activated.
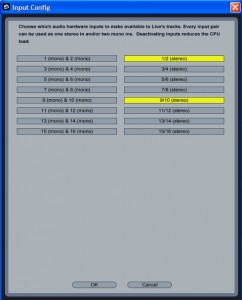
Ableton needs to know what audio ports you want it want to work with so click the Input config button on the Audio config screen. In my case Virtual Audio Cable routed my audio to Stereo 9/10 for Deck A and Stereo 1/2 for Deck B, strange outputs but at least the program is functional 😉 You might want to turn all the inputs on to start with to work out which cable is which, then disable the unused cables when you work out which cables are been used by Traktor. In the end it will end up looking something like this :
Now click Output Config, if you want to do your mixing externally on a mixer you will need to select one stereo channel for each deck you want to route. If your mixing with midi controllers you will need 2 stereo outputs enabled, one for your mix and the other for monitoring. I personally only have a single stereo channel sound card so i only have the one output enabled as shown :
The midi interfaces that Ableton will be using has to be set up next. Click Midi Sync on the Ableton menu then select Midi Yoke 2 and 3’s Track, Sync and Remote all to on. As shown here:
Now close the Ableton setup window and enable external sync by clicking the EXT button on the top left of the Ableton Live main window as shown below:
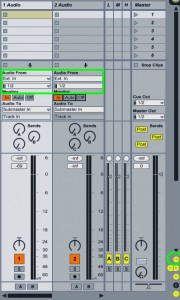
Change the inputs for the first two tracks in either the Moldover setup or the Belvario setup. Click the IO button to configure the inputs and outputs in your Ableton channels(circled in the picture), then change the inputs as shown in the rectangle.
You have now successfully set up from beginning to end the very basics of a synced smart mixer setup from Traktor to Ableton. I suggest assigning midi controls on your device for your EQ’s to control the sends on the Belvario smart mixer, or alternatively assign them to the smart mixer in the reaktor5 ensemble.
Personalize your mix by adding in VST’s and assigning them how you like, its also possible to add extra audio channels and add sampled(or your own content) to these tracks and have these channels smart mixed. This is only scratching the surface the possibilities are endless, all thats left for you to do is explore them.


