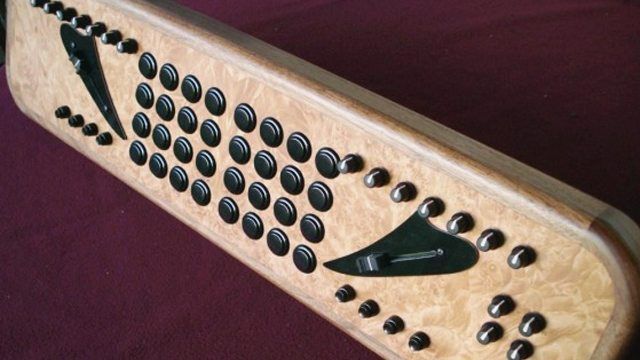
Anyone who has ever casually browsed through our domestic cable must have stumbled upon such gem’s as the “American Chopper” and discovered the unique world of beautiful custom motorcycles. Possibly inspired by that aesthetic, one of our readers has created his own custom Hot Rod: a classic looking arcade controller fitted with all the trimmings including flared faders and a gorgeous wood surface. Continue reading for more photos, tips on building your own DIY controller and even a great video demonstrating this unique instrument in action!
BUILDING MY “CHOPPER TONE”
By: Nick Francis
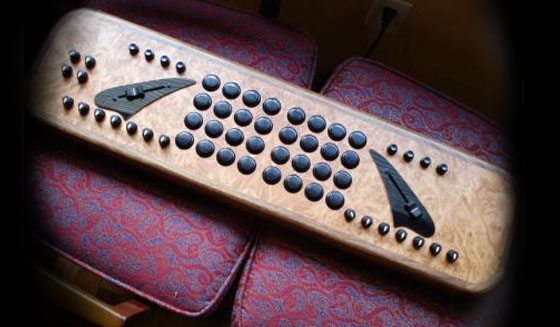
I think it was a post last year on Create Digital Music (with the announcement of the availability of the builder brain) that inspired me to consider building my own custom MIDI controller. After using Ableton Live for almost five years with standard controllers (Axion 25, Launchpad), I really wanted something that could be used in an intimate live performance situation like coffee houses, living rooms, small theaters. Instead of the standard plastic or aluminum, it had to be wood with soft round edges. I also wanted the face of the instrument with its buttons and pots and sliders to face the audience, rather than be sitting on a desktop, out of view. Something you could play on your lap and (with a strap) standing up. Kind of a cross between an elegantly smooth-carved jewelry box, and a guitar body. Most of all, I wanted this instrument to feel warm and beautiful.
Last fall, I attended a short talk at the Seattle Decibel Festival on building DIY MIDI controllers with Ean Golden. The one suggestion of Ean’s that really stuck with me was this: “Take your time with the design; look at every angle and every possibility.” I took this to heart particularly in regard to working with wood.
As far as choosing the components, pretty much straight away I purchased the Livid Brain and also bought turn boards, slide boards, and a breakout board from them. For buttons, I really dug those arcade buttons that are used on the MIDI fighter. The action and response to the touch are just really great, so I bought 32 black ones directly from DJTT.
For the design of the faceplate, I found some free software from frontpanelexpress.com, which served my purposes. I spent several months toying with all kinds of enclosure shapes and arrangement of components. Here’s a shot of the faceplate:
Because the thickness of the faceplate would have to be around 1/4″, it was necessary to make some adjustment for my pots and sliders (which are designed for thinner sturdier material). I decided to cut a rectangular hole in the faceplate with the exact shape of the slider pot and then attach the slider on top with some kind of guitar pickguard material.
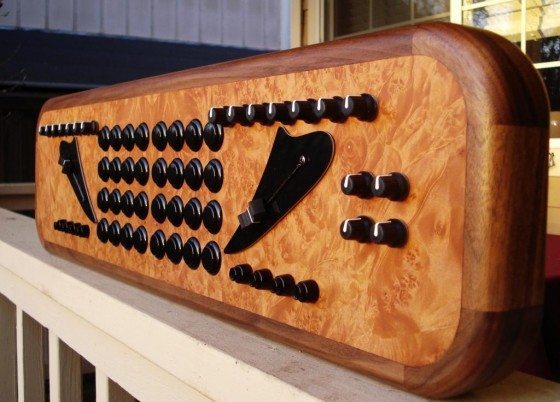
Now to the enclosure. I decided to go “all-in” and hire someone who had some skills. My wife was friends with a fellow in town named Carlos, who did custom woodworking. Carlos had a nice business doing custom furniture work on boats and yachts. Luckily, he was also a big music fan and hosted a weekly world music show on a local radio station. When I came to him and explained and described my project, he totally got it. Carlos suggested a 1/4 inch plywood top of maple burl, with the frame made out of walnut.
One week later the enclosure came back. Here’s what it looked like:
The next project was finishing the wood. I decided to use a very simple, though time consuming process of using Danish finishing oil. Each day I’d put a coat on and then wipe it down. I put nine coats on. By that last coat, it was really starting to shine.
The design for the pickguards came from a Gibson Thunderbird Bass, which were purchased from stewmac.com. Here’s what it looked like about halfway through.
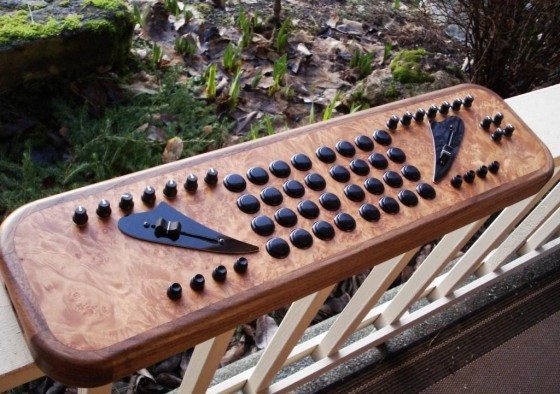
The last assembly section was with the button matrix. Tedious, but doable. And here’s the finished product, both the outside look.
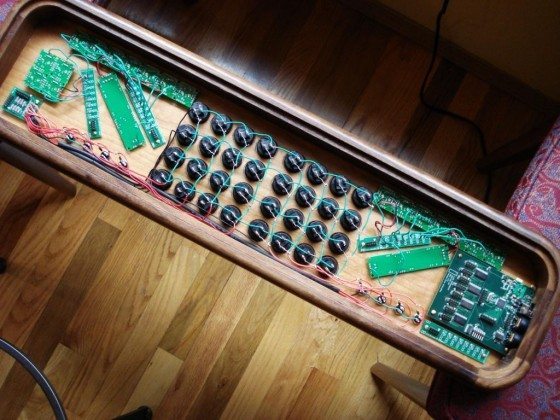
and the inside look.
THE CREATIVE RESULTS
LESSONS LEARNED
- Know what your needs are and what you want out of your controller; only go the DIY route if no other controller exists for what you want.
- Spend as much time in the design phase as you can; visualize how all the parts will fit in your enclosure, and how you see yourself using it, because once you start, it’s hard to turn back. And once you’re done, it’s inevitable that you’ll see how you could’ve done it better. For me, this was the biggest takeaway from Ean’s talk in Seattle last fall.
- Be creative and unique with your enclosure. make something that’ll make fellow controllerists and lay-people stop and do a double-take.
- If you’ve never done a major DIY electronics project before – DO NOT FEAR. You can do it. Just take your time, go step by step, and ask for help. There are loads of tutorials and instructions on all kinds of stuff online. And don’t be afraid to ask an experienced neighbor, friend, or acquaintance. Live real time mentoring is great.
- Enjoy the process, even when you’re stuck or frustrated. This is a prime reason for any DIY project; you learn so much along the way.
- Once you’re done, start making music…and don’t stop!
A NOTE FROM THE EDITOR
I just love this project, it really brings an entirely different set of influences into a world of controllers and music software normally dominated by high technology. It also never ceases to amaze me how many unique and special people are attracted to the world of DJing with controllers. Nick is hardly what you might assume our typical reader is like and I just love that.
– Ean Golden
Here are a few details about Nick from his own words:
- I’m Not a DJ (not in the way you guys are) but a longtime radio broadcaster, specializing in programming and production, with an focus on jazz.
- I’m also the Music Director at KPLU in Seattle (NPR), and jazz24.org
- I’ve had a passion for chopping up and reconfiguring audio ever since the days when 1/4 inch tape & razor blades were the tools.
- I really love and appreciate what you guys are doing and think these new digital DJ tools are fantastic.


