This week, I’m going to be discussing the basic techniques that I use when creating the majority of my multitracked projects, with some audio examples included, along with some tips on composition, again, with audio examples. What you learn here will get you started on creating your own multitracked mixes and edits.
As this article was approaching 4,000 words, it was split into 2 sections. You can find the first part here:
http://djtechtools.com/2011/07/27/a-guide-to-making-a-multitracked-mixtape-part-1
BASIC TECHNIQUES PUT INTO PRACTICE
All of the multitracked mixes and projects that I’ve created are built up almost solely using the techniques that have been discussed so far in part 1 of this article. The three techniques I use the most are:
- Duplicating blocks (looping)
- Effects
- Panning
Here are some simple examples of those techniques put into practice. All of these examples are things that you could do easily enough as part of a live set, but with multitracking you would usually use these techniques as part of a more complex composition, although not every transition in a multitracked mix needs to be complex.
BASIC EXAMPLE 1: CREATING LOOPS
These days, it’s easy to create loops on the fly in live sets, but with multitracking you may decide that you want to create a loop after you’ve already recorded a song or you may want to create loops to extend the intro or outro of a song for mixing purposes. Once you’ve created a loop, you can add extra layers, add effects or panning, speed it up or slow it down, reverse it so it plays backwards etc. – you have lots of options that you can experiment with.
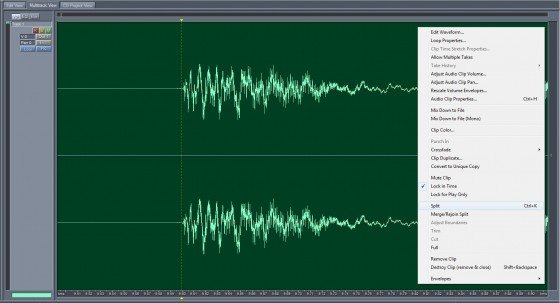
First, single out the section of the track that you want to loop. The key here is to use the zoom controls in the software so that you can cut the audio accurately. Move the time marker to the point where you want the loop to begin. Zoom right in so that you can place the marker as accurately as possible. Press play any time you like to check that you’ve got the placement correct and adjust if necessary. Once you’re happy, you can chop up the audio. In Audition, you would do that by right-clicking on the audio block and choosing “Split”. The process is almost identical in other multitrack recording software.
Now repeat the process at the other end of the section that you want to loop. If you’ve done this accurately, you can now duplicate the audio block that you’ve just cut out and this should create a perfect loop. You may need to go back and try again if you cut the audio block slightly too short, or you may need to trim a little more off one or both ends of the audio block if you didn’t cut it short enough.
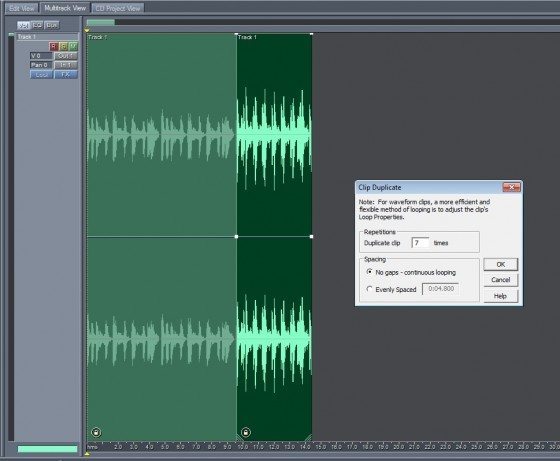
In the screen shot above, the audio block on the left is the intro of the song, then the highlighted audio block on the right is the first section of the beat which I have chopped up ready to loop. I’ve also removed all of the audio to the right of the section I want to loop to make room for the duplicated blocks.
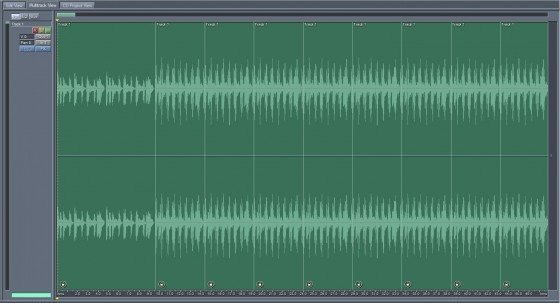
To duplicate a block in Audition, right-click on the block and choose “Clip Duplicate…” which brings up the window you can see on the right. From there you can choose how many times you want the block to be duplicated. In this case, I’ve chosen 7 as that gives me 8 blocks in total (including the original that I’m duplicating). Again, the process is almost identical in other multitrack recording software, so these instructions should easily translate over to other applications if you’re not an Audition user.
Tips:
- Use zoom to accurately cut up the audio.
- Cut too short and you’ll have to start over.
- Cut too long and you can trim the audio block down (preferable to cutting too short!).
- Don’t forget about the undo button, as you don’t always have to start over from scratch.
BASIC EXAMPLE 2: ADDING EFFECTS
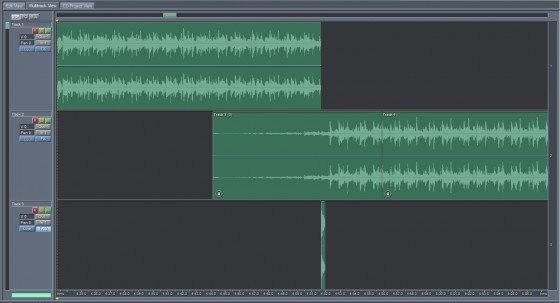
In this example, I’m mixing two songs from Big Daddy Kane. The first song is in track 1 of the multitrack. The second is in track 2. The songs are beat-matched and lined up so that the mix between the two works in terms of the songs being synced properly, but to further smooth over the transition from one to the other I have added some echo to the very end part of the first song.
[audio:http://djtechtools.com/wp-content/uploads/2011/07/Echo-Fade-Transition-Example.mp3|titles=Echo Fade Transition Example]
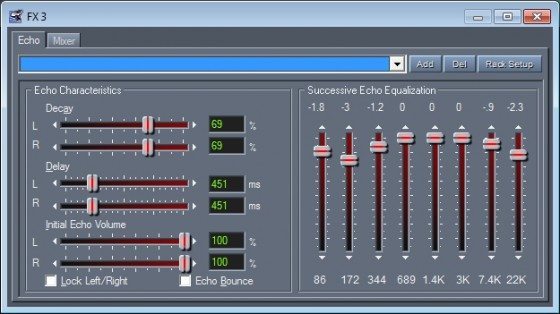
To do this, I cut off the end of the first song and dragged it down to track 3, then I added an echo effect to that track. Make sure that you lock your audio blocks in time before doing this, as you can still drag them across different tracks of the multitrack, but they won’t move left and right and go out of time.
To make sure that the echo effect is in time with the beat, all you need to do is adjust the delay. Place the time marker on the main multitrack screen at a position just before the part where the echo is heard, adjust the delay, then press play to listen to that section of your composition. You can then repeat the adjust delay/press play cycle as many times as you need to until the timing of the echo is exactly how you want it. [tech ed’s note: depending on the software you’re using, you may be able to sync effects to tempo]
There are lots of different effects that you can use as well as various settings to adjust with each effect, so experiment and play around. Remember, if you do something that sounds awful, it’s easy to remove the effect from a track and try something else, so you have the freedom to be creative and try new things without permanently affecting your composition.
Tips:
- Experiment with different effects and the various settings for each effect.
- Use effects sparingly, as overusing them can turn the listener off.
- You can always remove an effect if you don’t like how it sounds.
BASIC EXAMPLE 3: PANNING
As I mentioned earlier, panning is something that’s easy to add to audio blocks using envelopes, which should be available in most, if not all multitracking software. Each individual track also has panning controls that affect all audio blocks in that track, but unlike envelopes where you can drag individual points up and down to pan the audio left and right, the per-track controls are usually just a knob or slider that adjusts the panning of the entire track to the left or to the right, so it’s all or nothing.
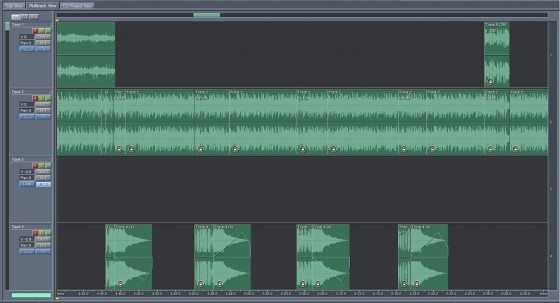
In this example, taken from a drum and bass mix, I used a human beatbox sample from a track by The Fat Boys which I’ve scratched 4 times in a row. You can see each instance of the sample in track 4 on the screen shot above. You can also see from the shape of the waveforms that the sample fades out as each waveform tapers to a point, so as it fades, I decided to pan the audio off to one side. As you can see by the panning envelopes (the blue lines), the first and third samples pan off to the right (the line moves downwards) as they fade, then back slightly towards the centre. A similar thing happens with the second and forth instances of the sample, except this time it fades off to the left (the line moves upwards), then back towards the centre. You should be able to hear this effect in the audio sample.
Panning can be used to add a subtle extra dimension to your mixes. Again, experiment and see how panning sounds when you add it to audio blocks, because you can always hit the undo button if you don’t like the result.
Tips:
- Add panning to individual audio blocks using envelopes (lots of control).
- Add panning to entire tracks using the per-track panning controls (all or nothing).
- Experiment and try combining effects with panning.
- Remember, you can always use undo if you don’t like what you hear.
AN EXAMPLE OF MULTITRACKING USING ONE SONG
So, on to the first example of a more complete composition. This was created using one turntable, a mixer, and a copy of Linguistics by Jurassic 5 on vinyl, which contains the full track along with an instrumental and acapella.
[audio:http://djtechtools.com/wp-content/uploads/2011/07/Jurassic-5-Multitracking-Example1.mp3|titles=Jurassic 5 Multitracking Example]
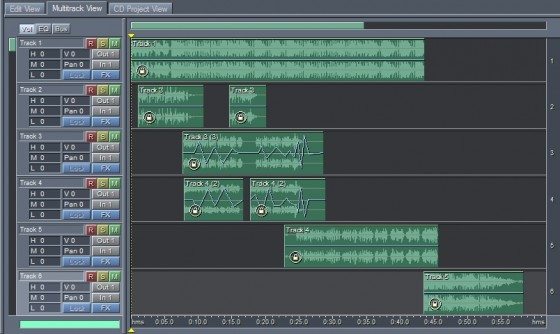
I’ll break down each of the 6 tracks in the project for you as that should make things much clearer. If you look at the time scale at the bottom of the image while listening to the sample, you’ll be able to figure out where each audio block begins and ends. On to the breakdown:
Track 1 – I used the instrumental of the track here. I did a short section of scratching, then let the beat play. That gave me a foundation for building up the rest of the piece.
Track 2 – Here I did some scratching on a vocal sample from the acapella, “turn it up real loud”. There are two sections of scratching separated by a gap where I decided to cut some of it out.
Track 3 – On this track I scratched on a “yo” sample from the acapella. The blue jagged line is the panning envelope as mentioned above in the section on adding panning and effects, so you can see (and hear) that the audio pans left and right.
Track 4 – More scratching on “yo” with some more panning. The idea was to create a layered scratching effect with panning that complemented the panning I used on track 3.
Track 5 – Here I brought in the chorus taken from the acapella, which makes it sound like the full track is playing.
Track 6 – And finally, I scratched in the full version of the track. If this was part of a mix, this is where I’d let the track play on.
Creating something like this using a single song is a great way to get started with multitracked compositions, as you can put the techniques that you’ve learned into practice to create something unique.
A MORE IN-DEPTH EXAMPLE AND SOME COMPOSITION TIPS
Here is a multitracked mixtape intro I made for a project I was working on with another DJ:
[audio:http://djtechtools.com/wp-content/uploads/2011/07/Multitracked-Mixtape-Intro.mp3|titles=Multitracked Mixtape Intro]
This example is a little more complex than the previous one as it uses multiple songs and samples as well as effects. Here is a section of scratching from this intro singled out so you can hear the panning and effects that I added to it:
[audio:http://djtechtools.com/wp-content/uploads/2011/07/Scratching-With-Panning-Effects.mp3|titles=Scratching With Panning & Effects]
The scratching itself is relatively simple in terms of technique, but the panning and effects give it a bit of extra depth.
When I started this, I didn’t have a clear picture in my mind of how I wanted the final piece to sound. The concept and name of the mix was “My Generation”, so I had the song from The Who as a starting point and I knew I would mention both DJ names and do a little bit of scratching, but that was it. In a way, it’s like fitting together the pieces of a puzzle. At first, you might feel stuck and not know what to do, but then you manage to slot a couple of pieces in place and it unlocks more ideas. I started with the sample of The Who, then found a beat I liked and added that in, looping it with some scratching, then I added an appropriate vocal sample of Pete Rock taken from a documentary and so on.
It’s a time consuming process, especially when the result is a piece of audio that’s only around a minute long, but the results can be very rewarding.
FINAL WORDS AND ADVICE
My aim here was to inspire people to give multitracking a try and hopefully, for some of you, I have achieved that. On that note, I’m going to leave you with some final pieces of advice:
- Learn the basics of your chosen software first.
- Watch for clipping when recording and layering audio.
- Be wary of accidentally recording over existing audio blocks.
- Experiment – That’s what the undo button is there for.
- Creating a little composition using the full version, instrumental and acapella of one song is a great place to start.
Chris says: Make sure you link to your mixes in the comments! Sigma is too modest to link but his latest mixtape, 79, is an unbelievable example of the kind of skills he’s been schooling you on – listen on Mixcloud.


