Your new track is finished. It grooves, it rocks and you’re happy with how it sounds. But unless you’re content with throwing light-switch raves in your studio, you’ll want to take that beast out into the wild environs of the club. In this guide, I’ll show you how to quickly take a raw, freshly-mixed song and polish it so it hits hard on a club system.
BRIDGING THE GAP
One of the simple thrills of producing is when you finish a new track, play it on a venue’s PA, and see how people respond to it. The only problem is that at most venues, you’re up against professionally mastered tracks. So how can you even the playing field?
These simple steps will show you how to bring your tracks up to par with the pro stuff. I’ll be using Ableton – download the custom rack here – but these principles and techniques can be applied to any DAW.
1) Start with a solid mix that doesn’t clip the master channel
This is your last chance to correct any glaring flaws in your track. Is a certain instrument sitting too loud in the mix? Are others drowned out? Does each part come through clearly? Jump in and fix those problems before you get started.
Also make sure that you’ve left around 4-5 dB of headroom on your final mix. You can tell how much headroom you have by playing the mix at its loudest point, and seeing how high it peaks. If you need to bring down the level, just slap a utility plug-in on the master channel of your finished track, lower the gain, and bounce down a fresh mix.
THIS:
NOT THIS:
2) Cut out the low frequencies
No, not your precious sub-bass. I’m talking about the super-low stuff – below around 30 Hz. – that no system can accurately reproduce. Removing those frequencies will eliminate potential rumble, and leave more room for everything else.
To do this, you need a high-pass filter with an extreme slope. One band of Ableton’s EQ isn’t nearly steep enough, but if you stack eight of them together, you’re good to go. I’ve included this in the rack. If you’d like to get rid of the low-cut – for example, if you already took care of this before the mixdown – simply turn the device off.
3) Remove any problematic frequencies
The idea here is simple: if something sounds like crap, or is downright annoying, get rid of it. To find the problem areas, use a steep EQ boost to sweep back and forth until you’ve found the offending frequencies. Then turn the gain dial down, creating a small notch. You want to remove the nasty areas with a minimum impact on the overall track. Here’s a rough guide to help you zero in on unwanted sounds:
- Subby: Use a narrow cut around 60 Hz.
- Boomy: Use a narrow cut around 150 Hz.
- Muddy: Use a narrow cut around 250 Hz.
- Boxy: Use a wide cut from 400-600 Hz.
- Ear-piercing: Use a wide cut from 2-3.5 KHz
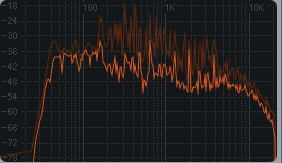
4) Make sure your frequencies are evenly balanced
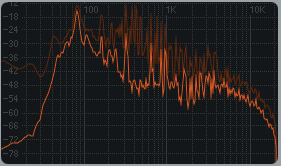
Fire up an analyzer, like Ableton’s Spectrum, and take a look at your frequencies. You should either have a gradual slope from the lows down to the highs, or a spectrum that’s basically flat across the spectrum. A relatively even balance means that everything should translate well on a club system, with minimal tweaking to the mixer’s EQ knobs.
If you don’t have a good balance, it’s time to turn to the EQ again. Use precise EQ cuts to tame any large frequency spikes. And if you find that a certain area is lacking – for example, the highs are lacking– try a gradual boost in those areas. A little goes a long way when you’re boosting, so be careful; too much, and you’ll probably wind up doing more harm than good.
Don’t fall into the trap of thinking a big bump in the low end will somehow sound awesome. I can tell you from experience that this usually sounds like complete ass in live situations; the bass frequencies will drown out everything else, you’ll lose headroom, and you’ll have to rush to turn down the bass knob on the mixer.
NOT THIS:
5) Bust out the compressor
You might have already used compressors on your individual tracks, maybe to achieve that OMG PHAT BASS or to sidechain the ever-loving crap out of everything. Here we’ll be using it in a more subtle way, to squeeze a few extra dB out of your mix. And that, in turn, will make your track slightly louder and punchier.
The main goal here is to cut the peaks of the song, which will let you to bring up the average level of the track. Since you don’t want to alter the tone or feel of the song, the best choice is typically a compressor with a low ratio (like 2:1) and slower attack/release settings. I’ve used these settings in the downloadable rack, but feel free to tweak them to dial in whatever sounds best to your ears.
Start by gradually bringing the threshold down, closely watching the gain reduction (GR) meter. Once you see the GR flashing 2-4 dB of reduction, you’re good to go. This rack uses the “makeup” button to add back the reduced gain, although I have better results doing it manually. First, make a note of the track’s peak level before you activate the compressor. Then make a note of where it peaks after the compressor is activated. The difference between the two numbers is what you enter for “output.”
6) Limit for loudness
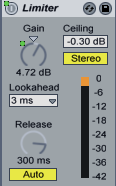
Now that you’ve added some final polish and tweaking to your track, it’s time to make it louder. Ableton’s limiter is dead simple. Slowly turn the gain knob until you see the GR meter flashing about 3-5 dB.
This is where the dark side will tempt you to join the loudness wars. The more you limit, the louder the track will get. But as you crank that knob further, you’ll be sacrificing dynamics, coloring the tone, and adding weird artifacts. It’s your call.
7) Holy crap it’s gig night
Time to take your beefed-up monster out into the wild. If you can, get to the venue early for a soundcheck. This will let you preview the song on the club’s system and mentally prepare for any adjustments; you may have to adjust the EQ knobs or add gain to make the song mesh with other tracks. Based on how it sounds on the club’s PA, you might want to go back and make adjustments to your mix after the gig.
So how does this technique sound?
KNOW YOUR LIMITS
This quick-and-dirty DIY approach is awesome for getting your songs club-ready, but unless you started with an absolutely slamming mix, the final result might not sit perfectly alongside professionally-mastered tracks. But hey, you get what you pay for. If you’re willing to spend around $25-$50 a song, a mastering engineer can provide you with:
- A fresh, objective set of ears.
- Tons of outboard gear to add warmth and distortion-free loudness.
- Years of experience making songs sound good on any system – big or small.
TECH TIPS:
While Ableton’s native devices are awesome, specialized VST’s can improve your results. For precision low-bass cuts, check out the Waves LinEQ. A lot of producers swear by the PSP VintageWarmer for compression. And for limiting, check out Waves L2 or the Fabfilter Pro-L.
Club systems sound best when the low-frequency content is in mono. Slap this free VST on your master, with a setting around 300 Hz and a width setting of zero, and you’re good to go.
While you’re at it, it’s a good idea to check your overall mix in mono; some club systems have just one channel. Make sure every part is still coming through with clarity – especially the stuff with weird panning or phasing FX.
The steps and settings I just walked you through are good starting points, but there’s no right way to do this. Tweak those knobs – for example, the attack and release on the compressor – and always use your ears.
About the Author: Kent Barton produces live, organic electronica as SEVEN7H WAVE. His upcoming album, cyberia, is due out later this year. http://soundcloud.com/seven7h-
CONTINUE READING:
A djs guide to mastering
Warm up your dj software
How to Compress with the Best


