In today’s electronic music landscape the word remix comes up almost as much as original production. Whether it’s a trending bootleg on Soundcloud or an official remix by an unknown artist for one of your favorite headlining acts, remixes are a great way for new and seasoned producers alike to get their name out there hone their skills or just have a lot of fun.
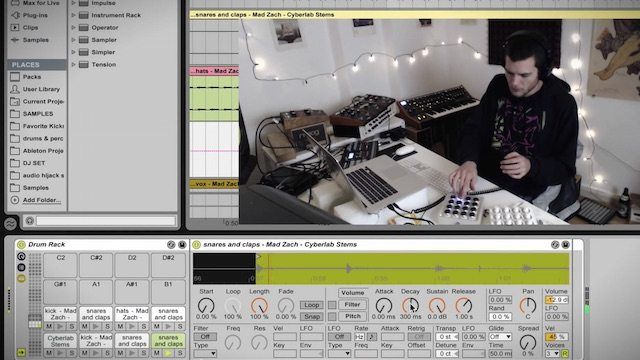
Mad Zach has put together a cool and informative video tutorial covering 3 different techniques and strategies that he uses when working with stems to create a remix.
So how does one go about creating remix?
Unless you’re working on a bootleg, chances are you’ve got your hands on some stems. Stems are individual tracks which have been exported from a finished song and optimized for remixing. Chances are you’ll find separated tracks for things like drums, synths, atmospheric risers and effects.
Unlike one shot samples, stem files contain all of the different instances of a particular type of sound for the whole track, thus the stem file will typically be the same length as the finished song. Subsequently when you layer all of this stems on top of each other you should be able to hear the completed track in its entirety. Because stems occupy a gray space between a finished song and a sample pack, creating the remix with stems can be as intricate or simple as you like it to be.
Most of the techniques in the video are centred around integrating live performance into a remix production workflow. By using the stems to create a set of instruments that you can play, creating a remix becomes an intuitive musical process that is super fun and depending on your musical skill level quite fast.
1. Slice The Drums To Midi
The first thing I do when I get a pack of stems is to throw the drums into a drum rack and slice up the samples so that I have cells dedicated for the kick, snare, clap, hat, and any other percussion elements that I want to use from the original in my remix.
This is my favorite way to get a remix started because it allows me to keep the original tone of the song while building my own pattern and musical idea. One huge advantage of putting the drums into samplers within the drum rack is that this way you can individually tune the envelopes, the transposition, and filtering for all the drum hits Individually. It also gives you the flexibility of being able to automate any of the parameters within the sampler, which can really come in handy later when it’s time to start laying the track out.
Personally I really like having my drums in MIDI form regardless of whether I’m working on a remix or an original tune because it allows me to play in grooves by feel which makes producing music a lot more fun and fast (Looking for a 4×4 grid style controller for drum racks? Check out the Midi Fighter 3D). Throwing your drums in a drum rack is also a great way to start working on the track and getting in the producing mindset without having to make a firm commitment on what type of direction you’re going to take in the end. While I’m a huge fan of making bold decisions and moving the track forward, I would also argue that leaving some or all musical decisions to your fingers (get some finger drumming tips here) and intuition can result in some really cool deviations from traditional electronic music composition technique.
2. Make An Instrument Out Of A Sample
Once you get the drums figured out the next step is to look for a sample or some kind of sound within the stem set that you can throw into a sampler and play like an instrument. I recommend looking for any kind of synthesizer sound, pad, atmosphere, or vocal blip. The only real requirement is that it should sound cool and perhaps melodic when played at different transpositions.
Something fun to try is to reverse the sample before putting into the sampler. Now when you play the sample on your keyboard or midi controller not only will you be triggering that sample at different transpositions but you’ll also be doing it in reverse which can lead to some really trippy results.
Another technique that almost always leads to some cool results is to take a granular approach and to grab a very short sample from the stem – perhaps even just a few milliseconds and loop it. This can be used to create a huge range of sounds depending on what types of modulations you might want to set up within your simpler.
One of the things that makes this sample to instrument technique really sonically interesting is that since you’re using audio that has already been treated, the resulting instruments are simultaneously wet and dry. For example if you have a sample with a really long Reverb tail but you have it loaded into a sampler with a very short release you’ll have this really big cavernous sound that ends super abruptly when you stop holding the button down.
3. Chop Up The Audio
Don’t be afraid to get in there with the knife and chop things up. When working with a DAW like Ableton, all of your edits are nondestructive meaning that you can go to town without ever having to worry about messing up the original source files. Frequently I will grab a little short piece of the stem that I like and use that as a starting loop to build an idea around.
Some of my favorite techniques for chopping up audio are: grabbing a short bit and looping it, reversing sounds or clips, and changing/automating the clip transpositions. Sometimes just grabbing a short loop and switching octave up or down can be a really cool way to get things going. Note: Mad Zach also put together an awesome tutorial on remixing with Maschine.
One of my favorite techniques that I use in the video is to draw some transposition modulation within the clip to create a vinyl slowdown type effect. You can also find some really cool parameters in the time stretching section of the click view when warping is turned on. Try setting your clip to granular warping, slowing it down to 25%, pulling the flux parameter down, and then automating the Grain size.
Hint: If you want to keep the timing the same while you change the Pitch (Or the pitch the same while you change the timing) make sure that warping is turned on.
You’ll definitely want to check out the envelope within the clip of Ableton because this is where you can do all of your automation for things like grain size, transposition, clip volume etc.
Get Remixing!
Working with stems can be a great way to get some fresh inspiration. Can’t wait to get on remix duty? There’s lots of places where you can find stems to work with. All the Mad Zach soundpacks and ill.Gates performance packs include .wav files that are begging to be remixed.
If you want to check out the stems that I used in the video grab them at blend.io/madzach.
What are your tips for remixing tracks?
Let us know in the comments below!


