Remotify is a platform to challenge the unknown void of scripting in Ableton and bring custom control surfaces to the masses. To many, Ableton scripting is a dark world full of confusion and endless frustration. In this complex world, it seems like only the truly worthy are able to unlock the mysteries coded in Python. Why can’t every controller Automap like an APC40 or a Push 2? The reason for all this heartache boils down to one thing: there’s no UI available for Ableton scripting.
Product Reviewed: Remotify
Price: Free version with basic functionality, Pro (with extended functionality) is $57 (one time purchase), 1-month subscription at $9
Platform: Web-based
THE GOOD
- Free tier for basic functionality; Pro version for your wildest scripting dreams come true
- MIDI Learn support (with Chrome)
- Shift + Modes available to create virtual banks (Pro only)
- Easy troubleshooting messages + comprehensive documentation
- One-to-one support with great response times
THE BAD
- No easy way to change feedback color for RGB devices
- Could use a script wizard with common scenarios (similar to how XtremeMapping does for Traktor)
- Missing copy/duplicate commands to replicate similar parameters
- Commands sorted randomly in the main list – you’ll have to hunt to find the command just added
THE BOTTOM LINE
If you’re new to scripting in Ableton, this tool is a must. It will not only save you a massive headache, but also allows you to learn how it works as you go since Remotify also gives you an uncompiled “.py” version of the files so you can have a look at the code. This app will make basic mapping tasks a breeze.
For the more experienced user, the app can help tame complicated scenarios and perhaps provide the inspiration needed to finish that ambitious project you’ve been continually putting off until you really “get it”.
Session Box: A Quick Example Of Remotify’s Power
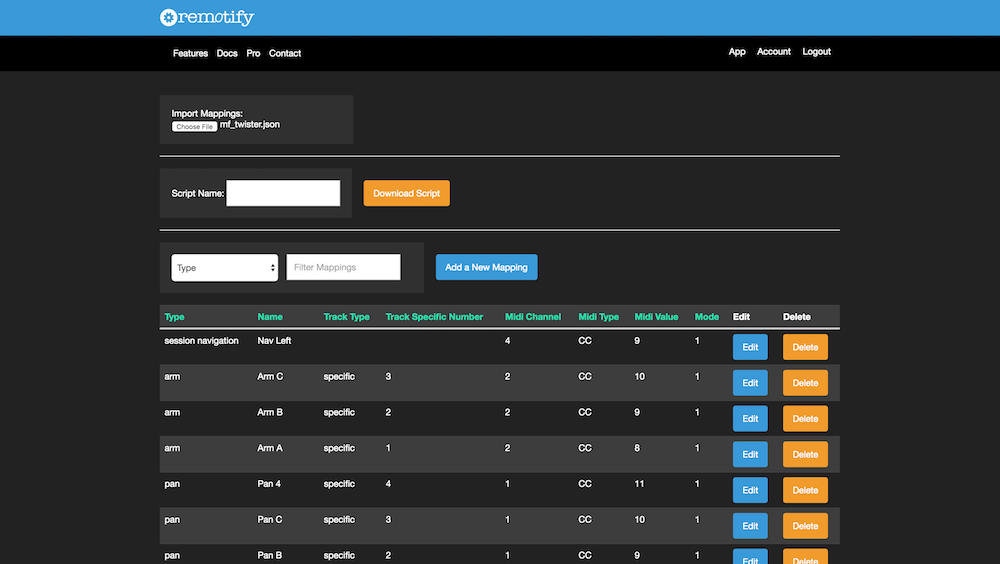
People who want basic mixing controls can get away with manually mapping them inside Ableton’s own UI. But if you want something more versatile – such as having those follow the selected track in larger projects or Ableton’s famous Session Box to easily control clip launching – then this platform is the tool you need.
If you want to create your very own Session Box script you’ll assign just a few lines.
- Once you click on “Add a New Mapping” and select “Session Box” you can assign how big you want it to be.
- Click on each of the boxes, filling in the CC/Note number manually or using the MIDI Learn tool (Chrome). Assign a name to it and save it
- Click on “Add A New Mapping” again and select the Session Navigation element making sure the “Direction” field matches where you’d like the box to move when the button is pressed. Repeat this step for all 4 directions.
- Give your script a name and hit the download button.
- That’s it! You just need to follow these easy steps to import it into Ableton.
As you can see the process is fairly straightforward and regardless of having mapping experience on other software or not you should be right at home with it in no time. We are quite exited for it’s future and hope it continues going strong as it has so far to keep the mysterious door of scripting open to anyone.
Have you done advanced controller mappings in Ableton before? Check out Remotify and let us know your thoughts in the comments below.
About the Author

- Who? Matias
- Years experience: DJing since 2005 and producing since 2008
- Why he’s helpful: Matias has used nearly every DJ software out there and has helped create tons of DJTT’s best mappings (with over 25k downloads). He’s our lead DJTT product expert and can answer pretty much any gear question too. Think of him as the super helpful guy behind the counter at the record store who has lots of great suggestions on what gear is perfect for your unique tastes. You can chat with Matias on live chat in the DJTT store (he gets nearly 100% positive feedback ratings).


