In the previous Windows optimization article we showed you a simple and temporary method to free up system resources and improve DJ software performance. In this article we guide you through the steps necessary to create a dual or multi-boot system, that can provide a clean and simple DJ system install for optimal performance without losing the other functions you might use your laptop for. Full tutorial after the jump!
Please Note: While we have included as much information as possible, there may be additional or different steps that need to be performed for your particular setup. This will be particularly true if you are planning on a dual boot with systems other than Windows 7. Before you embark on a project like this we highly encourage you to test this setup on a test machine. Read this article in its entirety and follow the video. Skipping steps or cutting corners may result in serious issues. DJ TechTools cannot be responsible for any loss of data as a result of a setting up a dual boot system using this article/video. This will not be the last time we provide you with these safety reminders.
Introducing the Dual Boot Concept
A dual boot system is simply a setup where two operating systems are installed on the same machine. A dual boot system can be particularly useful in a number of scenarios:
- Your primary Windows system fails but now you can switch over to the backup boot and be up and running again in minutes (assuming you are not facing a catastrophic hardware issue).
- You have a single machine that has to serve as your DJ platform as well as providing all your day-to-day needs. A dual boot system delivers two separate environments, allowing each partition to be configured directly for the tasks they need to perform.
- A single boot environment may suit you but there are applications, drivers or Windows services that negatively impact your DJ hardware’s performance.
So long as your machine can support them, It is entirely possible to mix and match different operating systems ranging from different Windows and even Linux flavors. When mixing and matching operating systems frequently it makes sense to install the most up-to-date platform first as that will be one that manages the “boot loader”. The boot loader is one of the first programs loaded when the machine is switched on and allows you to choose which partition you want to load up. Your laptop was likely shipped with a single operating system and hence probably has a single partition (excluding one or two tiny partition which may have been created by the laptop vendor or, as a result of the factor Windows install process). In this tutorial we will be creating two partitions, one for each instance of Windows we will be installing.
Safety First!
Creating a dual boot system means installing Windows, twice. Installing (not to be confused with upgrading) Windows means that all your existing data will be erased. Modifying partitions on the hard disk will not only erase any data previously stored but will almost guarantee that it cannot be recovered via any common means. We recommend, no insist, on you backing up all your valuable data to an external storage device. You might also consider creating a backup image of your current system so that you can roll it back should things not go to plan.
When planning this installation ensure that there is plenty of time until the next gig. Allow enough time to thoroughly test the dual boot system before taking it to the club. Also consider how much time you might need should you need to revert back to your original install.
The Process
- Set your machine to boot from the DVD drive
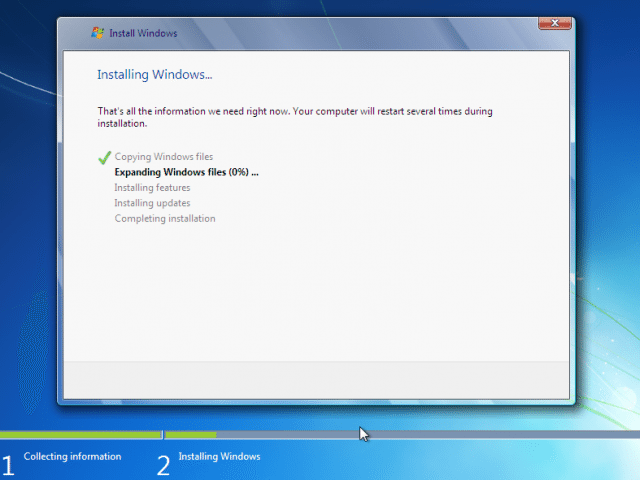
- Start the first Windows installation
- Use the Custom (advanced) option to create a custom partition size
- Perform the rest of the Windows 7 installation
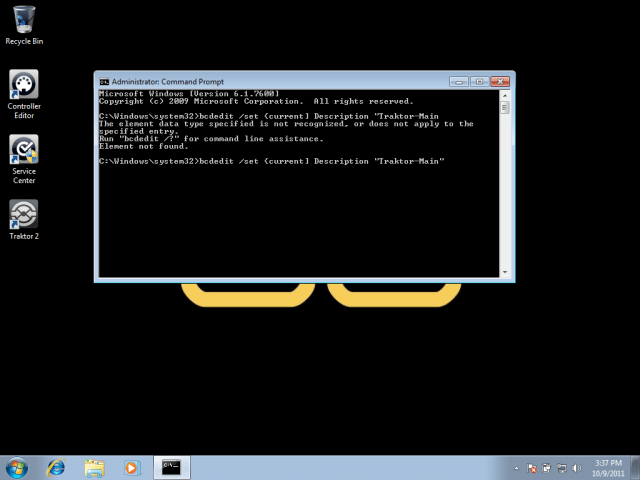
- Open a Command Prompt and use bcdedit to name your first partition
- Restart your machine
- Repeat the install process, this time for the second boot
- Select the remaining free space (“unused”) on the hard disk
- Complete the Windows 7 installation
- Use bcdedit again to name your second partition
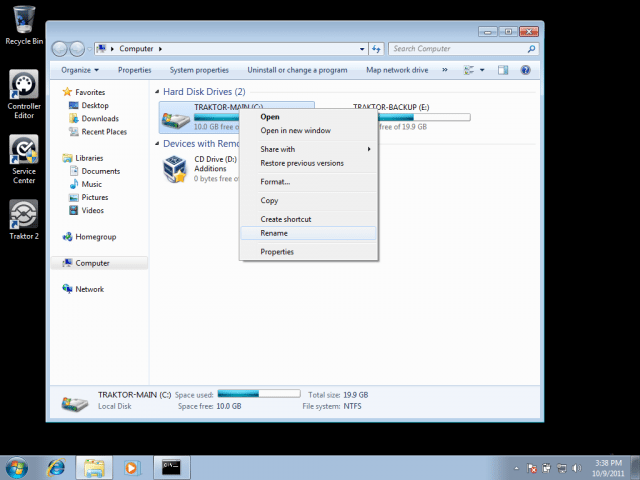
- Rename each drive letter to match the boot name
- Used msconfig to set your default boot partition
What you will need
- 1 computer (naturally.)
- Windows Installation Media
- Drivers for your machine
- Internet access
- Time and patience
This project is based on installing Windows 7. If this is the first time installing Window 7 for your or your PC, be sure to check that your system is capable of running Windows 7 and that Windows 7 drivers are available for your hardware.
Please refer to: http://windows.microsoft.com/en-US/windows7/products/system-requirements
Microsoft also offers an Upgrade Advisor which is a tool that inspects your hardware setup and tells you if you are able to run Win7: http://windows.microsoft.com/en-US/windows/downloads/upgrade-advisor
Installation Media
Window Installation Media: Most computers today are shipped with a manufacturer’s “restore” or “recovery” disk. These disks are designed to reset your computer back to the state it was in when you first purchased it. These disks provide a quick and easy way to reset your system as they automate most, if not all of the installation process. Attempting to set up a dual boot system using these disks will not work as they will not give you access to the installation options we need to change. You may need to purchase a full copy of the Windows operating system you want to install. The cost of this varies based on which system you buy and whether you are entitled to a specific versions. For instance, there are significantly reduced cost copies of Windows available to students and teachers. It’s worth doing some research and finding out what kind of Windows media shipped with your machine and if you are entitled to purchase Windows at a discounted rate.
If you do decide to purchase a new operating system, be sure to purchase a version that your system can support. If you have an older system that has been running XP, purchasing Windows 7 will likely cause you problems with drivers etc.
For more information on driver and software compatibility check:
http://www.microsoft.com/windows/compatibility/windows-7/en-us/default.aspx
**Drivers for your machine. While Windows ships with drivers for many machines, do not rely on Windows to have the right drivers for your machine. Depending on the manufacturer of your machine your drivers may come in the form of DVD/CDs which were shipped with the machine. Alternatively there may be a separate partition on your system that contains the drivers. If you cannot find your drivers, go to the manufacturer’s website and download them. Be sure to download the correct drivers for your machine. In some cases, multiple drivers may be offered for your machine. If you are unsure which ones to download, download all of them.
Internet Access
You will need Internet access at different points in the installation process. Unlike previous versions, Windows 7 does allow you to set up wireless networking as part of the install. We still recommend a connection wired directly to your router if possible.
The Check List
You have the right installation media and the drivers for your machine (make sure those drivers are the correct ones for the operating systems you will be installing). What else do you need to do before you can get started?
Back your data! This project will erase all the data on your drive, so be sure to back it up first. There are a number of different ways to back up your data.
Check out this quick guide from Microsoft: http://windows.microsoft.com/en-US/windows7/Back-up-your-files
Before you start this dual boot installation you should be able to answer YES to the following question: “If everything goes wrong, do I have a way to put the machine back the way it was before I started?”
Give yourself plenty of time! As we mentioned earlier, we recommend you testing out this process on another machine that you do not rely on for playing out on. If that is not an option and you have to use your primary machine, make sure you give yourself enough time to complete and fully test this process.
The Installation Process
The dual boot process is almost identical to a standard installation process. The major difference is that you separate your physical drive into two logical partitions and you go through the installation process twice. We recommend that you watch the video, but the major steps are covered here below.
Booting from your DVD drive
Your computer will be set up to boot in a particular order (boot order). Depending on how this is set up, you may need to go into your BIOS and change the boot priority to ensure the system boots from CD/DVD first. If this is not set up, you system will boot straight into your existing Windows environment each time. Different manufacturers use different BIOS types but they all do essentially the same thing.
Have a look at this article for more information in changing your boot order: http://pcsupport.about.com/od/fixtheproblem/ss/bootorderchange.htm
Initial Windows Installation Steps
Select CUSTOM (advanced) to begin the process. If you select UPGRADE you will simply be invited to overwrite the initial Windows system (which will not help you).
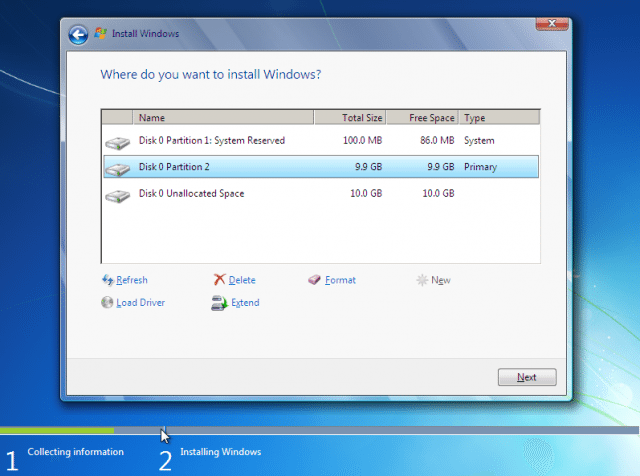
In this Window you can see your drive displayed. If you have have more than one drive, or you already have multiple partitions defined, you will see multiple entries here. You may see more than one entry if the manufacturer of your computer created a partition for storing drivers etc.
If you see anything else than unallocated space (as above) you will need to select each entry and then select DELETE. Again, understand that modifying or deleting partition will erase your data – so back up first!
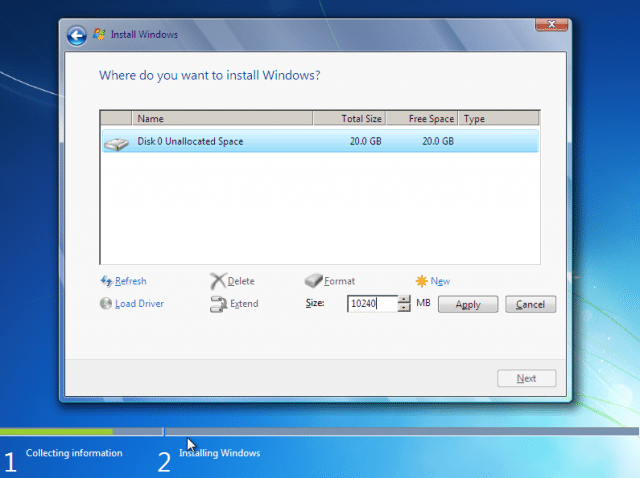
If you are installing on a new drive or, have now deleted the existing partitions, select NEW. Selecting NEW will enable you to define how big you want each partition to be. Remember that each partition requires its own Windows install and each install takes up disk space. The Windows installations on my system take up around 12GB each.
After clicking NEW you will select the size of the drive. by default Windows will use the entire drive for a single partition. If you divide the figure shown in the size box by 2 you will get roughly two partitions of equal size (Windows will kidnap some space and create a partition for system use).
Once you click APPLY the partition size will be set. Then click NEXT (not shown here) and you will be taken back to the previous screen which asked you where you wanted to install Windows. Select the partition you just created and hit NEXT. You will see a window informing you that some drive space will be used by Windows. Click NEXT past that and your install will begin.
The rest of the Windows Installation Process
We have not covered this here as it is the standard install process. You will be asked for basic networking information, time zone, computer name etc. In regards to computer name, give each install a different and descriptive name. This will help should you ever need to identify your machine on a network.
For more information on installing Windows 7 check out:
http://windows.microsoft.com/en-US/windows7/Installing-and-reinstalling-Windows-7
Installing the Second Partition
The process for installing the second partition is almost identical to the installation of the first. The only difference will be the partition you select. In this case we will be using the unused part of the hard disk.
Giving your boot partition an identity
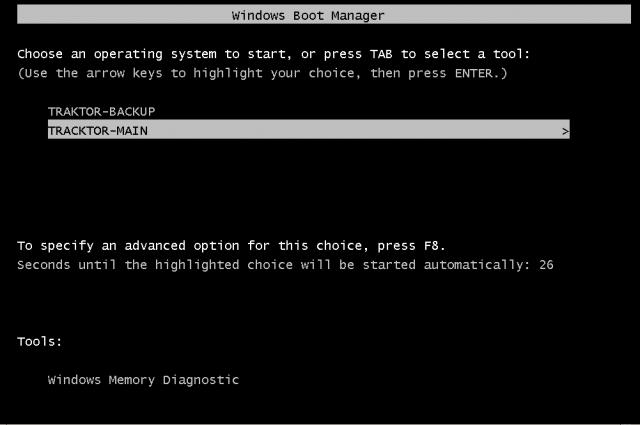
By default Windows will give each of your boot partitions the same name. You will want to change this so that each partition is easily identifiable within the Windows Boot Manager (as below).
To change the boot partition name you will need to open the Command Prompt and use the BCDEDIT command. To access the Command Prompt:
START > ACCESSORIES > (Right click + “Run as Administrator”) COMMAND PROMPT
bcdedit /set {current} Description “Traktor-Backup”
You will need to do this for the other partition as well by rebooting and going into that partition.
For more information on the bcdedit command check:
http://www.sevenforums.com/tutorials/2676-bcdedit-how-use.html
Once you begin working with two partitions you will find it very useful to change the drive labels to something meaningful. This will (or should) prevent you from saving/copying/deleting/moving files to, from or in the wrong partition. To make the change, right click on a drive and select RENAME.
At this point your dual boot environment is ready for action. Configure your boots as primary and back up or use them to execute entirely different tasks. In a future article, we will look at changes you can make to permanently optimize your DJ boot and extract maximum performance from your Windows system.


