Ableton is a bit like a Russian doll: the more layers you peel back, the more you discover underneath. While there are countless articles written on unlocking the power inside the obvious plug-ins, like the built-in compressor and EQ, there’s a host of features that go ignored. Click on to find 4 not-so-secret tricks in Ableton that we think might just change the way you work.
1. BE A UTILITARIAN
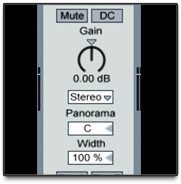
Though less flashy and obviously useful than its audio effect counterparts, the utility can save hours of mixdown adjustment andheadaches with just 4 parameters.
Try adding a utility to your master chain and bringing the “width” down to zero. This will render your mixdown out to mono immediately, which may cause either grief or joy depending on how you use it. Mixing in mono means that you can’t use stereo at all (no “horizontal” mixing), so you have to really get the gain structure right. Remember that many club systems are dual output mono, so if your track isn’t sounding good with the width down in Utility, it won’t sound good on the dancefloor!
Another handy use of the utility plug-in is the the “phase left “ and “phase right” buttons.Though they’re simple on/off toggles, using them will allow you to do some handy phase cancellation, which comes in handy when isolating vocals or stereo-izing low-depth content. most importantly, that lone gain knob will save you literally hours of work. How? Next time you have a track where you have automation over a clip’s duration, try adjusting the overall volume and discover how work-intensive it is. Instead, using the gain knob allows for complicated clip automation coupled with overall level adjustment through the main volume knob.
2. USE MACROS AS TOGGLES
Macros are another function in Ableton that, while typically reserved only for complicated audio chains, can have powerful functions that people typically ignore. One such function is the ability to map “device on” toggles to macro effects. This quick adjustment changes a lot when it comes to workflow. For starters, Ableton has a slightly irritating inability to snap “toggle” automation to grids, meaning if you want to achieve a sound very suddenly on a plug-in without a dry wet knob, like Ableton’s “Auto Filter,” you’re pretty out of luck if you want to achieve that effect in time. With macros, however, suddenly you turn a binary value (on/off) into an encoder value (0-127), allowing you to snap to grid instantly.
Another feature of macro-ing toggles to macro knobs is the ability to trigger devices only at specific values. Another example use with the Autofilter is a macro that only triggers the filter when movement is activated. Again, this is a minor change that has a huge impact; you can now toggle the Autofilter to instantaneously change the frequency range of an audio source. We’ll leave it up to you to think of other creative tricks with macro knobs (there are loads of possibilities!)
3. GET CREATIVE WITH SIDECHAINING
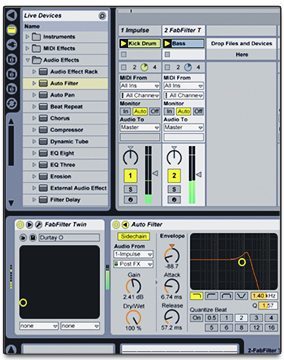
Sidechaining is a feature most often associated with the ducking, “whooshing” sound that a compressor can generate when the effect is activated. However, there’s a host of other audio effects that utilize side chaining that are exciting and can inject a little life into your workflow. Try searching for the arrow that indicates a sidechain capability, and get experimenting!
Ableton’s filter plug-in “Autofilter” has a great sidechain feature that rolls off frequencies in response to an audio input; it’s a great tool to use alongside a conventional sidechain to really get bass and kick-drums to sit well together. Another cool technique is using sidechaining on the “gate” plug-in, which functions sort of like a compressor except it ducks sounds under a threshold value completely.
The sidechain feature on the gate in Ableton makes it easy to take undesired elements out of loops; try taking a full drum loop and sidechaining the gate to a kickdrum, you’ll find that by tweaking the hold and release times you’ll have a perfectly cut up loop. Using the same technique on a synth line will generate a kind of chillwave/glo-fi pumping sound recognizable in tracks by artists like Washed Out and Baths.
4. USE CORPUS AND RESONATOR TO TUNE YOUR DRUMS
Tuning a kickdrum can be incredibly time consuming and difficult; referencing it, pitching it up, EQing, and repeating takes time and effort and often the result is only a slight difference.
Corpus is a fantastic tool in Ableton that can add a tone of your choosing to a sound, and using the dry/wet and decay knobs, you can add a subtle tuned metallic punch to your kickdrum – this will forever remove the need to sit fine-tuning and correcting. The only issue with this method is that it tends to generate a slight bell-like tone that muddies up the low-mid range. A quick fix to this is to add a tuned resonator and fiddle again with the dry wet and the decay. Using the resonator will add higher harmonics, which evens out the thump accidentally generated by corpus.
5. USE SAMPLER TO SUSTAIN A VOCAL

Have a vocal with a long, belted note but the singer just isn’t up to the task of sustaining it? Or maybe you want an interesting riser effect to put into a build. Either way, you’ll need to creatively use the sample source, but warping in Ableton generates all sorts of anomalies when stretched past its limits. Instead, a little use of fades within the sampler, coupled with some gentle EQ’ing, can create a “sustain” effect for a note or vocal line. This little trick is also helpful when dealing with a pitched up sample you need to be longer; the trick is really to find the “sweet spot” of the sound where there’s little to no volume or pitch change.
Have any other Ableton tricks that same you tons of time? Let us know in the comments!


