As a producer your kick drum defines your sound and can make or break your track. It is is easily one of the most important elements in any dance track. After battling kick drums for years, Ableton Certified Trainer Lenny Kiser has found some simple and effective techniques for getting kicks to sound punchy and fat on a club system and laptop – read on for his secrets!
There are many different ways to design and process a kick and many producers do it in their own unique way. This is not the only way to do it but rather a great starting point for learning how to build great kicks. In my work I have found that there are four main considerations to take into account when developing a kick – read on for each, or check out a video tutorial of all four at the end of this article!
Editor’s Note: Lenny, an Ableton Certified Trainer, has experience making kick drums off all kinds in his own remixes and productions. Check out the kicks in his recent remix of STRFKR’s “While I’m Alive”:
1. Sample Selection

Choosing the right sample is number one. Take as much time as you need on this, as the right kick sample may be light years better than the one you just EQ’d for six hours! Set aside some time to find solid kick samples and organize them in a way you can access quickly when producing. Some good tips on finding the right sound:
 Play your kick pattern and bass together when auditioning different samples to find the best match.
- Use the hot swap function (
 ) in Ableton to audition different kicks with the bass
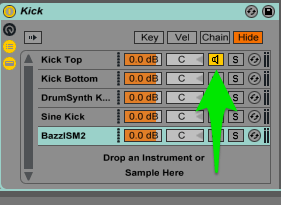
 - Load several kicks into your chains list and use the chain activator (image at right) to activate and de-activate different kicks to audition them together.
2. Layering
The next step to an effective kick is to layer different samples together – designate one as the, “Top Kick” which will contain the mid and high frequencies and one as the, “Bottom Kick” which will contain the low frequencies.
The top kick is what people will hear and the bottom kick is what people will feel. No two molecules can share the same physical space and neither can two kick drums. You’ll need to remove some of the low frequencies from the top kick so it doesn’t fight with the bottom kick. This can be done in many different ways. I prefer to use the filter in the simpler device and set it to, “highpass 24.”
Play the two kicks together and adjust the filter on the top kick until you hear a point where the two kicks play nicely together and sound like one. The frequency at which you stop at is dependent upon the samples you are using so use your ears and stop where it sounds good. I recommend doing this with sub-woofer or on headphones that can reproduce some low frequencies below 50hz. Some additional tips:
- Experiment with non-kick drums sounds as top layers: tom drums, hi hats or noise.
- Use the device chains volume control to adjust the volume balance between your kicks.
- Take it a step further and create a: Top Kick, Body Kick and Sub Kick Layer (Whoa.)
Using a Synth Sub Kick Layer
The advantage to using a synthesized sub kick rather than a sample is that you have more control of how your kick sounds in the mix. The ability to change the amplitude envelope on a synth gives you control over how fast the sound reaches its loudest peak (attack stage) and how long it lasts for (decay stage). This is extremely helpful when placing your kick in a busy mix as a faster attack will mean a punchier kick and a longer decay will mean a larger and longer feeling kick. Dance music is extremely rhythmic, so getting your kicks to pulse perfectly in time with the tempo is huge!
There are many ways to generate a synth sub kick and here are three that I have found useful:
- Use the Operator Preset: Sine Kick
- Use the Max4Live Drumsynth Kick Device – Fat Analog Kick
- Download Bazzism: a third party Kick Synth (
shareware correction:this is a paid VST – with a free trial. Support great plug-in developers!)
3. Processing
Now that you’ve got your kicks layered and filtered, it’s time to process and glue them together to make them sound like one. I use compression to glue the sounds together, EQ to subtract any additional fighting frequencies and saturation to add warmth, grit and distortion. Pay particular attention to the order in which you place your devices in your signal chain as this will have a factor in the overall sound. I’ve found that using the above chain, EQ-Comp-Saturation-EQ works well.
- When EQing, cut before compression to gain headroom and boost afterword with another EQ to bring any frequencies back.
- For compression try using ratio’s between 4:1-10:1 with very little gain reduction (about 1-6db) and a fast to medium attack time (1ms-10ms)
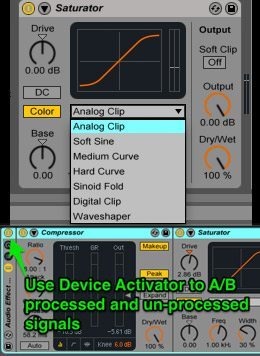
- Test out different saturation curve types to color your sound differently. Try the curve “Analog Clip” for warmth and “Hard Curve” for more extreme distortion.
- If you find yourself EQ’ing the kick with more than several bands boosted and/or large cuts or boosts (more than 8db) this may be a sign to look for a different sample.
- Group your processing chain into an audio effect rack to A/B the before and after processed signal by using the device activator.
4. Tuning Your Kick
Your kick will sit better in the mix and be more musical if it is tuned to the key of your song. To do this you will first need to figure out the fundamental frequency of your kick. Use the frequency display on EQ8 or Spectrum to do this.
Open the frequency display and place your mouse over the peak of the kick. This will show you the frequency and associated pitch in a dialogue box below. Now you can tune your kick using the transposition control in the simpler or on the tuning or pitch control of the synth. It is very helpful to use a reference chart (like the one above) before tuning that shows which frequencies are associated with certain pitches. This is done for you if with the Drumsynth Kick or Bazzism.
Tips:
- Figure out what frequency your kick fundamental is at and find the associated pitch. I.e. 41hz = E
- Use the tuning control or pitch control on your sub kick to tune to the key of the song.
- If you don’t know what key your song is, use your ears! A key detection software will only be about 60-70% accurate, so instead try to match it by ear. More info here!
VIDEO WALKTHROUGH
If you’re having issues grasping any of the above concepts – check out the video below where I show off the techniques discussed above and specifically how to use them in practice:
Kick drums are worth investing the time to get them right. Through strategic sample selection, layering, processing, and tuning, your kicks will make your tracks shine and people will dance! I can’t emphasize enough that the most important thing to take away from this is to find the right kicks to start with. Check out some of the Mad Zach sample packs for some great kicks to start building with.
Lenny Kiser is an electronic music producer, performer, audio engineer and instructor – need more tips? Let him know on Twitter.


