It’s becoming clear that automation is the future for many jobs and industries out there – but did you ever think it might come to the DJ turntablism world? DJTT member mushrooshi has shared exclusive details with us on project to build robots that can gate the crossfader and manipulate vinyl in time with the beat. See it in action and read our interview with the man behind the robot DJ revolution inside.
First, watch the current prototypes in action – they’re obviously early concepts still. Here’s the both parts of the robot working together to cut over a familiar theme song:
And a closer look at the crossfader cutting bot – here’s a recent video of it in action:
We asked him to walk us through a few parts of his creation and the thinking behind it – read his responses below.
Hey Mushrooshi! What are you trying to build here, exactly?
I’m creating a robotic system which is able to perform turntablist scratches with high precision, synchronized with Traktor. I’d like it to be able to perform in two modes: firstly as a reliable “Instant Gratification Scratching” system, where I hold buttons down to play pre-programmed scratch routines on the fly, and secondly as kind of the turntable equivalent of a “player piano”, where a music loop plays and the scratchbot selects random patterns to continuously play.
So what are the specifics of how each bot works?
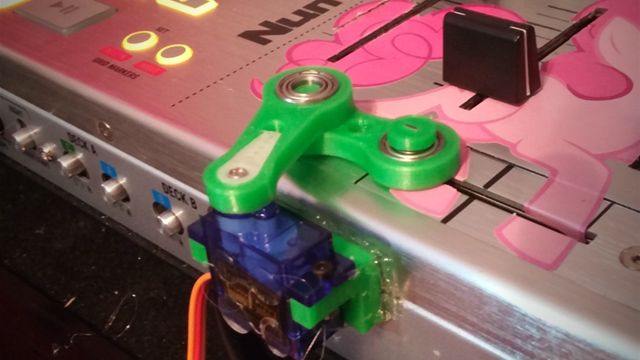
The robotic system’s mechanisms are currently comprised of two parts. The first part is a simple crank, powered by a single servo and attached to the mixer, which controls the crossfader. It’s currently on it’s third prototype, which has been 3D printed. It’s action is almost perfect right now and only needs a bit more calibration.
The second component is a swinging arm, powered by two servos, one servo which pivots directly over the turntable’s axis of rotation and controls the scratching sweeping motion, and the other servo of which controls if it is pushing down on the record. It is on it’s second prototype at the moment, and works okay with a small 7-in record. However, the scratchbot’s performance is poor with 12-in records, likely due to the increased surface area with the slipmat and the much heavier mass and inertia of a 12-in record. I’ll need to heavily redesign it for it’s third prototype, which unlike the first and the current prototypes, will be mostly 3D printed.
Redesigned the turntable thing. The 3D printed CAD design will likely be similar to this pic.twitter.com/FGGWJMtGIE
— ?Mµ?SHROO?SHI™ ????? (@Mushrooshi) July 15, 2015
How did you get your parts/components?
Most of the electronics were sourced off Amazon, including the Arduino Mega2560 and Sunfounder’s Project Starter Kit. Some of my servo motors and servo mounting hardware is from my local Hobby Town. Many of the “raw materials” for creating the prototypes I just had lying around in my room. Actually… I think some of the cardboard I used was from the Amazon box that shipped my Arduino, haha. I made a trip to Walmart hunting for some nice grippy material for the arm to press down on the record with and my haul included some stuff like shelf liner and a silicone potholder, but I found a heel cushion and a dashboard phone grip-mat worked the best.
As far as the 3D printed parts go for the later prototypes and very likely the finished robots, I actually have them printed out by my school, Texas A&M University. I was taking a Materials Science midterm early and after completing it, I had a discussion with my professor Tanil Ozkan and his student Yasushi Mizuno, who are setting up an Open 3D Printing Studio for students to use. They liked the idea and decided to help me out with my project by printing the parts for me; It’s fantastic being able to design a part and send it off in the evening and receive it right before my next class!
What about software? What’s behind the scenes here?
The mechanisms are controlled by an Arduino Mega, which takes in MIDI control from Traktor (Via the loopmidi and Hairless MIDI utilities) in order to synchronize with the beat of the music (which is played in Traktor). I originally used an Arduino Uno R3, but I found it’s memory was likely too limited to store the amount of scratching routines and patterns I wanted to include.
The Arduino counts the MIDI clock’s ticks in order to time movements within a beat, and Traktor’s Beat-phase MIDI output controls when to iterate the beat counter and reset the tick counter to zero (indicating the start of a beat). I initially had problems with it either “slipping” or adding an additional beat randomly, but now it is able to keep time for over 5 hours (at which the test only failed because my laptop overheated, causing the CPU to throttle and Traktor to glitch).
What drove you to create this scratching robot in the first place?
I’ve always been interested in robotics since I was a toddler, and DJing is only a more recent interest of mine, having started three years ago. I’m not sure how I came up with the idea to make a robot turntablist, but when I came up with it, I really wanted to do it. I did some searching and found a couple other attempts at creating a turntablist robot, but while they were both interesting attempts, both seemed to only manipulate the record without cutting with the crossfader and neither performed well enough for me to want to include in a real performance. I had lots of free time over the summer and I haven’t built a robot since high school, you could say I was… itching… to make this project a reality. I told my father about my idea (who’s been very supportive with all my past robotics endeavors) so he’s been helping me finance this project, which I’m very grateful for!
I’ve had a few people asking why I didn’t go with a purely software solution (such as emulating turntablist maneuvers via MIDI input), which indeed would be more reliable and easier to do; I just find the mechanical mechanisms very fun to design, and its extremely rewarding to not just hear a perfect output, but see the action behind it physically happening in front of me. That, and robots are just really cool!
We’ll continue checking in with Mushrooshi as his project develops. If you want to learn more about the specific components or read his build log, check out this link!


