Many DJs know all about different types of music, but it’s not too uncommon to find DJs who know absolutely nothing about how sound actually works. In this two-part series, we get a little nerdy and offer an introduction to basic audio electrical engineering for DJs. At the end of it, we hope you’ll understand a bit better what’s going on “under the hood” of your DJ hardware! This first part covers how analog sound becomes digital audio – and what sample and bit rates really are.
This two-part article series was crafted by guest contributor Ryan Mann, an Energy Engineering student at UC Berkeley.
To start things out, let’s talk about the difference between the analog sound coming out of speakers, and the digital music files in your computer:
Analog Sound
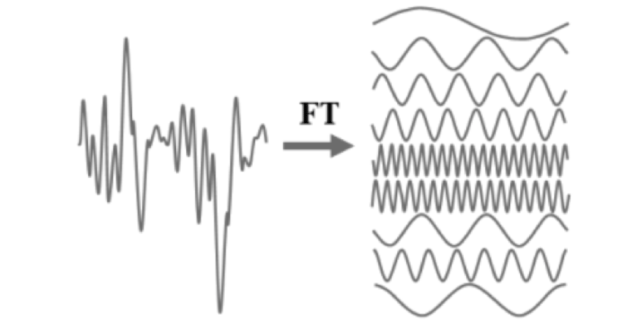
Sound itself is the propagation of pressure waves through a compressible medium. These acoustic waves correspond to continuous, smooth analog electrical signals produced or generated by a speaker or microphone. These signals can be decomposed (using something called the Fourier Transform) into a combination of sinusoids (elements of the signal) with different frequencies, amplitudes, and phases.
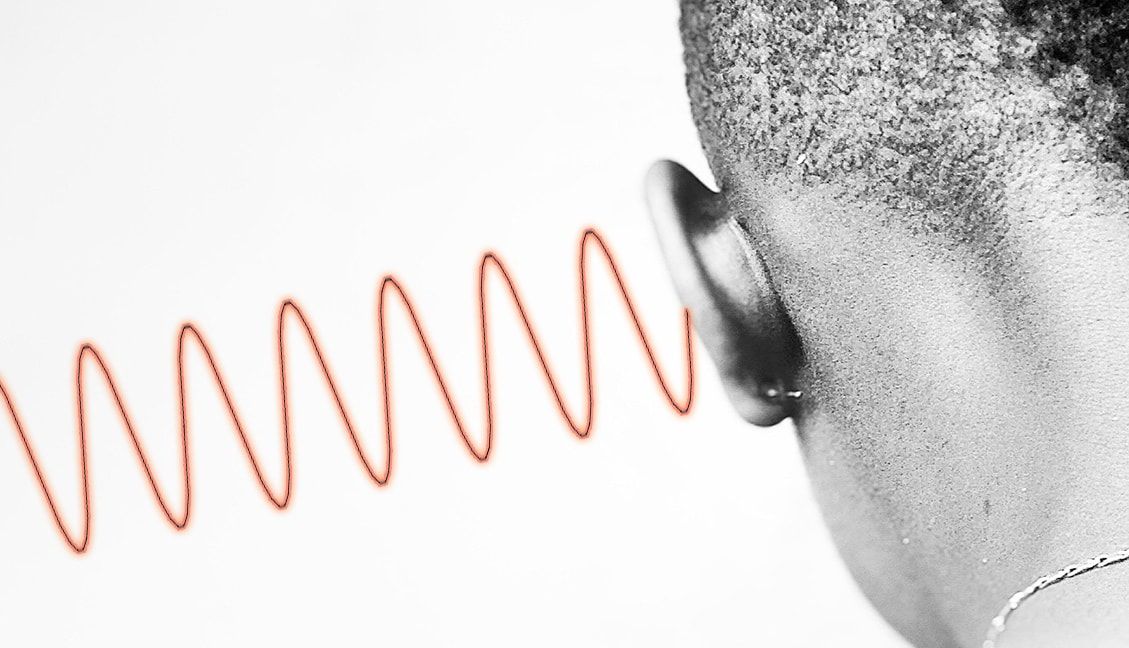
Frequency is the duration of each cycle, measured in Hertz (Hz), where 1 Hz is 1 cycle per second. The human ear can hear frequencies between 20 Hz and 20,000 Hz (20 kHz), and each part of your ears’ cochlea responds to a different frequency.
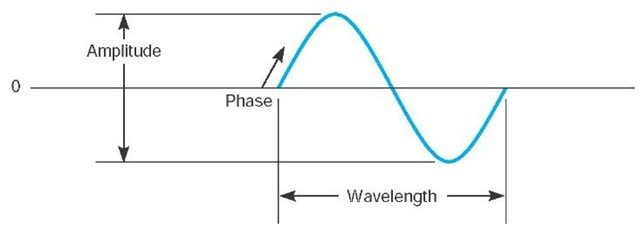
Amplitude is the height of the wave, or the maximum pressure during the cycle. Pressure is measured with a bunch of different units, and the amount of power required to produce a certain amplitude over an area is measured in Watts (W), but volume is usually measured in decibels (dB), which compares the power of the sound to a power of 0.001 W using a logarithmic scale.
Phase is the timing of one wave relative to another. If there are two waves with the same frequency, they may or may not reach their peak at the same time. Phase measures the time between the peak of one wave and the peak of another, if any.
Digital Music Files are not stored as continuous analog signals, but as a large number of digital bits able to be read by a computer (in binary; 1 or 0). Each 1 or 0 is called a “bit.” 8 bits make up a “byte.”
Analog-to-Digital Conversion (ADC)

Analog sound is converted to a digital file when recording live instruments, or when recording a mix from an analog mixer into your computer. The Analog-to-Digital Conversion (ADC) process occurs as follows:
- There is some sort of physical phenomenon to be measured – in this case, sound (or pressure).
- A sensor (in this case, a microphone) converts the sound into a continuous voltage signal.
- The ADC sound card samples this signal, sorts the sampled value into a “bin”, and records this value as binary “bits.”
Digital-to-Analog Conversion (DAC)
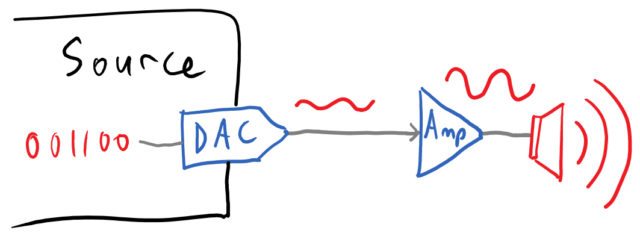
For the opposite process, audio starts as music file stored as digital bits. A DAC soundcard (like in a mixer, DJ controller, etc) converts the digital voltage values into a slightly “choppy” continuous signal (Author’s update: as commenters have noted, DAC output is not “slightly choppy” – the DAC uses a sinusoid to reconstruct the signal, so it should be perfectly smooth.) Then, an actuator (here, a speaker) converts the signal into sound.
The quality of the output is determined by the quality of the original file, and the resolution of the DAC in the soundcard – for example:
- playing a YouTube rip on a cheap Chromebook laptop might mean a 96 kbps file and a 16-bit, 48 kHz soundcard
- alternately, playing a lossless FLAC file on the brand-new CDJ-TOUR1 would mean a 1411 kbps song and a 24-bit, 96 kHz Wolfson DAC
Bits
The number of bits used in analog-to-digital conversion determines the accuracy with which the digital signal replicates the actual analog value at any given point.
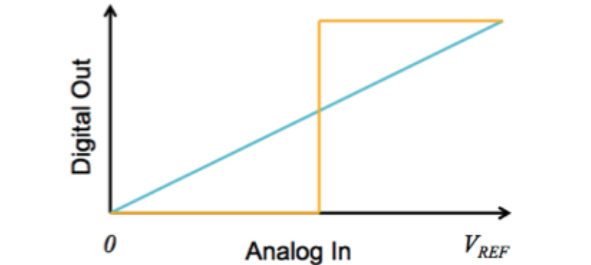
For example, a 1-bit ADC (pictured above) is only capable of recording a 1 (full voltage) or a 0 (no voltage). So anything in between has to get “rounded” into the closest available category, meaning there will be a large jump at the halfway point.
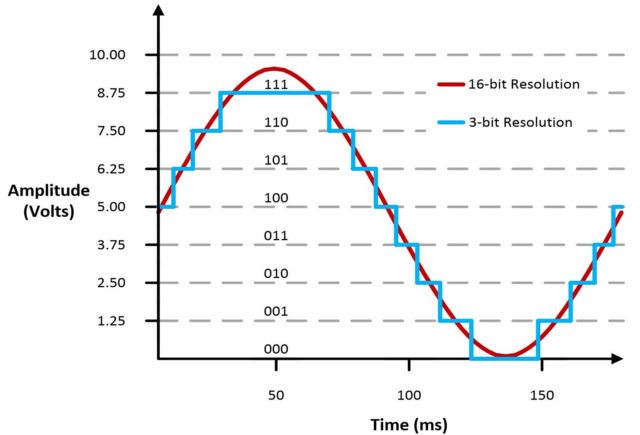
For every bit that’s added, the resolution (number of steps) doubles, so it’s possible to get a nearly perfect representation of the signal with only a relatively small number of bits:
- 1 bit = 2 steps
- 3 bits = 8 steps
- 16 bits = 65,536 steps
- 24 bits = 16,777,216 steps
Sampling Rates
Time resolution (the sampling rate) is just as important as amplitude resolution (the number of bits). A higher sampling rate means that the original analog signal is replicated more accurately.
But if the sampling rate is too high, it uses a lot of processor power and memory. So what’s the right sampling rate to use? Nyquist-Shannon Sampling Theorem states that the sampling rate must be at least twice the frequency of the highest frequency found in the signal.

In the above diagram, you can see how 1 sample per cycle would not be enough to capture what’s going on, and 2 samples per cycle would be the minimum for recording the signal accurately. At two samples/cycle, the samples must be at the min and max points of the wave, otherwise it will record the right frequency but wrong amplitude and phase.
Sampling at higher than 2 samples / cycle smooths out the waveform and increases the quality of the audio – but at the cost of more processor power and storage space.
CD-quality audio is recorded at a little higher than the Nyquist minimum sample rate for the highest frequency that people can hear. (The maximum audible frequency for most people is 20 kHz, and CDs are recorded at 44.1 kHz).
Bitrate + Compression
Most digital audio files are not as high-resolution as a lossless audio file like those found on a CD.
There are a number of different algorithms and file formats to compress the audio file in order to make it easier to transfer and store. There are a number of different algorithms and file formats used to compress the audio file in order to make it easier to transfer and store. It is possible to reduce file size without losing any information – this is referred to as lossless compression, and is the central mechanism behind both the FLAC audio file format and the fictional Pied Piper algorithm from “Silicon Valley.” However, further file size reduction typically requires lossy compression; the challenge is to reduce the file size while retaining as much audio quality as possible.
In general, this means reducing the sampling rate and bits. This means that higher-frequency sounds are not converted accurately, or are filtered out entirely to prevent aliasing.
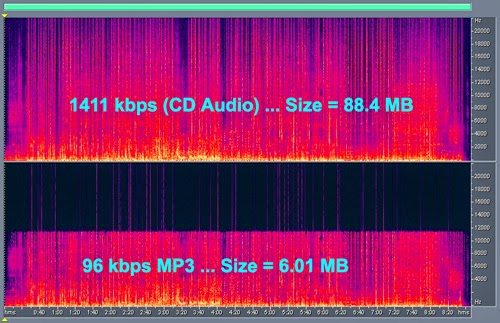
The bitrate of a song (measured in kbps – kilobits per second) is equal to the number of bits, times the sampling rate. For instance, the bitrate of a CD-quality lossless file is equal to 16 bits x 44.1 kHz x 2 stereo channels, or 1411 kbps. Some DJs swear by only playing lossless WAV or AIFF files, but it’s generally fine to play 192 kbps VBRs (variable bit rate), 256 kbps AACs (iTunes Store purchases), or 320 kbps MP3s (cheapest Beatport option, most downloads) even on a large club speaker system.
Recordings that are 128 kbps and below should generally be avoided. This is the sound quality of a YouTube or SoundCloud rip, or an old Napster download. Stay away!
Read more: A DJ’s Guide To Audio Files + Bit Rates
In part two of this series, we’ll cover the inner workings of DJ equipment – how they manipulate digital and/or analog audio, and what filters and EQ knobs do on an electrical level. Stay tuned!
Ryan Mann is a guest contributor to DJ Techtools, and helps to lead elecTONIC, a student group at UC Berkeley dedicated to promoting electronic music.


