What if you took a MIDI-sending hardware sequencer and used to re-trigger cue points in time with your DJ set? Today’s post is from Italian competitive DJ John Type, and he’s sharing how cue point sequencing works in his sets. John’s calling it turntablism combined with controllerism – or “controltablism”.
Cue Point Sequencing = Controltablism?
First off – this is one of the first examples of this style of routine that we’ve seen done well. If you know of someone else who also deserves recognition alongside John Type pioneering this concept, please share in the comments at the end of this article.
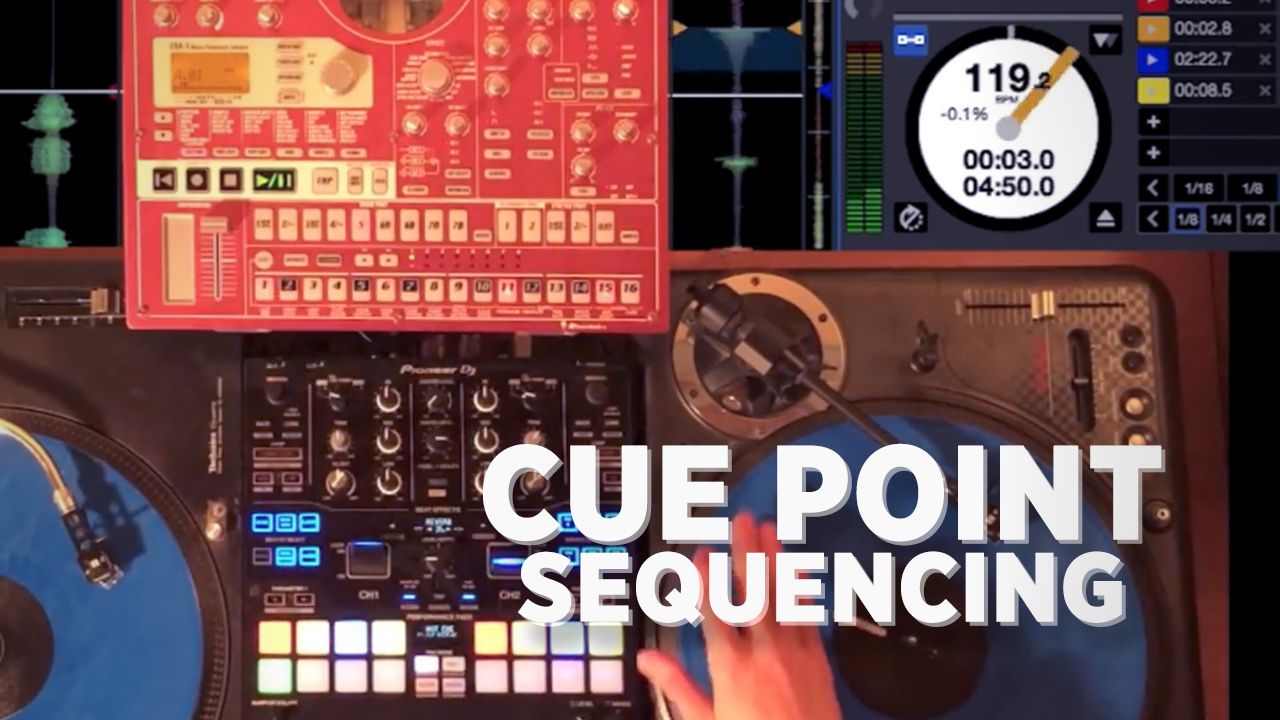
Here’s John’s original video, showing off the controltablism / cue sequencing concept:
How To Start Sequencing Cue Points
We asked John to share a bit more about this concept and DJTT readers could do the same for themselves. Keep reading for his own perspective:
“Controltablism” is the fusion of controllerism and turntablism. In the video above, I reveal for the first time “Cue Sequencing”, a technique I used in 2011 in a live show, to control Serato Video with the Korg ESX-1. The main idea is trigger hot cues with a sequencer, to use the DVS decks like a sampler, with the advantage of having our samples on the turntable so we can also scratch it.
Settings + Requirements
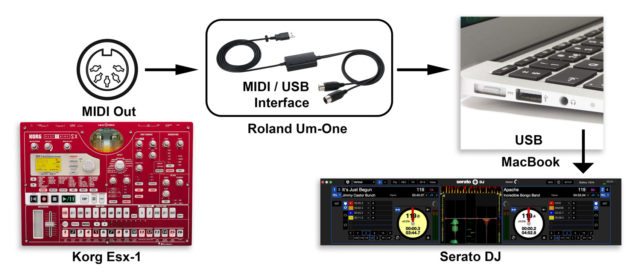
- You’ll need a sequencer – in this demo, I use the sequencer on a drum machine, the Korg ElecTribe SX (ESX-1)
- The drum machine is connected to the computer with a MIDI / USB interface to communicate with Serato.
- Each drum part of the drum machine corresponds to a hot cue.
- To assign hot cue to each drum part, use Serato’s own MIDI mapping
- As the sequencer triggers the drum parts, it will trigger the cue points
- Hot cues become recordable / programmable using the sequencer

MIDI Routing
In Serato, the MIDI setup is pretty simple:
- Set the first hot cue at the beginning of the point we wish to to loop and sequence
- Set additional hot cues, such as snare, hi-hat, and so on
On the sequencer:
- Set the length to a 1 bar loop (this means 1 bar corresponds to 16 of the step sequencer buttons)
- Set the same bpm of the track on the Serato deck (on some hardware, you might be able to have this automatically get MIDI clock via USB)
- Write the Cue 1 in the first step of the sequencer and press play
- Cue 1 is triggered repeatedly to form a loop
- Adjust the BPM of the drum machine and the turntable speed to create a perfect loop
- Once the turntables and sequencer are in sync, you can begin to modify the sequence.
- Create a new variation on the step sequencer, and combine it with elements of scratching.
- The roll / note repeat function is activated by using the arpeggiator function on the ESX-1
Do It Yourself
In this video I used:
- Hardware Sequencer: Korg Esx-1
- MIDI interface: Roland Um-One
- Mixer: Pioneer DJM-S9
- Turntables: Technics 1210 MkII & Vestax Pdx 3000
If you want to do it yourself, you’ll need any hardware sequencer with MIDI Out or MIDI via USB. The sequencers are usually integrated in grooveboxes, drum machines and samplers (and also on the new Roland DJ-808)
• The best choice are the 16 step-sequencer like Roland TR-Style, for a direct control of the sequences.
Standalone Step-sequencer with MIDI out:
Akai: Rhythm Wolf, Tom Cat
Elektron: Machinedrum, Monomachine, Octatrack
Korg: Electribe Series
Novation: Circuit
Roland: Tr-8, Tr-09
Yamaha: Tenori-on, Rs7000, Rmx1
Standalone Step-sequencer with MIDI out also via USB:
Akai: Mpd323
Arturia: Beatstep Pro, Drumbrute
Dave Instruments: Tempest
M-Audio: Trigger Finger Pro
Misa Digital: Nsc-32
Sequentix: Cirklon
Squarp Instruments: Pyramid
Final Recommendations
In general a standalone sequencer is better since it frees up both CPU power so you keep your DJ software at minimum latency and you won’t need to use your computer’s screen to know what’s going on other but if you got the juice Maschine and Push 2 are really great software based options.
Drum machines are the most suitable since the drum parts and layout easily relate to hotcues on your DJ software, having a sequencer with more parts means that you’ll be able to control more hotcues so when shopping try to get something that has 8 or more slots available. Each steps sends a MIDI command which you can easily map to your software of choice so you aren’t really limited to mapping just the cues. Possibilities are endless!


