In a world teeming with knobs, buttons and faders, the possibilities of customized musical interfaces seem endless. Many a feverish inventor has spent sleepless nights doodling, dreaming and drawing out their dream device. And yet at the end of that night, your custom controller is just a heap of wires and plugs without an enclosure. And while there are many internet merchants who are keen to sell you all the electronics you want, you may find yourself left to your own devices when it comes to boxing it all up. Well, never fear. Creating your custom enclosure can be done, and we’re here to tell you how to do it using acrylic and a simple CNC. Come with us, as we step through each aspect of the fabrication of an acrylic case for one of the most straightforward monome-clones, the arduinome.
Step 0: Drawings and The Benefits of Beer.
Before you start any fabrication, it’s important to have a full understanding of what you want the final product to be. That may sound obvious, but it really is the hardest part to figure out. Mostly because there is always one part of the process that we might forget about that stands to bite us in the end. For this project, the route files are the most critical part. Because we are trying to match our final box to premade components, it’s important to look for spec sheets from the manufacturer to make sure that the drawings you found or have drawn yourself are correct. Measure twice, mill once.
Lets get started..

After getting all the materials together, you need to get a CNC router. Now, odds are, you don’t have one of these sitting around. So you have three realistic options to choose from.
- You could become fast friends with a person that works at a shop with a CNC. They typically drink a lot of beer, so you know what you can use to bribe them to cut your project.
- You could find an art, trade or design school that will let you use their CNC. I know a few people who have been able to pull this off, or have made fast friends with students in the program. Beer works for art school kids to (if they’re of legal age, of course).
- You can pay a fabrication shop to cut the project for you. This is the most expensive way to go, but also the best. They will most likely have the material that you need and will charge you for what you use, and not the extra. They will also take the file you have (Illustrator, *.eps or whatever) and set it up for the router to cut. This point shouldn’t be lost on you, because each router will have to have tool paths and depths set in the file format that that CNC understands. The operator of that machine will know the best way to do this.
If you have a friend try this step without a lot of experience, you might be making a lot of trips to replace trashed material because a setting was wrong. Expect to pay a bit of money for a pro shop, in the $100’s when everything is said and done, but you will know for sure that everything was done right. You get what you pay for sometimes, and this may be one of those times that it pays to pony up a few bucks.
Step 1. Raw Materials.

EPIC TIP ALERT: There are places out there that toss out what they think of as scrap that could be all the material you need for your project. Fabrication shops and the such go through a lot of material in any given job, find them and see what they might be willing to part with for cheap or for free. Metals can be recycled and therefore have a life after a project in a scarp yard, so it might be hard to score them free, but acrylics are typically never recycled and often end up in the trash.
Whatever you do, never go to home depot for this kind of stuff.
The prices they charge are twice or more from what you might find from another vender. Open up the yellow pages (yes, they still make them) or google for your area and call around. Most will have a drop bin they let you dig in and pull great stuff for cheap. In this project I’m using:
- ½ inch clear acrylic for the side walls.
- ¼ inch acrylic for the bottom and under faceplate.
- .090 aluminum for the top faceplate.
- 4-40 countersunk screws to attach the PCB’s and faceplates together.
- Threaded rod (threaded with 4-40) embedded in the corners.
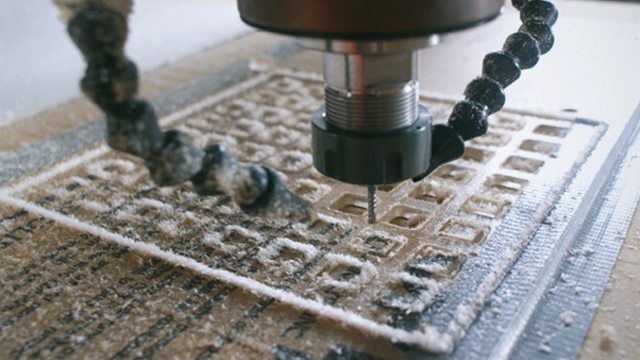
Step 2. The First Cut.

The cuts themselves are smooth and seem effortless as this magical machine just chews up the material. All CNC run on a XY and Z system. The X and Y can be thought of as left and right. The Z is the depth of the cut. These machines can cut extremely exact measurements, and you can mill in for any component. It’s also the reason that we wouldn’t be able to do this job on a WaterJet or Laser cutting tool, which can only cut through a material, and can’t mill a depth out of it. For the faceplates, any of these tools would work, but not the box. Food for thought.
3. Cleaning up

We have pulled the parts off the router table, now it’s on to cleaning the parts up, giving them a sand and getting ready to put it all together. I love the look of clear acrylic, but for projects like this (where I will be using the box for live shows) a clear surface will stay that way for about a week. Sanding (or frosting) the acrylic gives it a cool look, but also hides all the wear to come. All a sander does is scratch the surface to a given grit. And in this case, where I will be using the box a lot in places not suited for the precious, it will make it easy to clean up over and over. In most cases I use a Duel Action sander (DA) or a Random Orbit sander (basically the same thing).
4. Cutting the Angle.

The CNC machine I use can make mitered cuts, but it’s really not worth the time to set it up when I have a faster way. So I use a chop saw to do this job. I go slow and make sure my cut is just right to the faceplate. Typically one would use a tablesaw for this, which would give a better cut. But I haven’t made the right attachments for that yet, so I use the Dewalt. And it looks cool, so there.
6. Wood Workers Trick.

Whenever I make a box with 45 degree cut corners, I use an old wood worker trick to get the box just right. Line up all the pieces with a straight line (rulers rule), edge to edge. Then place some tape (I like painters blue tape from home depot) to join all the pieces together. Now you can stand up all the pieces at once and fold the two ends together. If your material was cut right (Did you measure twice?) you will have the perfect box. Tape the ends together and reinforce the sides with more tape, pulling any loose parts closer. At this point you will want to have your faceplates for the top and bottom to make sure everything fits right and your box is square. If you have some wood clamps, you might use them to get everything 100%, but you don’t need them. It’s a nifty technique that has never failed me.

7. Meth Please and 8. Welding the Joints.

The next step is to get some meth. Methylene Chloride is a chemical that will weld the acrylic together. Once it sets, the two pieces of acrylic will basically be one. This stuff is toxic, but nothing too terrible for you. Use rubber gloves and glue in a well ventilated area. There are a lot of brands out there, but we use Weld-on. It comes in a few different thicknesses, from super watery thin to jelly thick. When I use it, I basically “tack” the joints together with the thin, which will run into the tightest joint and give you a really fast bond. After it sets up, I use the thick to give it a final set. In this project I am gluing the bottom into the side for added strength. I use a thin bead of thick and slap it down with some weight on top to make sure it sets up right. As far as I know, there is no connection between meth and Meth. But I wouldn’t smoke either. And since you have to give a DNA print to buy cold medicine now-a-days, I figure this stuff will just give you cancer.

9. Details

If there was a devil in the details, I would better at getting them right. Always make a clear plan for a project, but remember that sometimes you just have to fail a few times to learn something. In the bottom of the box I have 3/8 inch holes milled into the bottom so those little rubber pads can stick into the recess. I learned this trick because all my rubber feet fell off my arduinome while packing up for a gig. I didn’t notice this until I started setting up and it made for a frustrating night of my gear sliding around my table. Not a huge detail but it made the show really hard to play. With these holes, my feet never come off, even if I want them to. Just a little trick that makes life easier.
10. Voila!

And then it was done… well, not finished done, but the box is finished. I sanded the aluminum faceplate too so it has a cool brushed look. Now I’m just a few steps away from having a one-of-a-kind arduinome that looks professional and unique. It may seem counter productive to spend so much time working on custom tools like this, but there is something to having every part of your setup built by and for you. Every gig I play people ask about my gear and where I got it, and teaching people the freedom that not everything you need as a musician is at Guitar Center, opens peoples mind to new projects and possibilities. With electronic music there is stale vocabulary of gear as well as sounds. If you are going to spend the time pushing for new sounds, it might be worth your time to invent new gear. Or at least look like you invented it!

Now go out, you mad geniuses! Wire your buttons, solder your leds, secure the knowledge that the product of your hard work will rest secure in a stylish and personal enclosure. Or, if this all seems daunting to you, then come out to Gridfest the monome community‘s upcoming crowd-sourced music festival and DIY workshop, May 6-8 2011 in Santa Fe, New Mexico! There are only days left to contribute to our ongoing Kickstarter campaign, raising valued travel funds to bring musicians and DIY enthusiasts out from around the globe. Sign up to attend Circle Six’s hands on Arduinome workshop for only $250, and walk away with a customized grid box, complete with your choice of LED and customized enclosure! We’re in for a final push, so go check out our Kickstarter page for all the interesting music, art and tech available, and help us throw down an amazing event!
The amazing build wizardry and photography has been brought to you by Circle Six ( facebook.com/circlesix ), and mildly edited by leif, your friendly lokey baselayer (soundcloud.com/lokey)