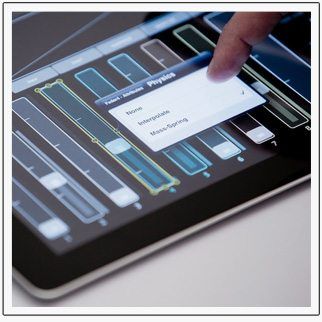
Great performances come from artists with great control over their tools. Finding the right way to interact with your music is as important as the music itself – it’s an element of DJ style that can be as personal as you make it. If you can’t seem to find that perfect controller, or even if you just want to complement your existing setup with an unusual piece of kit, you might want to try making your own with TouchOSC.
INTRO TO TOUCHOSC
 Devices with physical controls are always limited by their layout. If you want to really make something of your own, TouchOSC is a great way to go about it. Created by Rob Fischer of hexler.net, TouchOSC is an app for iOS devices of any shape or size, and recently, Android*. It allows you to design a custom layout of control elements – buttons, faders, rotaries, even XY pads. You can then specify what MIDI notes each element sends out to your software. It uses the CoreMidi and UDP protocols to send and receive MIDI and Open Sound Control (OSC) messages over wired or wireless connections.
That last bit is the killer feature. You can configure your computer to connect wirelessly to your iPhone, iPad, iPod touch, or Android device and use them as control surfaces for any application that accepts MIDI input.
*It seems that creating custom layouts is currently only supported for iOS devices
MAIN USES FOR TOUCHOSC
TouchOSC supports a wide variety of control types, allowing for a lot of flexibility in the design and features of your custom controller. Shown above are the six basic layout elements: push button, toggle button, XY pad, fader, rotary, and encoder.
There are also grouped versions of these, like the “multi-push” that lets you specify a grid of push buttons so you don’t have to align them all yourself. I use them to create all my hotcue grids. With these basic elements you can put together almost any interface you could need. You could use a couple of XY pads to get some really intuitive control over FX. You could make a massive clip launcher with an array of toggle buttons. You could make a fully fleshed out mixer with as many knobs and faders as you want.
Ready to try some of this stuff out? Read on for an introductory tutorial going over:
- Creating a layout
- Connecting your device
- Getting it to work with Traktor
BUILDING BASIC LAYOUTS
What you’ll need to get started:
- iOS or Android device w/TouchOSC app (in iTunes app store or Google Play)
- TouchOSC Editor (Mac/Windows XP&Vista & 7/Linux – download here)
- TouchOSC Bridge (Mac/Windows XP&Vista & 7 – download here)
- Audio software to rock out with (this tutorial is focused on Traktor- similar principles apply to other software)
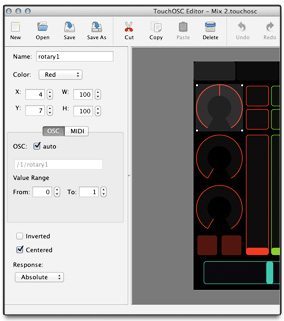
Install the editor – it will allow you to build, edit, and upload OSC templates to your new weapon of musical raditude. Bridge is a tiny little app that sits in the background and watches for MIDI messages coming in over the WiFi and redirects them to your audio software (more on this later).
Open up the editor – you’re presented with a blank page and some basic layout options – whether you want the interface to be horizontal or vertical, and a choice between designing for iPhone or iPad. If you right click in the main layout area, a menu pops up listing all the different kinds of controls you can add, in horizontal and vertical variants (e.g. a cross fader is just a horizontal line fader). Once you add a control, you can scale it, drag it around, copy/paste it, change the color, and assign MIDI notes to it.
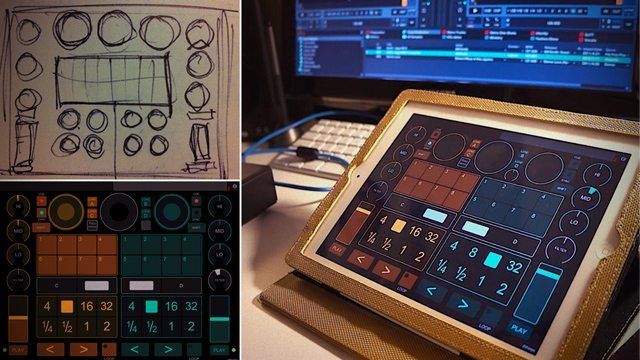
Let’s build something! The first step is to come up with a design. I always like to draw them out on paper first. Here’s the sketch for what we’re going to make – a simple layout that will control volume, EQ, play/pause, seeking, and an FX pad.
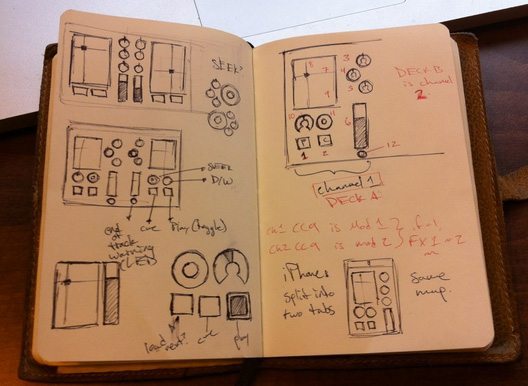
To start, open up the TouchOSC editor, and select either iPad and horizontal, or iPhone and vertical. For the iPhone layout, we’re just going to put the controls for Decks A and B on separate pages, but everything else will be the same.
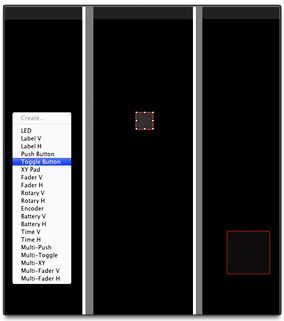 Let’s start with the play button. Right click on the background area and add a Toggle Button. It starts off a little small so let’s stretch it out and drag it to the corner like in the diagram (at right).
Now we have to give it a MIDI note to send. If you click on the button, the panel on the left side will give you a bunch of controls for it. We can rename it, change the color, size, and MIDI messages.
In the bottom pane, click the MIDI tab, then pick ‘x’ from the drop-down “Var” menu, and check the box. This means that we want the button to send a message when its ‘x’ parameter is changed, i.e. when it’s pressed.
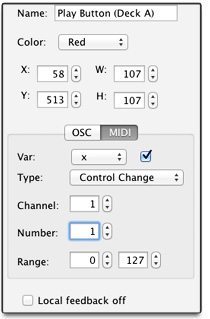 There are other parameters, and they change depending on the type of control you’re setting up. Most have x, z, and c.
• x is the control’s main action – button presses, fader moves, knob turns.
• z is activated whenever you’re touching the control. If you’re holding a rotary but not moving it, the ‘z’ message still gets sent, while the ‘x’ message will not. This is useful if, for example, you had a filter knob that you only wanted active while you’re touching it. You could assign the Filter On control in Traktor to the message sent from ‘z’, and the filter amount to the message sent from ‘x’.
• The c variable listens for output messages from Traktor, and can be used to change the color of the interface element.
XY pads have x, y, z, and c controls. ‘x’ and ‘y’ are the two dimensions of motion on the pad, ‘z’ is the touching variable, and ‘c’ is color again. The grouped controls, like multi-push, have separate variables for each of the items in the group: x1, z1, c1, x2, z2, c2, and so on.
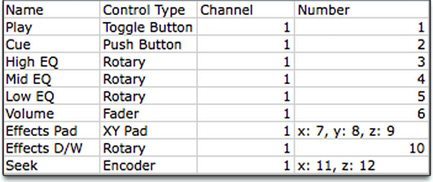
Back to our button – in the sketch we can see its CC message is supposed to be Channel 1, Number 1 (CC 1-1). Type those in the boxes, and it’s good to go. Leave the ‘z’ and ‘c’ alone for now. Fill in the rest of the layout according to the list at right (if you tick the centered box on the rotary settings, they’ll have a center detent).
That’s all the controls for deck A. Now just copy/paste them to make the controls for Deck B. If you’re working with the iPad layout, paste the controls in, then drag them around so they’re symmetrical. To help tell them apart, try changing their color! For iPhone, right click on the gray bar at the top of the layout and choose “Add Page”, then paste the controls there. The advantage of copying/pasting the controls like this is that all the MIDI settings we picked are the same. We can just go through each control and change the channel from 1 to 2 (be careful of controls where you set more than one variable, you’ll need to change each one independently).
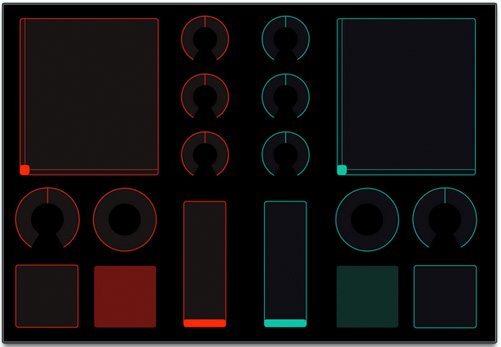
Your layout should now look similar to this (on iPad):
When making layouts like this, I usually give identical controls the same number, but with different channels for different decks. So both volume faders are number 6, deck A is channel 1 and deck B is channel 2. This is just an organizational trick, you can set it up with every control on channel 1 if you like.
MOVING YOUR LAYOUT TO A DEVICE
Most personal WiFi networks seem to be okay with this kind of traffic, but in general school- or business-provided WiFi tends to not play well with TouchOSC (this has to deal with which communication ports are open on the network and how many other people are using it). And what if you’re in a venue that doesn’t have WiFi?
Make your own! You can run TouchOSC over an ad-hoc network, meaning your laptop can act as a wireless router and broadcast its own WiFi- a little local, private network just for your DJ gear to use.
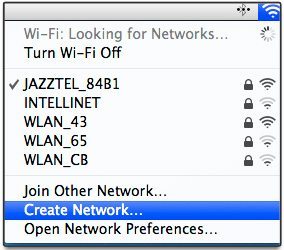
- Click on the WiFi icon in the menu-bar and enable it if it hasn’t been already
- Select “Create Network” from the drop-down menu
- Enter a name for your network – do not set a password. This process can be a little dodgy and it seems that my iPad occasionally has trouble with secured networks.
- Join the network from your iOS/Android device
On Windows 7:
- Click Start, then Connect To
- Select “Set Up A Connection Or Network”
- Follow the steps in the Wizard
Getting the TouchOSC ecosystem running over WiFi and having so many different bits of software in sync is tricky from a technical perspective. In my time using it, I’ve found that the following steps seem to work pretty consistently.
- Start with all software and wireless closed / turned off
- Either have both your computer and mobile device join the same WiFi network, or make an ad-hoc network
- Start the Bridge (and the Editor if you’re going to use it)
- Start TouchOSC on your mobile device
- Click the little ‘i’ icon in the corner to get into the TouchOSC settings on your device
- Select “MIDI Bridge” from the menu, and make sure it’s enabled
- Your computer should show up under “Found Hosts”; select it and the “Host” field should change to match your computer’s IP address. If it bothers you about settings for OSC, go to the Host field under OSC and write out the same IP from the MIDI menu.
- Start Traktor
- Either import a mapping for your TouchOSC device, or make a new “Generic MIDI” mapping and set the In-Port to “TouchOSC Bridge”
- If you touch a control on your device that is set to send a MIDI message, you should see the CTRL light flicker in Traktor. This means you’re good to go! (Instructions on how to load your layout onto your device are below)
Sometimes when connecting to an ad-hoc network from your iOS device, the little WiFi symbol in the corner won’t show up for a long time, occasionally even not at all. Sometimes it works in this state and sometimes it doesn’t – I’d recommend either making a new ad-hoc network and trying again, or rebooting both devices if you continue to have problems. In any case, remember that making the WiFi network is always the first step when setting this stuff up.
After making your own layout, sync it to your device. Go to the Editor and click the green Sync arrow in the top menu bar. The program will look for devices on the network that want to download a template. From your mobile device, touch the ‘i’ icon again to go into the settings, then choose Layout > Add, and wait for your computer to show up in the Hosts list. Click on it and it’ll start downloading. Now back out to the main menu and hit “Done” to go to your custom interface.
Now that you have the layout on your device and it’s all connected, it’s ready to be mapped in Traktor. You can map this layout yourself if you like, or you can use the .tsi file I made.
The above layout and mapping are downloadable on Maps.
DESIGNING YOUR OWN
MIDI controllers and their mappings quickly become very complicated. A good first step is to figure out what hole in your setup this app is going to fill – what functionality does it need to have? If you’re going to use it as the main source of mixing and transport control, it’ll need EQ controls (rotaries are good for that), volume controls (faders), some buttons for play/pause, and maybe another small grid of buttons for jumping around cue points. If you’re doing effects, you might want some different control surfaces like XY pads. Paper sketches are a great way to go about this kind of design. I also make dummy layouts in the editor, without taking the time to assign MIDI notes to them, just so I can see how it works ergonomically on a real device.
Once you come up with a compelling design, it’s time to figure out how you want the MIDI messages to be configured. Because you’re going to be mapping this yourself, you can choose how clever you want to be about setting this up. If I have repeated sets of controls, like EQ controls for 4 decks, I’ll assign them the same CC number but on different channels. That way, when I’m building the MIDI map, I know that the High knob is always CC 3, on channel 1 for deck A, 2 for B, and so on. If you have multiple controllers with custom mappings, they could send conflicting messages, so you’ll need to keep them all on separate channels.
DAVE’S SPECIAL BREW / CUSTOM MAPPING
I’ve spent the past couple months in London, and when packing to come over here, baggage weight limits forced me to leave my trusty S4 at home. I still wanted to be able to practice or maybe play a small gig, so I decided to bring just my iPad and Midi Fighter Pro.
I use the Kontrol S4 for the brunt of my DJ work, and it’s great but it doesn’t have the kind of control I want over effects. I originally found TouchOSC on a quest for ways to use my iPad as a more intuitive effects pad. I generally have the S4 in charge of mixing, cueing, and transport, and the iPad as an extension of the setup reserved just for effects and other fun in-the-moment play.
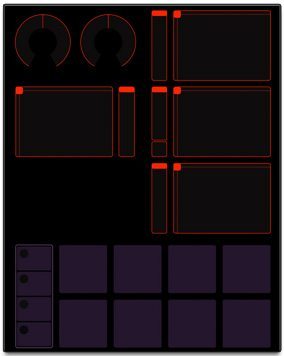 This is the first really involved layout I designed for myself. Held vertically, the XY pads are easily reachable by thumb, and the pads at the bottom can be played with a free hand while the iPad is held with the other.
I used the pads for cue juggling (toggling between the four decks with the buttons on the left). The XY pad on the left controlled filter and delay, and the right had gater, flanger, and ringmod respectively. It was conceived in a fit of excited, inspired nonsense and is a little bit overkill when actually used in the field.
I was planning to use the iPad for mixing, cueing, loops, and transport, so I had to build something new and rock solid. I spent a lot of time sketching out/mocking up layouts but couldn’t figure out anything compelling.
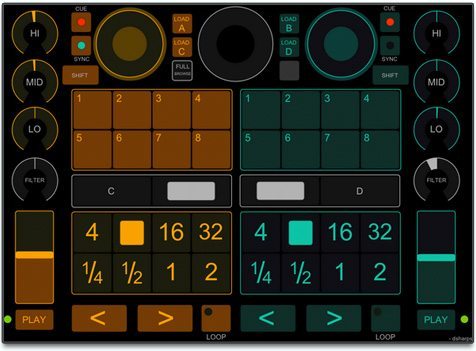
One day I was reading the DJTT review of the Electrix Tweaker and was inspired by its funky design. That led to the layout I’ve been using ever since:
This can handle hotcues (mostly just for navigating around tracks, my Midi Fighter Pro mapping has much better controls for that), loops, mixing, seeking, and browser navigation. The gray buttons in the middle row select the decks – it’s currently using deck A on the left, and B on the right. The grids of loop values is set to 8 for both decks right now, and the arrows below are beat jump controls. I made a short video explaining both this and the mapping on my Midi Fighter Pro, if you’re curious.
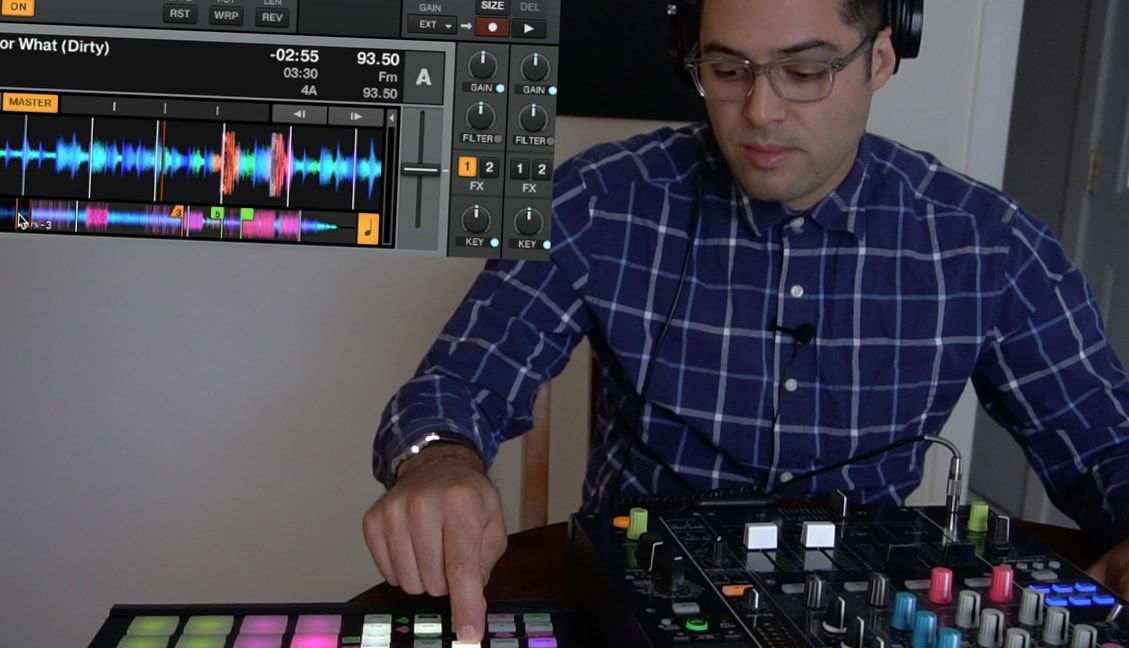
Watch the video and download DSharp’s Special Brew Mapping.
Thanks for reading this crash course on TouchOSC – the best way to learn this stuff is through experimentation. If you have questions I’ll be hanging around in the comment section below!
Dave Sharples is a former DJTT intern who loves MIDI maps and burritos.


