We all feel it – the COVID-19 burnout is real. Many of us are itching to get outside, to play clubs again, to be back on a dancefloor, and to play on a big soundsystem again. Yep, we miss it too.
But we’re not quite there yet – particularly in the United States. That’s why so many DJs are searching for ways to be productive in ways that we haven’t quite had the time for in the past. If you’re not playing DJ gigs, but you know you will again someday, it might be worthwhile to utilize this time to get organized. As much of a pain as it may be, you’ll appreciate it down the road.
We’ve compiled a list of places to start thanks inspired by this Reddit thread and the ideas you’ve shared with us, but the possibilities are endless.
1. Set your cue points.
A simple, time-consuming, and somewhat painful process – yet completely worth it if you can give your tracks the time and attention they need to place your cue points throughout. Whether it’s Rekordbox, Traktor, Serato, or another software of your choice, it’s worthwhile in the end.
You’ll thank yourself later when you’re back in the club scrolling through tracks to play. Here’s a great guide to the most important cue points any DJ should set, or check out Ean’s video below:
2. Set, fix, and adjust your beat grids.
Another part of prepping your library that can be a bit tedious, but ultimately so worth it: setting and fixing your tracks’ beat grids. First, put your tunes into Rekordbox (or your software of choice) – if you haven’t already – and let the auto analysis take its course. Allowing the program to process this metadata will ultimately make it drastically easier to play on the fly.
But be wary: auto analysis algorithms are not foolproof. For Rekordbox, there’s a predictable amount of manual readjustment that you might need to do. This is especially true with tracks that are in half time, drum and bass, hip hop and trap.
Take time to check your tracks and ensure that the software read your music correctly; if not, you can easily adjust the grid to fit the timeline of your needs.
Pro tip: if you’re ever in doubt about your beat grid: turn on the metronome! Almost every piece of DJ software has a built-in metronome that you can check your beatgrids against.
Here’s a solid piece on how to set beatgrids in Serato – or watch the video below for tips in Rekordbox.
3. Reorganize your playlists.
There are numerous unique ways to sort and organize your library as it grows, and everyone has their own routine and system that works for them. Keep in mind that there’s no right answer here, but these ideas are a great place to get you started when it comes to re-organizing your tunes. Being able to quickly find the music you need when you’re playing stems from the preparation you do with your organization process. Building a detailed organization system, then, becomes a vital part of quick access to the music you need at any given moment.
Perhaps one of the best – and easiest – ways to do so is by using iTunes, then routing to your preferred DJ software. PDot wrote this great piece on tagging and coding your DJ library efficiently so that the algorithms within your software, like iTunes, do the work for you. The base setup may take a big chunk of your time, but the process will get smoother once you’ve done the bulk of that work.
The tl;dr with the iTunes system involves setting up smart playlists that sort by comments that you can choose and customize yourself. Consider creating folders for genre, data added, time of day, and any further types of organizing that resonate with you. For example, I have a “moments” folder that includes smart playlists such as “early evening mellow house” and “heavy late-night techno”. From there, you can create smart playlists within each folder (open the creation window by heading to File > New > Smart Playlist) for a comment, a genre, the date it was added etc.
Once these playlists are set up, they will automatically populate with music as you sort it. If I create a “Minimal House” smart playlist that populates based on a “comment” I deem to be “minimal house”, I’d then write that “minimal house” phrase into the Comments column of any of my tracks that’d fit into this category. Those songs will then show up in your smart playlist. You can do this with any word or phrase of your choosing, and just assign it in your smart playlist. Make sure you check “Live updating” and it’ll stay up-to-date as you sort your music. Easy, right?
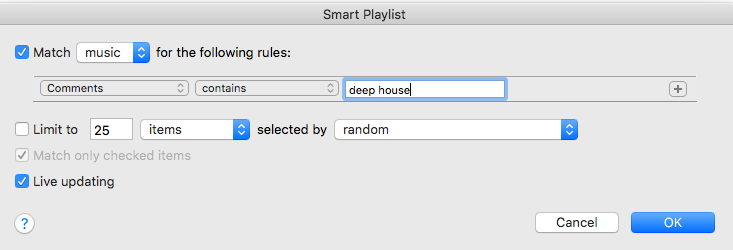
You can choose from the drop-down that says “comments” here, and create a playlist based on whatever category you choose.
We dive into the step-by-step process to set everything up – along with more power tips on using iTunes – in this classic four-part series from 2009 (Part 1 / Part 2 / Part 3 / Part 4). Turns out, music library organization hasn’t changed much.
4. Clean out old tracks.
Yup. Simple as that. We know that you’ve been putting off that deep-dive-into-the-bottom-of-your-library for months now. And you know that you’re sitting on a ton of old music you’ll probably never play again. Why keep it around and allow it to take up more space on your precious hard drive?
There are two routes you could go here, depending on how attached you are to that part of your library. If there are tracks you love and want to keep, but don’t necessarily need them anytime soon, back them up to an external hard drive (or an online service like Dropbox or Google Drive) so you’ll have them for future usage without clogging up your memory right now.
Sort your library by Date Added, and start from the bottom. What tracks have you not touched in six months? A year? Multiple years? Which songs were one-hit wonders that you’ll never play out again? Consider your attachment to them, decide whether or not they’re worth keeping, and if it’s the latter – hit delete and get ’em out of there.
If you’re using iTunes, it will likely ask you if you want to keep the file or not. “Keep file” will allow the file to remain in your iTunes folder that lives in your computer’s files (even though it doesn’t show up in your library here), which ultimately will still allow it to grab your drive space. “Move to Trash” will remove the file completely, freeing up that space instead.

And while you’re at it, think about how you shop for your music to start – check out this piece on digging for tunes with intention.
5. Inspect the quality of your tracks & upgrade
How many tracks in your library are low bit rates like 128mbps MP3 rips, or 320 mbps MP3s that are solid, but not quite as great as WAVs? Most of us have a combo of the three, which isn’t the ideal situation when you’re playing out on a big sound system – you can hear the difference (drastically) between a WAV and a 128 MP3. Don’t do that to yourself.
Dig through your library and see what type of files you have. Then give yourself the opportunity to upgrade them. Having a library of WAV – or another form of lossless – files is your best bet for crisp quality, but keep in mind that it may hurt your bank account a bit. They are the priciest formats, but are worth the long-term investment. If you’re feeling up to the (financial) challenge, convert all of your 128 and 320s to WAVs. If you bought your tracks on Beatport, you can upgrade those files for a discounted price to WAVs.
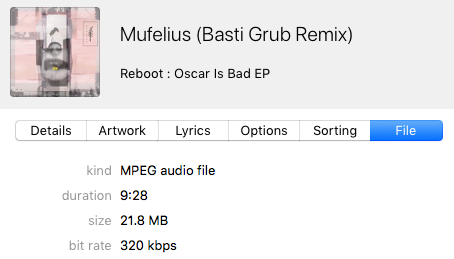
If you’re using iTunes, right click any track > Song Info > File. Under “bit rate”, you’ll find the info you need.
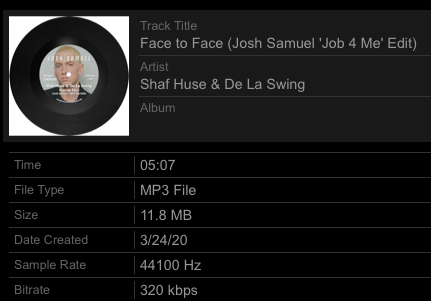
With Rekordbox, it’s a similar process – select your track > right click > Song Info.
Not ready to spend that kind of money? No problem – instead of having a fully-WAV library, just make sure you upgrade any lower-grade tracks (below 320) to 320mbps. You’ll appreciate your work here later.
6. Reorganize your record collection.
So, you have a growing (or already significantly large) record collection – fantastic. Now, ask yourself: how easy is it for you to find that single record you’re looking for in a huge stack of vinyls? Is your library not quite as put-together as you’d hope? Consider a few easy tricks to make your collection well-sorted and easy to utilize:
- Organize your collection alphabetically from A to Z. Consider whether it’s easier for you to find your tunes by first name, last name, or album title.
- Consider dividing your stacks into two separate collections, sorting by “listened to” and “haven’t listened to.” This could be a great way to get yourself to try out those records that haven’t seen the light of day yet. Alternatively, you could go a similar route by sorting by your most-recently-played choices. Put the last-played albums at the top/front/left (depending on how your vinyl setup sites), and the never-played items at the bottom/back/right.
- Sort your vinyl by genre.
- If you’re a fan of aesthetically-pleasing setups, organize by the color of your spine.
- Upload your records to Discogs to keep track of what’s what.
What have you done to up your DJ organization game this quarantine? What do you aspire to do, but haven’t done yet? Let us know in the comments below.


